

January 3, 2013
Many of you may already know that Panasonic recently released the Lumix GH3, their newest addition to their growing line of Micro Four Thirds cameras. Being a big fan of the Micro Four Thirds system I scrambled, searching the web, calling contacts and eventually got my hands on this highly anticipated photographic tool. It was hard to come by. According to DrillPressView.com, all local channels received none on initial release. The Internet sellers were all sold out. My last chance was a newfound friend at Samy’s Camera in Los Angeles, and it was Ray who put it all together for me. Thank you Ray and Samy’s Camera. You can see some of my favorite images shot exclusively with the Panasonic Lumix GH3 by clicking on the following link, Into the African Bush with the Panasonic GH3. If you want to see our guests having a great time there’s a gallery of images here. Our Guests Enjoying Kenya
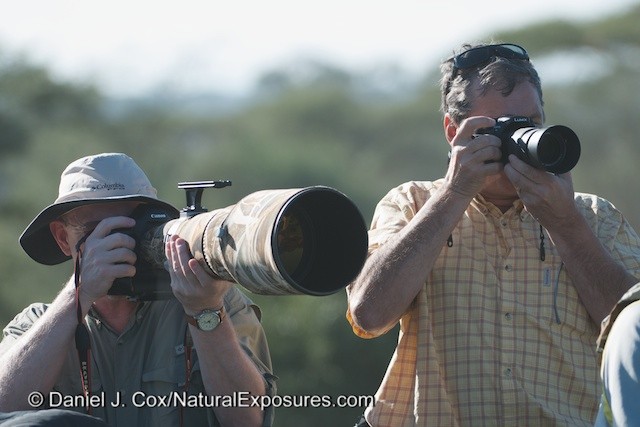
 The Canon 600mm F/4 with photographer attached is on the left. On the right is me shooting the Lumix GH3 with a 100-300mm F/4-5.6 lens. In the Micro Four thirds world all lenses are multiplied 2x so the Lumix 100-300 is actually equivalent to a 200-600mm lens. The same long magnification as the massive Canon lens.
I’m writing this on my way to Kenya, a trip we do annually, and in my briefcase is the GH3 with a 100-300mm F/4-5.6 lens attached. Also in my briefcase is a 15 inch Macbook Pro Retina, cords for two external hard drives, the drives themselves, my travel docs, cell phone and the many incidentals all of us typically travel with. In other words, the GH3, even with the attached lens, is small. For those unfamiliar with the Micro Four Thirds system, it’s essential to know that all the lenses designed for the Lumix line, as well as Panasonic’s consortium partner– Olympus, need to be multiplied by 2X. That being the case, a 100-300 is actually a 200-600mm lens, a fabulous range for wildlife and nature.
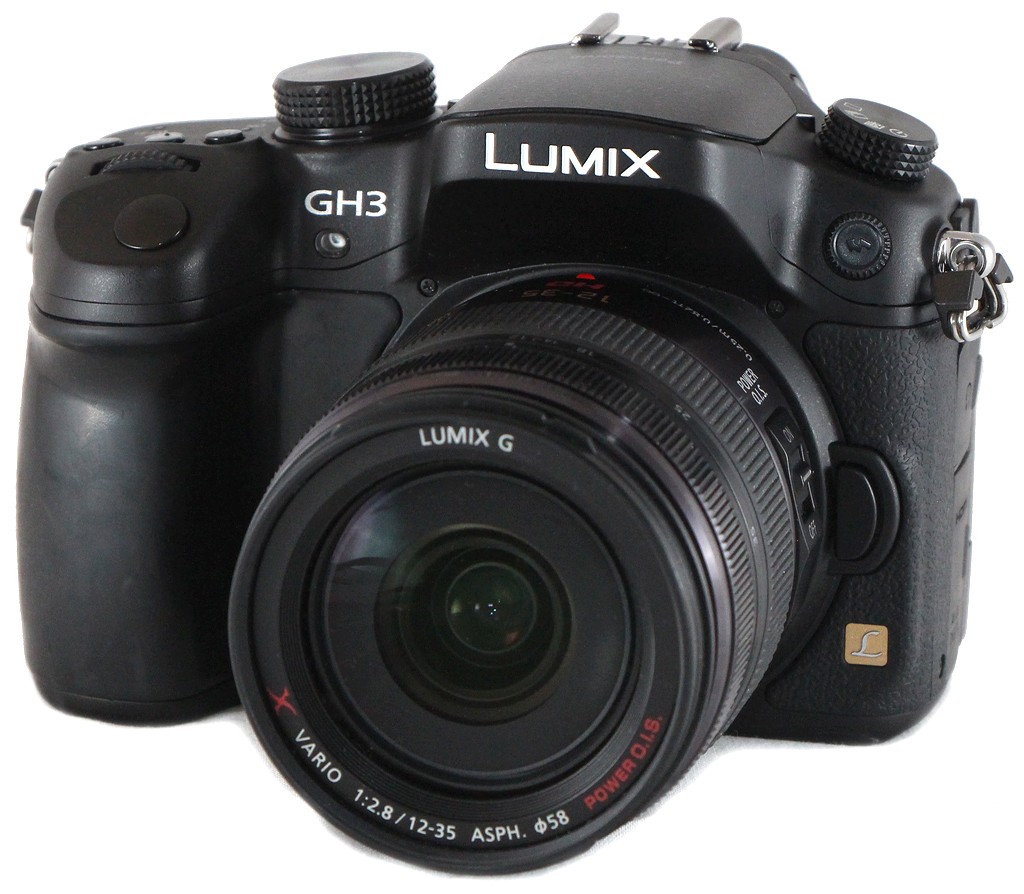
Panasonic’s Lumix GH3.
Does it seem too good to be true? I have to admit it does. But that’s why I also have nearly 40 pounds of Nikon gear in a Lowepro roller as well. That said, I’ve never been afraid to give leading edge technology a try. I was one of of the earliest adopters of digital capture among the folks in the field of nature. There were so many ney sayers early on. My first digital camera was the Nikon D100 and the files from that camera were superior to any 35mm film I ever shot, including Fuji Velvia. I still sell many of the images I produced with the D100 so my early adoption didn’t hurt from a marketing perspective. I’m hopeful the same will hold true for the GH3 and I’m excited to start putting it through the paces. I’ll be shooting the new GH3 for the next two weeks and when I’m finished I’ll be sharing with you the pros and cons Panasonic brings to the industry.
Back in the United States: January 19, 2013
Fast forward a little over two weeks and I’ve now captured just shy of 12,000 images with the GH3. To say that I’ve been pleasantly surprised would be an understatement. Quite frankly this camera exceeded all my expectations. When I review my images at 100% it’s hard to believe such an inexpensive package produced such stunning results.
Before I start with a fairly detailed analysis of how the camera performed, I should first explain my desire to test it. It all began with the Panasonic Lumix GF1, a small, light, nicely designed picture making machine that produced remarkable images in an impressively small package. All of that, AND it had interchangeable lenses. Part of the benefit to Micro Four Thirds cameras is their lack of a DSLR-like mirror box. Instead, all viewing is done by way of the rear LCD or an electronic viewfinder. Remove the mirror box from any camera design and you substantially reduce size and weight. Remember the 40 pounds of traditional camera gear I mentioned earlier? Now you know why I’m excited about smaller and lighter. As much as I loved the early G series cameras, they were no match for my full featured Nikon system. The GH3 on the other hand is Panasonic’s first crack at changing the professional camera paradigm and they’ve done an admirable job. Lets’s get to specifics.

Waiting for an elephant to pass on the road in Samburu. Kenya. Shot with the GH3’s baby brother camera the Lumix GX1 and 14-42mm X lens.
The GH3 Manual
Most photographers hate manuals and I’ve never heard anyone make a positive comment, ever, about a camera manual. Though manuals are no fun I think we can all agree they are a necessity of ever expanding options, especially when it comes to advanced technology. As my father Jack Cox would say, “If all else fails, read the manual”.
When I first started shooting the Lumix cameras I was amazed at how poorly they were written. Working with a new brand gave me something to compare Nikon’s manuals to and from that I gained a tremendous amount of respect for Nikon’s ability to explain their camera’s features.
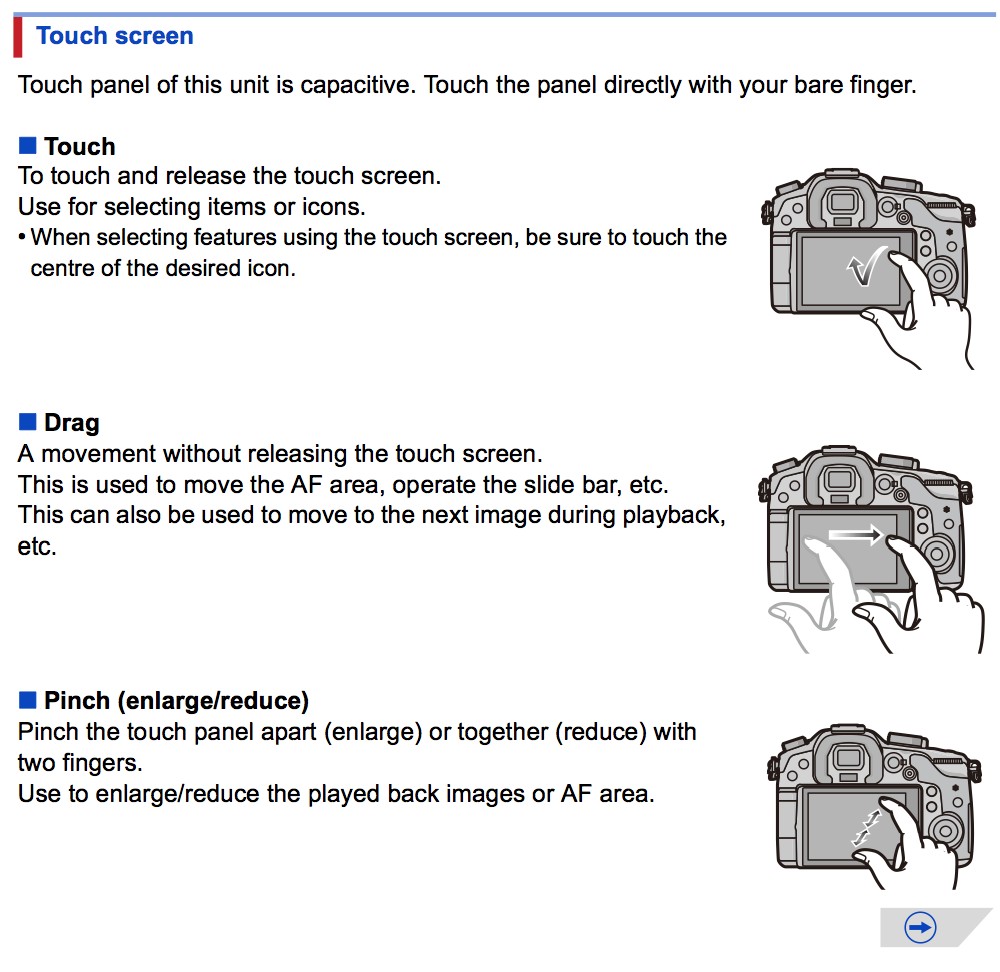
A screen shot of the GH3’s manual highlighting the touch screen option.
Thankfully, Panasonic has made huge leaps forward with their manuals and I now feel they’re every bit as good as any others I’ve HAD to read. The GF1 manual was like reading something written in another language. It’s interesting to watch Panasonic move ahead so quickly from the vast improvements of their manuals to the advanced features in their cameras. Attending to and drastically improving the details of their manuals is another sign Panasonic is in this game for keeps.
Gh3 Basic Specs
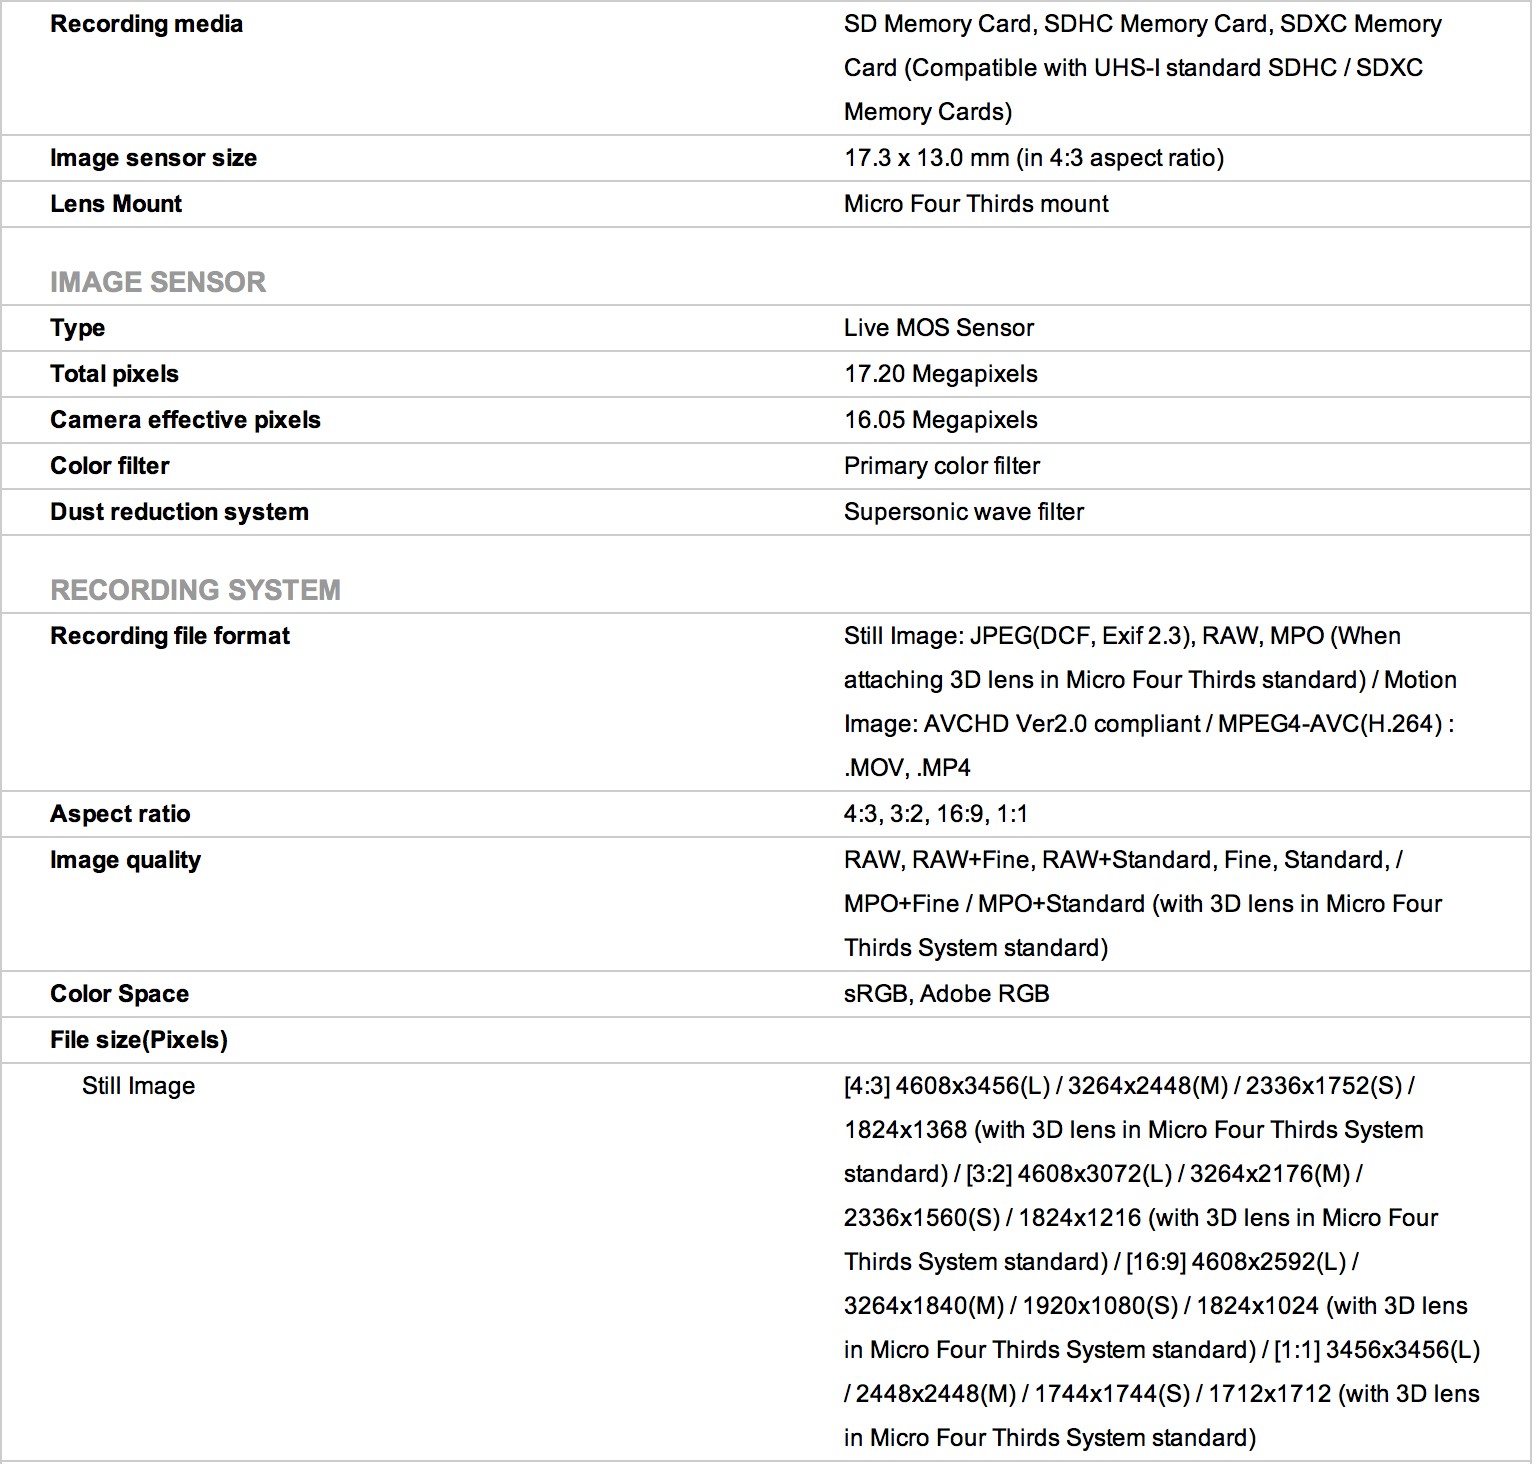
A list of the general basic specs of the GH3
Ergonomics and Handling
Right off the bat I noticed a big improvement regarding the layout of controls on this camera over its predecessor the GH2. Buttons such as ISO, Exposure Compensation, and White Balance are placed right behind your shutter finger and are easy to reach. Like Nikon and most all other camera manufacturers, Panasonic chose to place the Main Command Dial on the upper right, rear corner of the body, just like my Nikon cameras. The sub command dial on the GH3 is more like Canon’s design which is behind the shutter release. I prefer Nikon’s sub command dial in front of the shutter button but admittedly that may be due to habit. The important point here is Panasonic went with a more conventional approach in its placement of dials and wheels. Only Canon has gone out on their own with the back of the camera, vertical wheel and it drove me nuts when I shot Canon for about a six month period back in the mid 90s. Yes, I had a small Canon system for a short period of time but that’s another story.
Next up are Function Buttons (Fn) galore. Six of them all told, four actual physical buttons on the body and two virtual buttons on the LCD. Fn buttons can be extremely helpful in customizing your camera to your specific needs. There are dozens of options that the Fn buttons can control so I won’t go in to details since customizing your camera is a personal matter. Suffice it to say, there is almost nothing you can’t customize with one glaring exception, that is, Exposure Compensation for flash. Not sure how Panasonic missed this option since their GX1 bodies have this feature but it’s nowhere to be found as on option on any of the Fn buttons of the GH3. The only way compensate onboard flash is to dig through the menu.
On the top right of the camera deck you’ll find a rather old school, traditional looking, large, well placed, rotating dial that is easy to grasp and read. It’s the main control for changing shooting modes such as Manual, Program, Aperture Priority, Shutter Priority, Manual Video, three different customizable group settings C1, C2, C3 as well as Scene Settings and Art Settings. It has a quality solid feel, precise click stops when changing from one mode to the other. It gives the impression of a quality design and the dial is not easily, accidentally rotated. This common sense approach is quite welcomed in the camera world when compared to other camera manufacturers who’ve waited for updated models to add a lock to their ill designed mode dials. It’s nice that Panasonic got it right on the FIRST try.
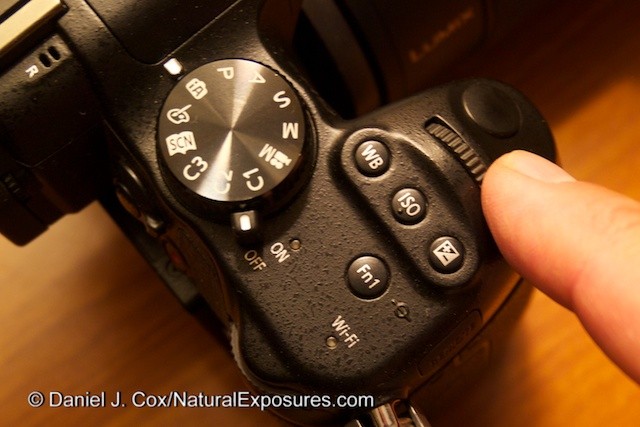
A shot of the top deck of the Lumix GH3 that shows placement of important controls including Shutter Button, Subcommand Dial, WB, ISO, Exposure Compensation, Mode Dial, On/Off switch, Fn button for WiFi.
Just to the left of the Main Command Dial and to the right of the EVF, is a switch that incorporates Auto Focus settings of AFS/AFF, AFC and Manual focus. This adjustable AF switch surrounds the AF/AE Lock button. It’s right there where your thumb can access it with ease for switching from Single to Continues AF. Additionally, the AF/AE lock button can be customized for use as a rear AF start button, just like my Nikons. You have to make sure you turn the shutter button AF off first, via the Custom Functions menu, so one doesn’t override the other when shooting. This is a very important AF option that Canon invented and Nikon adopted. Now Lumix has joined the trend to give us the ability to separate the AF Start function from the Shutter Release button. The advantage to this is well known by many who use it for more effective composition. More in another post about the benefits to separating AF and Shutter release.
There is another vertically rotating command wheel in the back, similar in fashion to Canon’s invention on the back of their cameras. I haven’t’ found a need for it other than to scroll through images on the back LCD. Maybe there’s something I’m missing pertaining to its use in the shooting mode, but if so I haven’t found it. Another button gives you a Quick Menu for changing the most common menu settings that eliminates the need to dig through the menu. I have to say I don’t find it that useful. Might just take some getting used to.
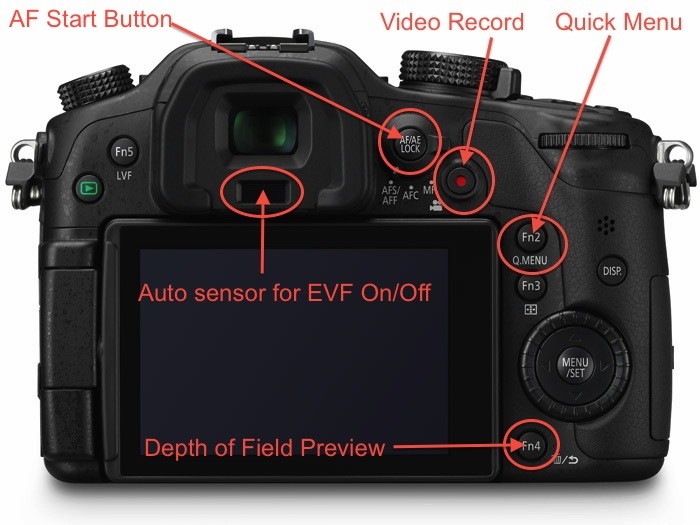
Back side of the GH3 with it’s specific controls such as AF Start, Depth of Field Preview, Video Record and others.
Additionally there’s another Fn button that changes AF Pattern options. Patterns that include Face Detection AF, Tracking AF, 23 Area AF, 1-Area AF, and a very handy Pinpoint AF. When selecting Face Detection and 1-Area AF you can easily change the size of the AF sensor from a very small, square box, to a box that nearly covers the entire LCD/EVF. I wasn’t able to test the larger box on birds in flight but it makes sense that flying objects would be a natural for enlarging the box to give you a bigger square for acquiring focus on a moving object. Rounding out the AF option is Pinpoint AF which was very handy when shooting through a lot of tall grass at lions lounging on the Serengeti Plains. I just wished the Pinpoint AF would not enlarge the image, while acquiring focus. The idea of enlarging the image area, the Pinpoint crosshair is pointed at, is good in theory but the constant enlargement of the image in the EVF gets in the way of shooting quickly. I’m hoping there is an option for shutting that feature down while in Pinpoint AF. If not now, maybe in a firmware update that will hopefully also bring us the ability to change EV on the flash.
Last but not least is another FN button at the base of the rear LCD that gives you Depth of Field Preview (DOFP). I’m a big fan of DOFP on my Nikons but the electronic EVF of the GH3 just doesn’t do an adequate job of showing the change in the depth of field. Furthermore, I wished they had placed this button on the front, right side of the camera, between the grip and the lens mount where your fingers can easily reach it when your hand is placed on the main grip. I hate to beat a dead horse but Nikon’s position of this same feature is far superior to that of the GH3.
All in all, the most impressive thing about the layout of the controls on the GH3 is how well the majority of them are placed for one handed operation. Both Nikon and Canon could take a lesson from the GH3 in this department. At one time Nikon’s top of the line cameras were superbly designed for one handed operation. In Nikon’s most current models, controls that are accessed regularly are placed in all sorts of different positions, many of them requiring the use of your left hand to push one button while the right hand turns a dial to make the change. Ease of one handed operation has always been a plus in serious shooting situations such as hanging onto a ship’s railing, shooting out of a helicopter, dangling from a climbing rope or just holding your coffee in the left hand while shooting your kid’s soccer game with your right 🙂 I’ve always been a proponent of as many controls available for one handed operation as possible and the GH3 does a great job in this department.
Now for the most impressive feature on the GH3–– the ability to easily move the AF sensor by touching the back LCD. Describing this is a bit difficult so I shot a mini video to highlight exactly what I’m going to detail in words.
When the back LCD is live, there is a yellow, square AF box visible on the LCD. As I mentioned above, you can change the dimensions of that yellow AF box to almost any size. More importantly, that same AF box can be moved ANYWHERE on the LCD screen––with the touch of your finger––giving you the ability to place your AF sensor at any spot in the picture area. Even better, when you switch the LCD off, to use the Electronic Viewfinder, the back LCD stays active but shows no image. Because it’s still live, you can hold the camera to your eye and use your right thumb to activate the yellow AF box now visible in the EVF. By placing your thumb on the back, dark, LCD, you can move the AF box to any spot in the picture area you choose, making this the fastest way to select your AF area of any system I’ve ever used. It’s impressive, effective and very, very useful.
For my time shooting the GH3 in Kenya I used only the main camera without the additional vertical grip. Overall, I think the vertical grip would have been very helpful. As I’ve mentioned, I’m all for lighter and smaller but I’ve come to realize there are limitations to how small we can go in size and weight. I think Panasonic has hit a great happy medium with the size of the GH3. The vertical grip would give it slightly more heft and size for ease of use with larger hands. Generally, it handled very well but it took a little getting used to not having the bulk of my larger Nikon lenses and cameras. I know, I can’t believe I’m saying this.
Auto Focus Capabilities
Up to this point I haven’t had a chance to run my typical AF speeding dog test with the GH3. For those of you who aren’t familiar with my technique check out my Blog entry related to the AF capabilities of the Nikon D4, D800 and D600. I’m hopeful to get a chance to run this test with the GH3 in the next week or so. That said, I still have some thoughts on what I saw and experienced the past two weeks in Kenya. There’s both good news and bad news.
Overall the GH3 has the most effective, dead on, accurate AF I’ve ever tested in overall general use. When you point the GH3‘s AF sensor at your subject it almost never misses. I’m quite confident what I’m seeing is the difference between Phase Detection AF and Contrast Detection AF. The Contrast Detection AF adjusts focus on the camera’s sensor and when it says it’s in focus, it is really in focus. It gives you a totally different feel when looking at your correctly focused images. If there is no camera movement or subject movement, the focus is exceptionally accurate and very, very sharp. Even when using what I would consider a less than professional lens, which I will highlight shortly, the accuracy of the AF gave me the feeling of using a lens that should have sold for much, much, more than what I paid for the Lumix 100-300mm zoom.
Additionally, the GH3 seemed to have no issues with the one time I was able to get it pointed at an in-flight tawny eagle or the cheetah chase we shot late one evening. Both situations produced razor sharp, well focused images except for a few of the eagle where my panning technique faltered and several of the flight images were soft due to motion blur. At no time did I feel the AF speed and accuracy were lacking, even when compared to the ultimate AF shooting machine the NIkon D4. I have to say I was surprised. The GH3 shoots a 4fps when set to continuous autofocus. It jumps to just short of 6fps with fixed focus. It has a considerably large buffer for sustained quick-fire operation and I never did experience any down time due to a full buffer.

A Tawny Eagle flies over head. Masai Mara National Reserve, Kenya
Now for the bad news. The biggest issue the GH3 relates to fast moving subjects and the inefficiencies of the current Electronic Viewfinder. The problem here is simple but very important. When shooting digital cameras we’ve always had the ability to Preview the image immediately after capture. This is an option on the lowliest point and shoots to Nikon’s D4. On the GH3, when Preview is active, the Previewed image can block the view of a moving subject as you try to follow the action. As an example; as I tried panning with a bird across the sky, Preview images kept popping up in the EVF to block my view. This eliminates the ability to follow focus on a fast moving flying or running subject. Keep in mind, it is possible to turn the Preview off on the GH3, which I had done, but there’s a related issue. When in Continues AF which allows capture of up to 4fps, even when the Preview option is turned off, there is still a split second vision of the image captured as it’s being written from the digital chip to the buffer. One image by itself is not a problem, you virtually don’t even notice it. However, with a 4fps burst or more, 4 split second views all run together, effectively creating what looks like a normal Preview as those images are being sent to the buffer. This choked off the view of EVF and ultimately my ability to follow the eagle as it moved across the sky. After a one time 4fps burst I could no longer follow my subject and the action sequence ended abruptly.
The answer to this would seem to be constant streaming of the camera’s view to the EVF. Apparently the way the GH3’s current EVF is set up, all images have to be written to the buffer before the EVF clears completely. As I said above, one image at a time is no problem, but a constant burst, like I shoot with a traditional DSLR, becomes seriously problematic for action shooting with the GH3. I learned to work with it to some degree but compared to what I can get with my Nikons, by virtually always being able to see the subject, there was no contest. Not sure how they’ll remedy this but it’s imperative they do before the mirrorless cameras can be taken seriously. Below is another action series I collected for your review. You can click on the image for a larger version.
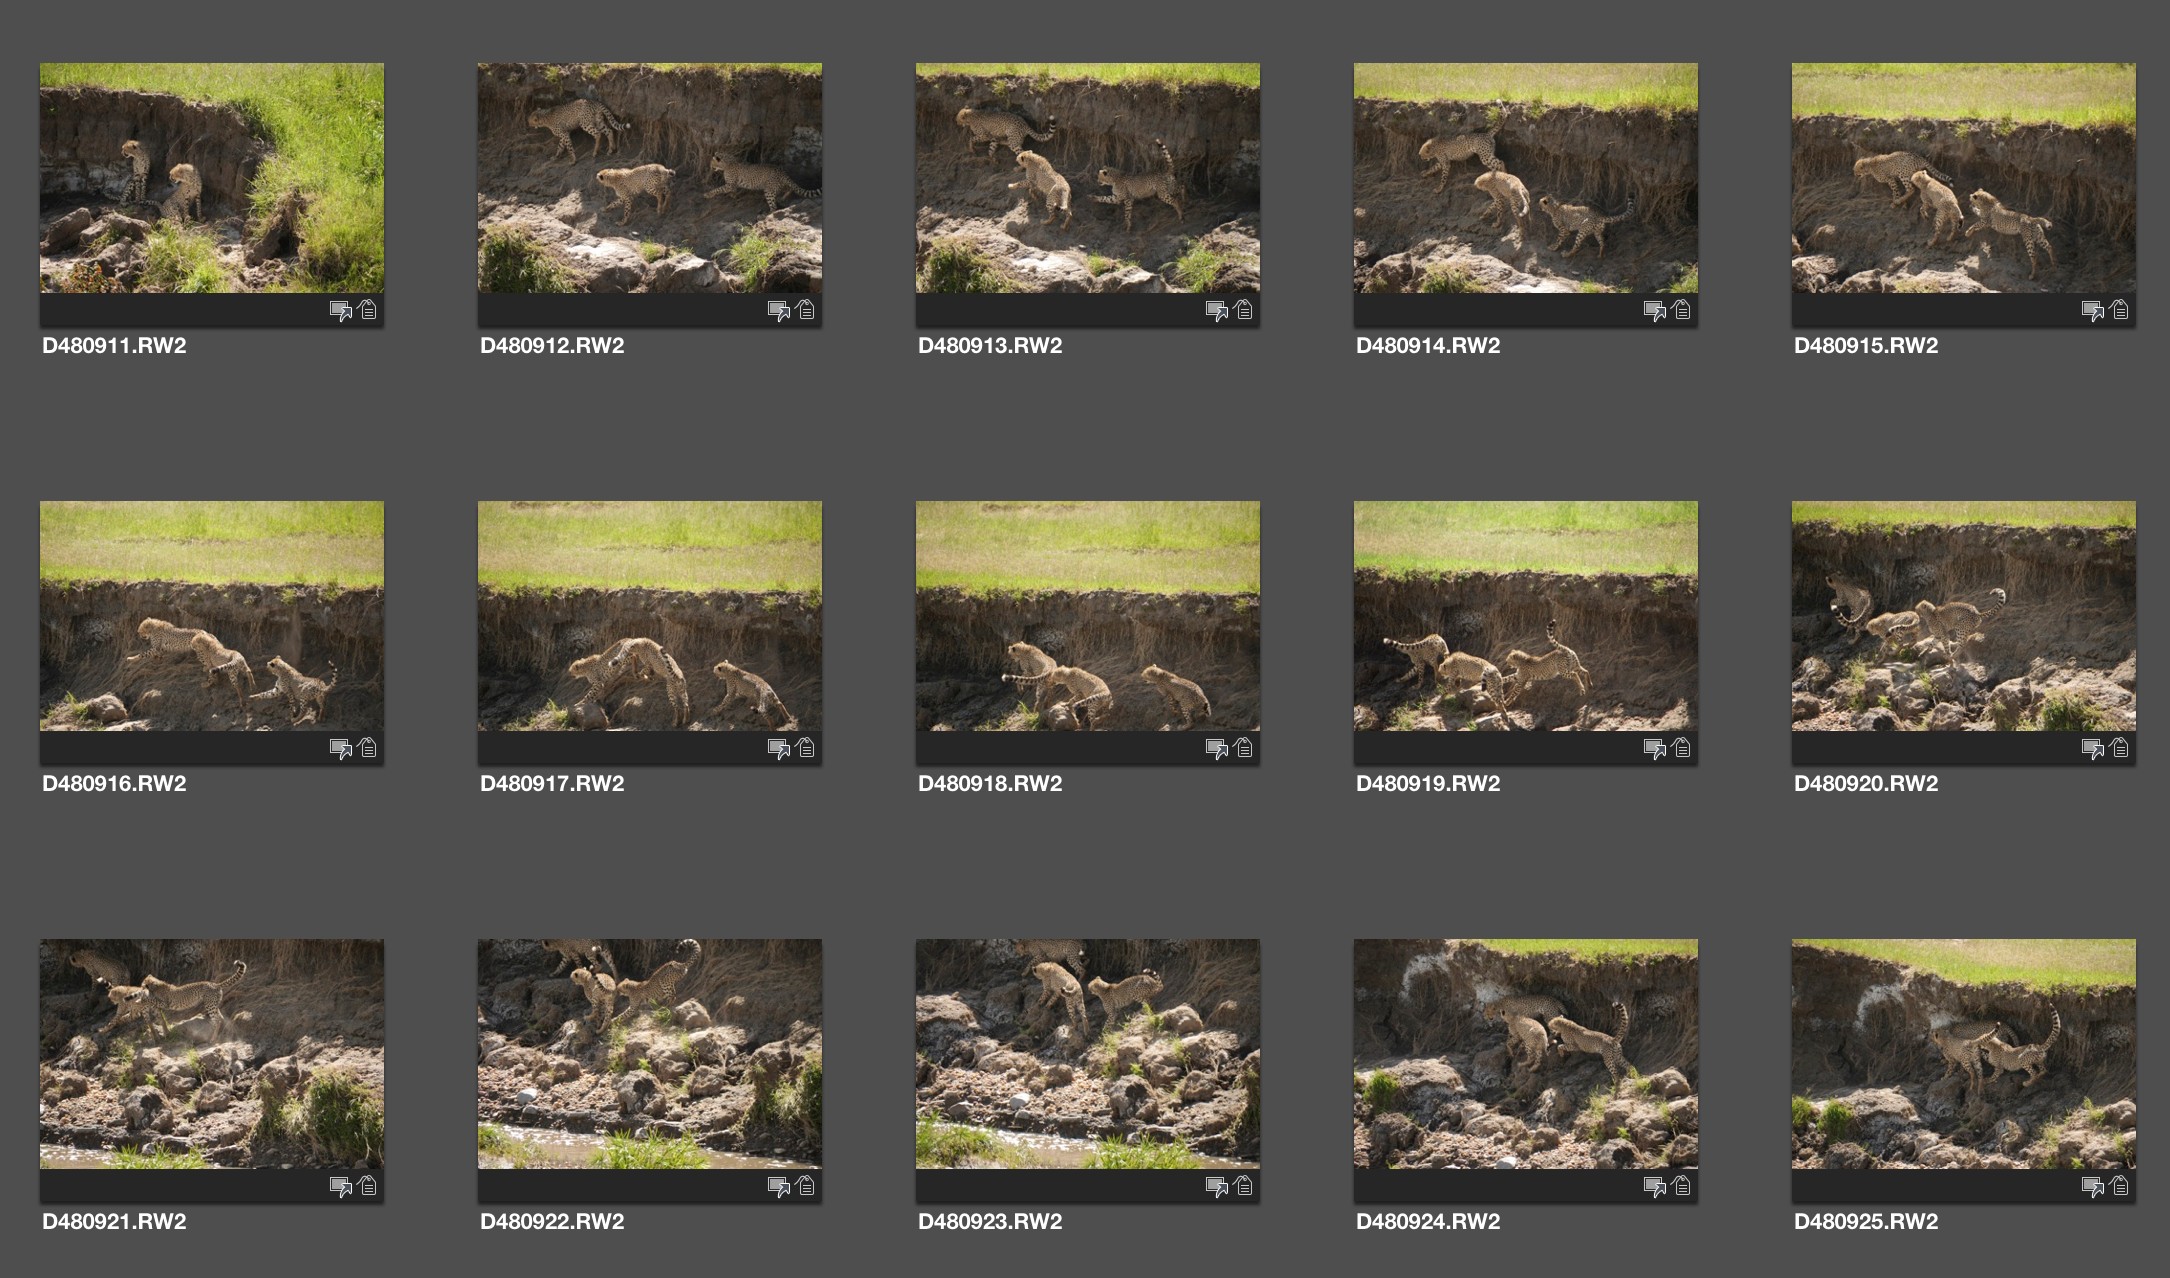
A trio of young cheetah cubs run back and forth across the natural rubble along a stream back. It was very tough to keep them in the frame properly since I couldn’t see the their movement due to the 6FPS burst showing in sequence in the viewfinder even though image review was turned off.
One last note on the speed of the GH3. Overall the AF speed is impressive, however, I’m not sure about the shutter button release time. Panasonic lists the GH3 Shutter release time at 0.50 seconds. Nikon’s D4 is listed at 0.42 seconds. Could I really see the difference between these two times? All I know is that I have an image of a lilac breasted roller that I shot right along side my buddy Fred Kurtz. Fred was using a D4, I was using the GH3 and as far as I can tell we pushed the shutter button at virtually the exact same time. Who knows for sure? All I know is Fred outshot me in this situation. Was it my slow reflexes or could the minutely slower shutter lag of the GH3 be responsible? I’m guessing it was me. The bird in my image is nearly completely out of frame. Fred’s on the other hand is very much in the frame. It’s the best flying shot of a roller I’ve ever seen and definitely better than anything I’ve shot. I’m going to place the blame on me and not the camera. Take a look for yourself at the two images below. I was shooting a bit tighter than Fred so that may have added to the missed shot as well. Whatever the reason Fred did a great job capturing one of the most beautiful birds of Africa.
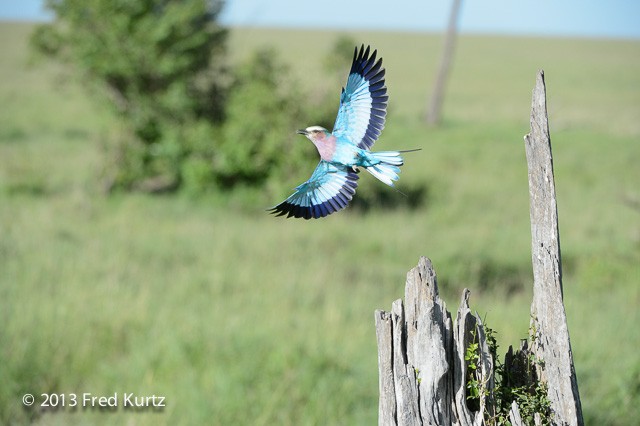
Fred Kurtz captured the beauty of the lilac breasted roller as it jumped from its perch to fly off.

My version of the same shot just a little behind the action.
Electronic EVF Quality
Along with the issues I described above there is also a serious problem with the visual quality of the EVF. I’ve included a selection of images of a cheetah chasing a grants gazelle that I shot one evening. It was late and the light was very soft and low. The cheetah was similar in color to the grass and the chase took place much further out than I would have liked. Problems mentioned above and the very low quality of detail in the GH3’s EVF, I was barely able to keep the lens on the cheetah and the gazelle. It was hard to even see the cheetah.
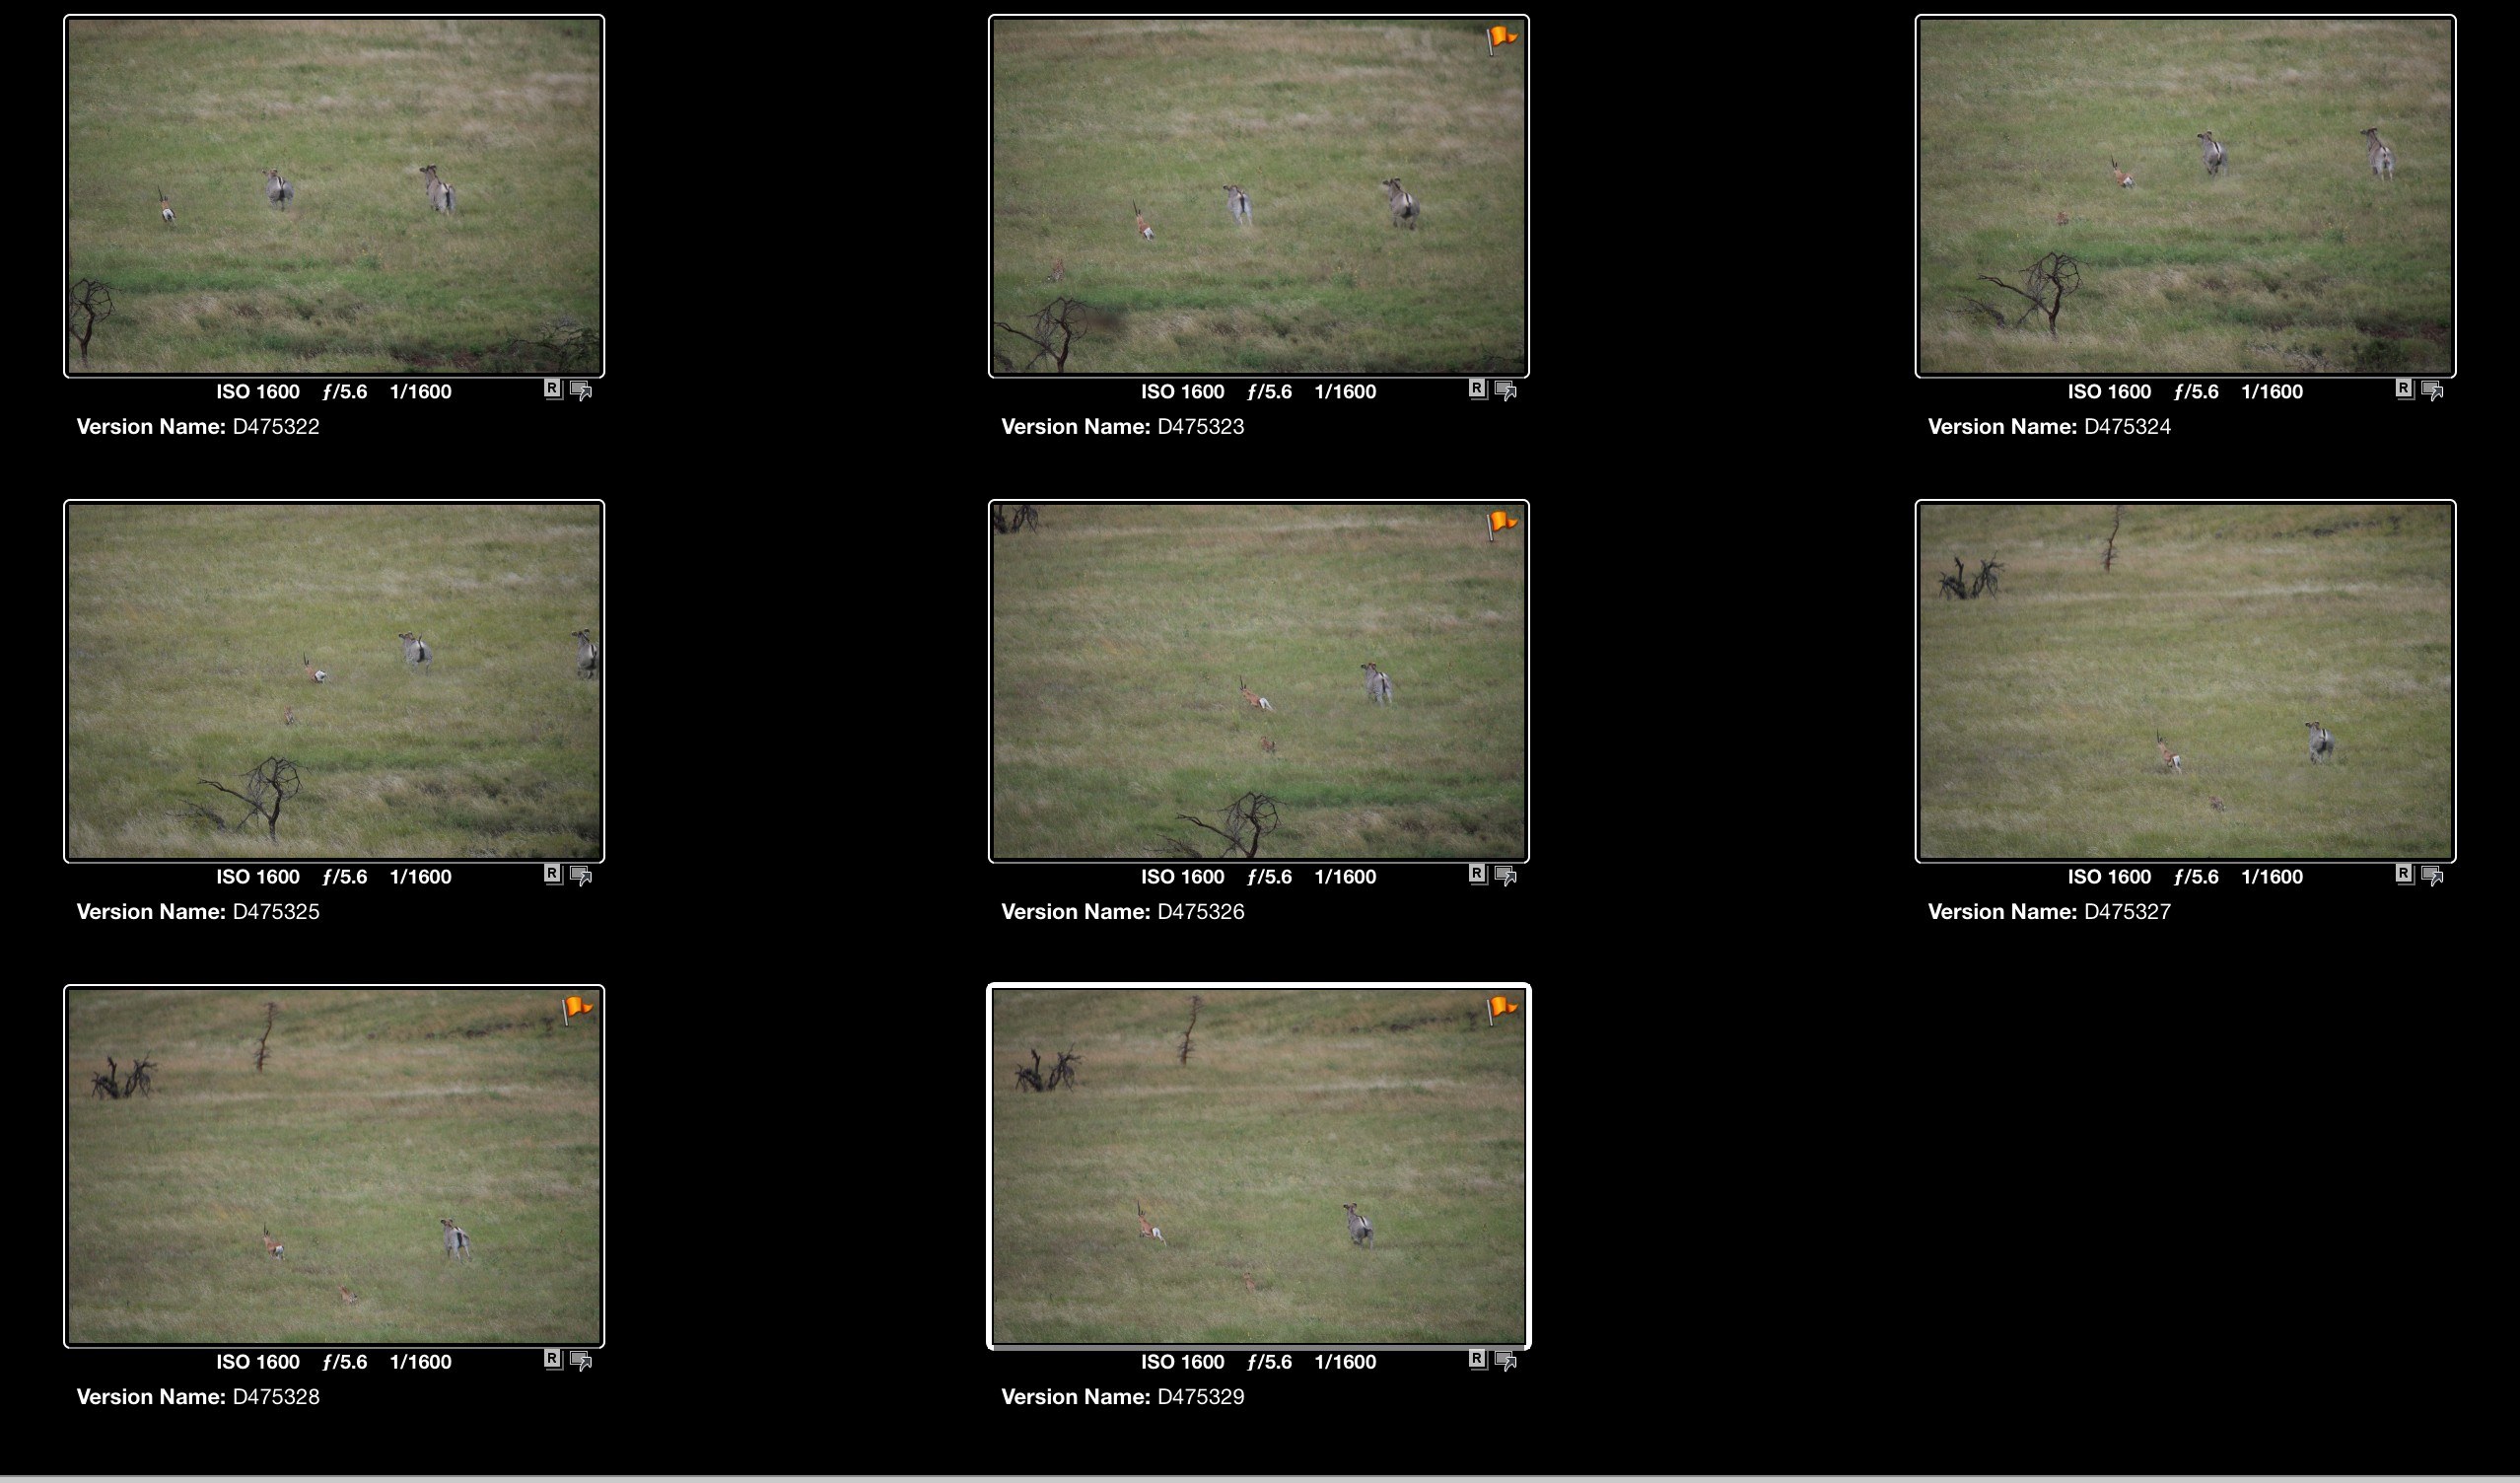
The cheetah hunt takes place late in the evening. The distance of the chase and the color of the cheetah made it difficult to keep the chase properly composed since I couldn’t even see the cheetah in the Electronic Viewfinder. The GH3 could really use an EVF at least as good as what seems to on the rear panel LCD.
The reason was due to the extremely poor details visible in the EVF. Poor light, a cat the color of grass running at nearly 75mph and the compilation of short, mini previews clogging up the EVF, all contributed to a lack of ability to keep the animals in the frame. I got a few images but missed just as many. Why not put an Apple like retina display within the EVF? I’m certain that would solve the quality issue. When it comes to action images even one miss could be the one that makes the cover of National Geographic. Capture it and you’re a hero. Miss it and you’re broke.
Lenses
For my time in Kenya I specifically went out and bought the Lumix 100-300mm zoom. As many of you might know, in the Micro Four Thirds cameras, you have to multiply all lenses X2. So in this case the 100-300 was actually a 200-600mm lens with a variable aperture of F/4-5.6. This lens surprised me like nothing I can recently recall in the testing of any camera gear. It was a lot sharper than I anticipated.
This inexpensive zoom retails for $499.00. It’s smaller and much lighter than my Nikkor 70-200. It has a reach equal to my $12,000.00 600mm F/4 Nikkor. And, it’s sharp. Not as sharp as my Nikkor but for what it is I was pleasantly surprised. I’m still having a hard time believing what it helped me produce. I haven’t done any official lens tests and I generally never do. I leave that up to DXO and DPReview but in real world shooting situations it was excellent. I shot it wide open much of the time due to a fear of higher ISO’s on the GH3 which we’ll get to in a moment. It seemed as good wide open as it was at F/11 with the exception of some vignetting. Most all frames were acceptably professional in detail and quality and none of them could be disqualified from publication consideration due to lack of image clarity and sharpness.
The 100-300mm includes in-lens image stabilization and it works very well. I also like the fact that that the EVF warns you if your shutter speed doesn’t equal the length of the lens you’re shooting. A red hand icon pops up on the screen to warn you there may be issues with motion at slower shutter speeds. Overall the 100-300‘s image stabilization is very good although I’m not sure it’s equal to the VR capabilities of my Nikkor lenses. Just a gut feeling. However, overall it’s simply hard to believe all the positive attributes of this $499.00 lens.
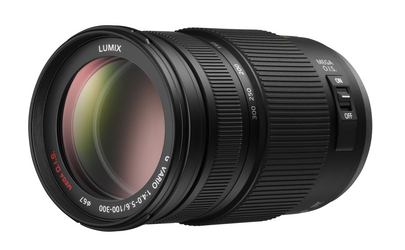
Panasonic’s G Vario 100-300mm zoom lens.
The other lenses I shot included the 7-14mm, 14-42X and the 45-175mm zoom. I love the 7-14 for it’s sharpness and wide view. However, it’s tendency to flare is a big drawback I hope an eventual update will address. Several of the Lumix lenses incorporate Nano Coatings as do Nikon’s newest lenses. The first Nikkors I shot with Nano Coatings convinced me it was well worth replacing all lenses I had that didn’t’ incorporate nano coating technology. It’s especially helpful with reducing flare and something the 7-14 could seriously benefit from.
The 14-42X lens is my standard carry everywhere lens. I typically keep it on my GX1, the combination being small and compact allows me to carry it in my briefcase at all times. It’s sharp though a bit sensitive to harsh conditions. I wrecked a 14-42X lens this summer after being caught in two sand storms while photographing brown bears on the beaches of the Alaska coast. It’s not considered a pro lens so I can’t complain too loudly. Overall it’s produced fabulous images.
Next on the list is the 45-175mm zoom and it’s a sleeper. I’ve really come to love this lens. It’s extremely light, zooms electronically which is more fluid and responsive than the manual zoom of the 100-300. Remember, you have to multiply all these lens numbers X2. Thus, the 45-175 is a 90-350mm zoom. That’s an excellent all around great range. And it’s also extremely sharp. The zoom mechanism is internal so there’s no lengthening of the barrel as you extend its reach. It’s a very nice touch that gives the impression of using a fixed focal length optic.
Finally, I should mention two lenses I don’t have but I’m looking forward to trying. They’re two new optics by Lumix in the range of 12-35mm F/2.8 and the 35-100mm F/2.8. Do the math and they end up being the equivalent of a 24-70mm F/2.8 and a 70-200mm F.2.8. Both have Panasonic’s finest optics and are weather sealed for what Panasonic says is professional use. Each lens is targeted squarely at professional photographers who appreciate the faster F/2.8 aperture and the pair are getting excellent reviews across the web. You can see a review here by an English gentleman named David Thorpe that I found quite interesting.
Shooting the GH3 at High ISO’s
All of the positive attributes I’ve mentioned above would be useless without being able to shoot in conditions with low or little light. In the world of nature photography, many of the subjects I document are most active when the sun hangs just above the horizon at either end of the day. If it’s cloudy, the lack of light is even more challenging as it was a couple of days ago when we found a leopard guarding a freshly killed impala in the limbs of an acacia tree.
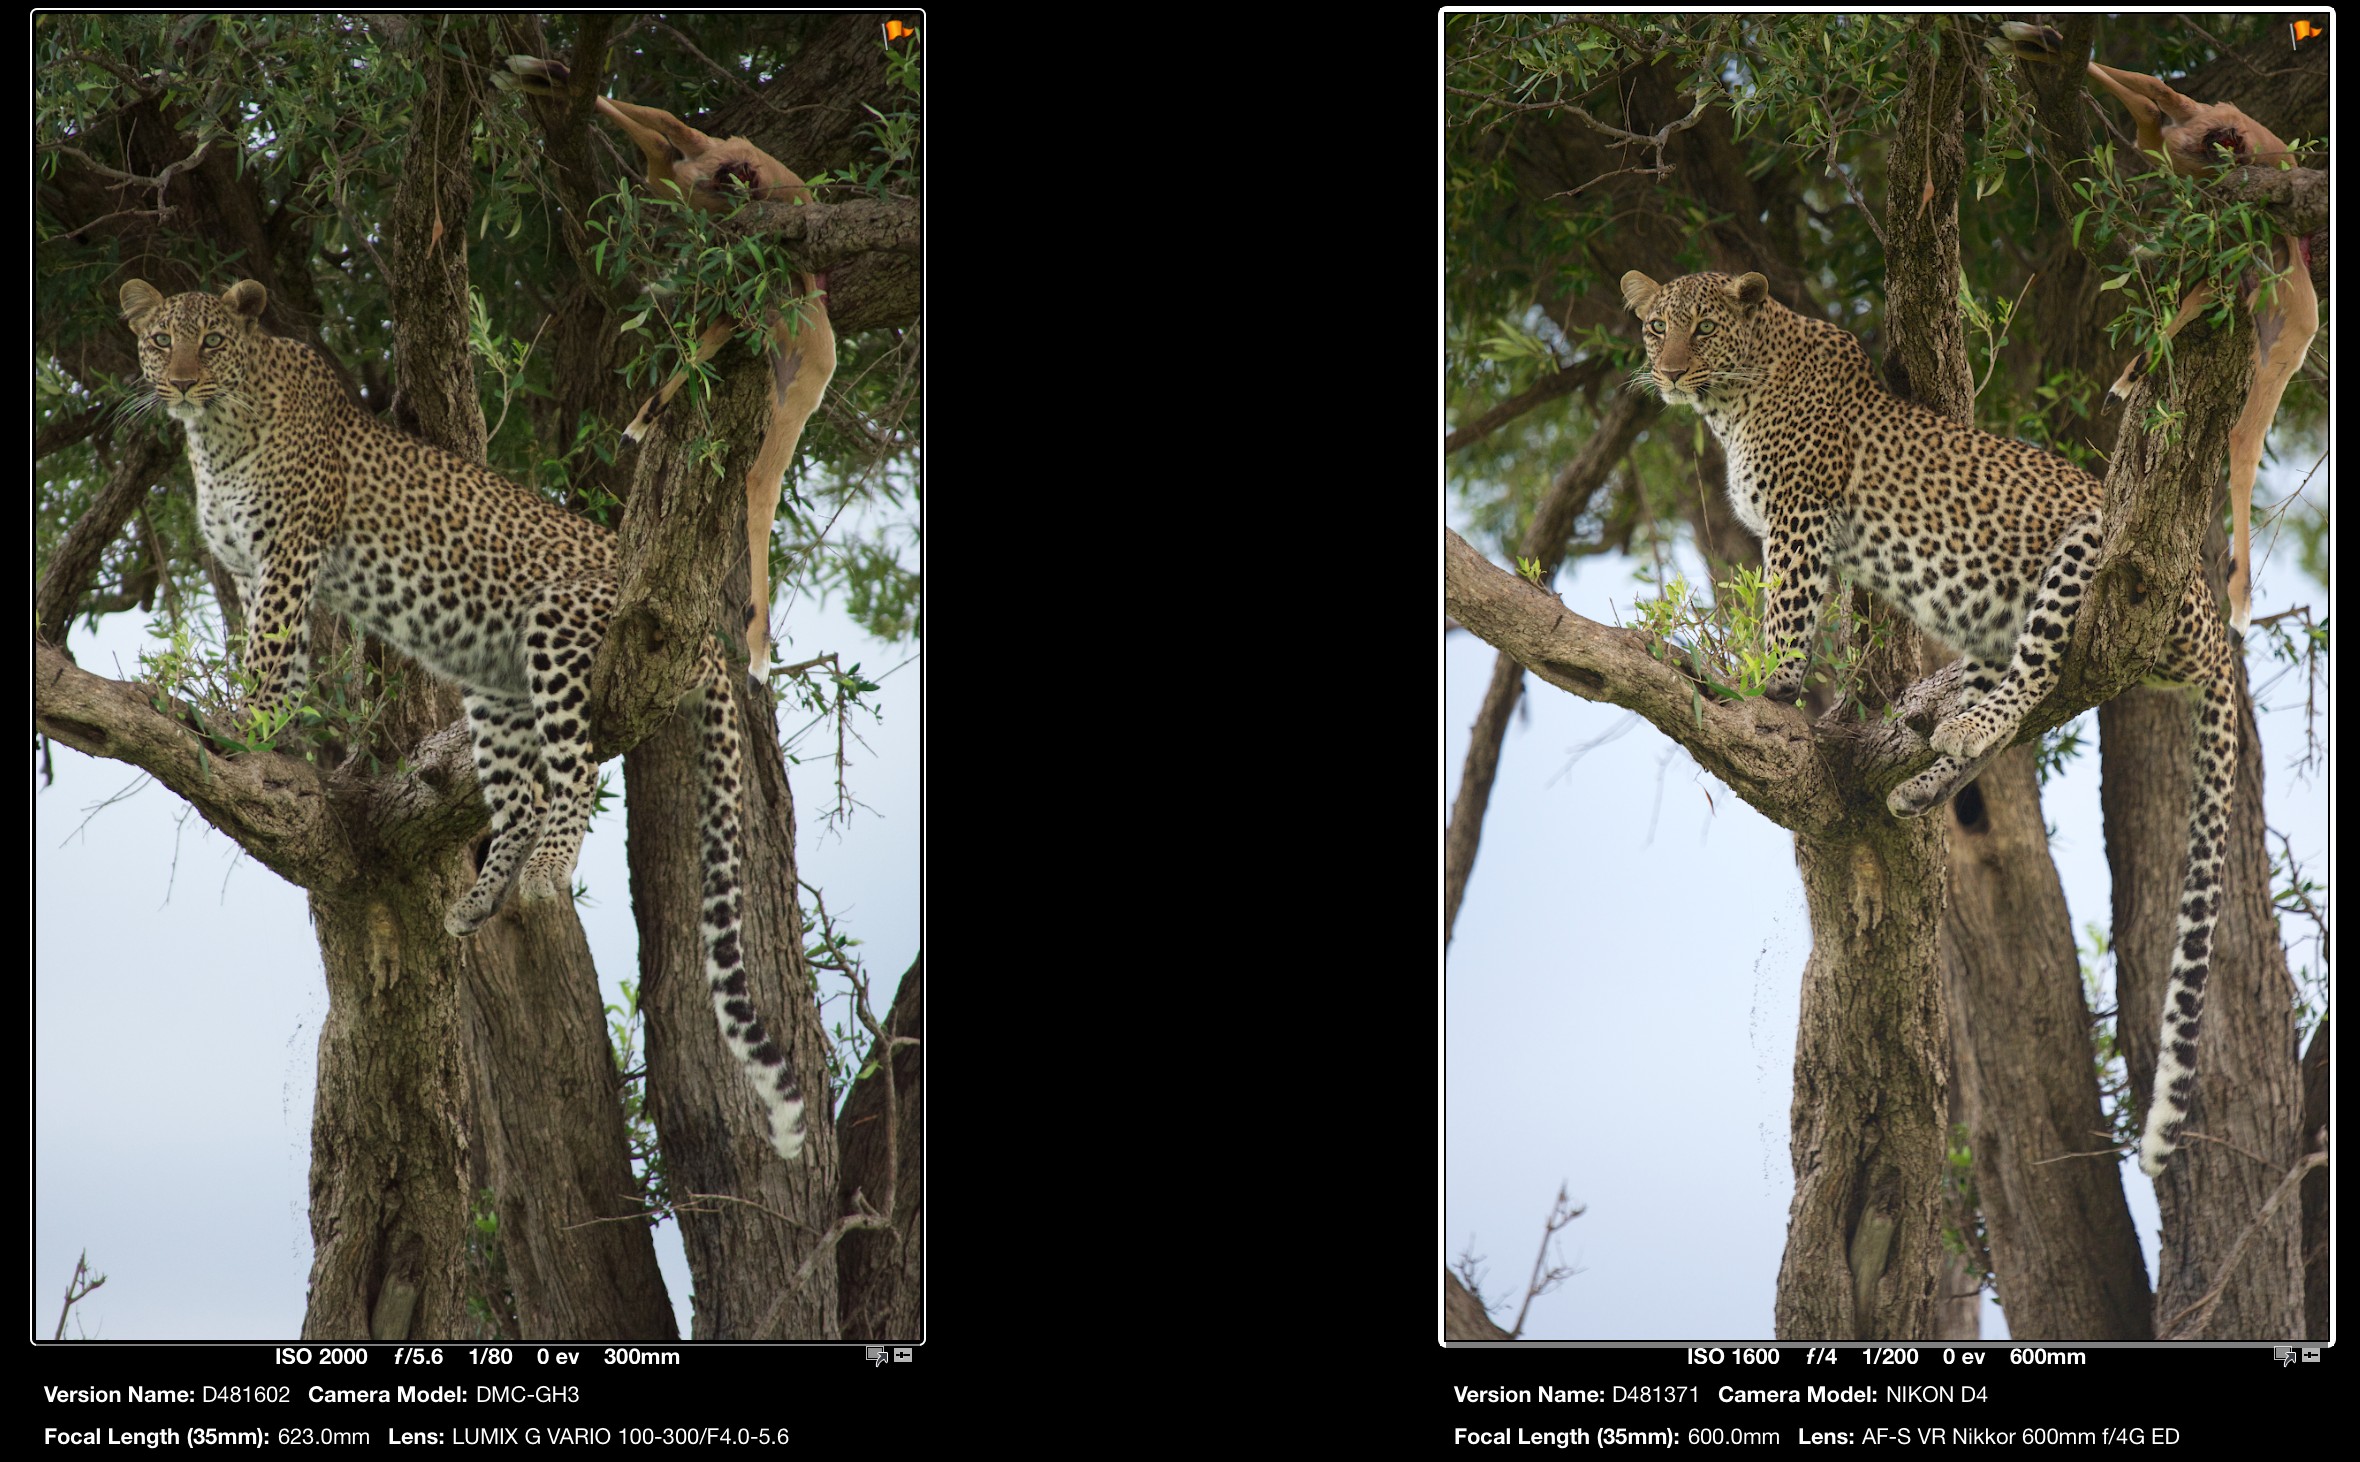
A comparison shot between the Lumix GH3 on the left and a Nikon D4 on the right. Without a doubt the D4 has more detail and resolution but for most shooters the GH3 would be more than adequate. My guess is the issue had more to do with the quality of lens, even though the Lumix 100-300mm is very good and in other situations I would consider excellent.
This beautiful cat spent the best part of the late afternoon hiding among the thorns and leaves making it impossible to get a good view. But we waited, and as the sun crept closer to the earth’s edge, she got up, stretched, and then made her appearance. By this time the sun had fallen below the horizon and a bank of clouds added another layer of diffusion. It was, by all accounts, very poor lighting.
I had been trying the GH3 in other situations at 1200, 1600 and even 2000 ISO. When we found this leopard I suspected I would be pushing the envelope of what the GH3 could deliver so I grabbed my D4 and photographed the cat with a 600mm F/4 attached. I boosted the ISO of the D4 to 3200 and shot with no worries. After getting a good collection of quality frames I knew this would be a great test for the GH3. I set the D4 aside, grabbed the GH3 and changed the ISO to 3200. I shot several frames, then brought it down to 2000 ISO and eventually down to 1600. Each reduction in ISO I had to concentrate even more on keeping the camera steady. But overall I captured some very sharp frames. The images at 3200 ISO were unfortunately unacceptable. But the 2000 ISO frames were beautiful. I’m going to do some comparative printing of the two exact frames from the D4 and the GH3 to see how things will look at 24×36 inches. I’ll update this when those are finished. Overall, I’ve been quite impressed with the high ISO settings on the GH3. Are they as good as the D4? No. But for what the GH3 is I’m once again pleasantly surprised and was left shaking my head in amazement when I saw the comparisons on my computer screen.
Overall the GH3 has ISO ratings that include Auto / Intelligent ISO / 200 /400 / 800 / 1600 / 3200 / 6400 / 12800 (Changeable to 1/3, 1EV step) (Extended ISO125-less under 200, ISO more over 12800-25600 Available) (Up to ISO3200 in Auto). A big range but my experience wasn’t all the positive over 2000 ISO. That’s still pretty good however and would be considered amazing if it wasn’t for my experience with Nikon’s D4.
Shooting Video
Up to this point we’ve discussed nothing but the GH3’s ability to shoot still photographs. However, Panasonic designed this camera to be a serious video machine as well. The predecessor to this camera, the GH2, gained virtual cult status as a fabulously small and capable video production tool. Its size was an advantage for cinematographers wanting to place cameras in tight spots and places the typical movie camera just couldn’t fit. The GH2’s video quality was so good it competed with cameras costing tens of thousands of dollars more. Take a look at this blog post I wrote several months back. The Red Scarlet versus Panasonic’s GH2.
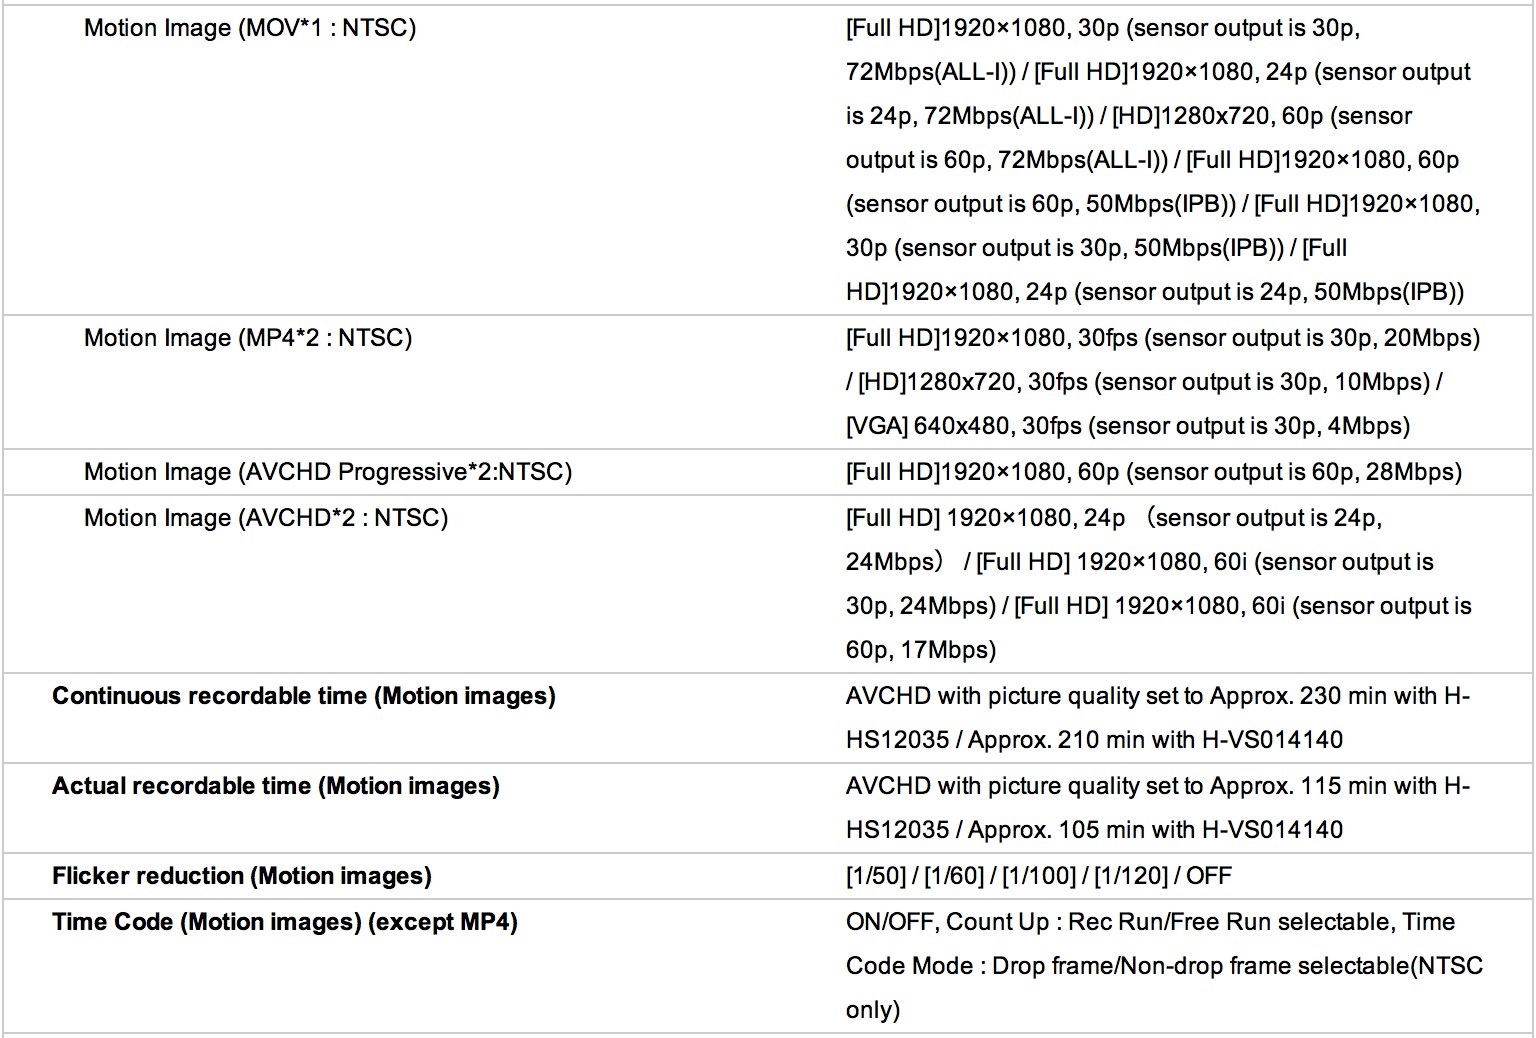
This is a list of all the video options on the GH3. As you can see it’s extensive and I thought it would be much easier to include all pertinent info by sharing this screen shot from Pansoinc’s GH3 spec page.
Some of the improvements on the GH3 video capabilities are getting a lot of attention. Lumix has updated the mic input to the larger and more standard 3.5mm input compared to the 2.5mm on the GH2. They’ve also included manual audio levels when recording, a headphone jack for monitoring sound, as well as a higher bit rate. What is bit rate? For those wanting a bit more technical details take a look at this video by the lockergnome that does a pretty good job explaining what bit rate is all about.
The GH3 has a better system for Auto Focus while shooting in the video mode. Video recording can be set to AVCHD, AVCHD Progressive, MP4, and MOV, all video encoding in the GH3 is H.264. I know this is all a bit technical but suffice it to say the the AVCHD setting is considered extremely high quality. For us still guys moving to video, figuring this all out is just part of the process. As still shooters we’ve been spoiled. Video is a lot more technical but just think of learning this material as keeping our brains active 🙂
When shooting video, whether on the GH3, the D4, D800 or D600, I will often set the camera based on how I envision the end product I’m producing. If I’m doing something related to teaching, I don’t need all the data of AVCHD. The .MOV or MP4 settings give me all the image data needed for a web tutorial and they don’t take up as much space. If I’m hoping to capture documentary material for a wildlife film I would most certainly shoot in the highest quality possible which is AVCHD on the GH3. As a still photographer I just think of these different formats being similar to a small, medium or large JPEG. If we want to get more movies on our card or hard drives we shoot a smaller type of file. Same for video.
I recently found a great blog post that compared the GH3 with Panasonic’s GH2 and Gh1 as well as Nikon’s D600. You can get more in-depth details about how the GH3 stacks up by reading the Chase Jarvis Blog where Ben Pitt gives a highly technical rundown of the sensors on all the cameras mentioned and how they compare.
In conclusion, by no means is this a complete run down of all the GH3 can or can not do. Like all my reviews, this is just my experience with a new camera in a real world situation. I’m certain there will be lots of others who do a more complete analysis and I’ll look forward to seeing what DXO has to say as well as DPReview. Overall I’m extremely happy with the results I shot on my trip to Kenya. The GH3 did a superb job, especially taking into account how inexpensive this camera is, as well as the lenses that go with it. Will this system replace my Nikons at this point? No. But I can’t help thinking the cat’s out of the bag with this Micro Four Thirds camera system. I’m quite confident that any camera company not paying serious attention to Panasonic does so at their own peril. The GH3 exceeded all expectations and will remain a major part of my current photographic tools. Don’t let it’s diminutive size fool you. It’s a serious contender.
One final thought that’s interesting to contemplate for the future of the obviously ongoing development of still/video cameras. I’ve been thinking about where this is all going how this all may shake out. Here’s what I’ve been thinking.
We have Sony that has been a dominant force in video for decades. A few years back they decided to get in to the stills game by purchasing Minolta and they now have their feet firmly planted in both industries with quality stills and video options for all their dedicated shooters. Then we have Canon that also has a long and successful history in video with an equally successful stills department. Two major forces in the imaging world that are doing both stills and video in a serious manner.
Then comes Nikon and Panasonic. Two highly successful companies trying their hand at things new to their business model, specifically video for Nikon and stills for Panasonic. I’m having a hard time imagining how they will compete with two heavyweights such as Sony and Canon. One answer might be to merge and combine the amazing video capabilities from Panasonic with the spectacular stills capabilities of Nikon. Who would buy who? I’m guessing it would be Panasonic bringing Nikon into its fold. Who knows if this will ever happen but the times are changing fast and the competition is furious. I for one would love to see the merger of Panasonic and Nikon so we could get the best of both worlds under one roof. Only time will tell. Until then I’ll be shooting both systems depending on the job. The GH3 offers a great alternative for projects where I just don’t need the slightly faster frame rates, super high ISO capabilities and legendary Nikkor optics. Then again there is always tomorrow. The digital imaging business is changing so fast none of what I just spent two days writing may matter. Stay tuned.
Incidental thoughts taken from my field notes:
Pros
-Very light body and lenses. It’s an absolute joy to carry around
-Changing the AF sensor is the best on any camera I’ve ever used. This feature is what all cameras will have at some point. The GH3 has it now.
-AF sensor is active even when LCD goes out. You can move AF sensor with thumb while looking through the EVF. Same comments as above regarding this must have AF option.
-Microphone plug is the larger more common size. Makes it easier to find Mics that are easily compatible.
-I love the power zoom of 45-175mm zoom. It does not extend when zoomed all the way out.
-Able to use all lenses from the Olympus Micro Four Thirds system though none of the Olympus lenses have built in stabilization since Olympus provides IS via the digital sensor.
-Water resistant body and lenses.
-Wireless strobe capabilities are a plus but there is no ability to change settings on remote strobes. Would love to see that option added.
-Lots of Function buttons.
-Easily the best one handed camera being produced today. Better than all other pro bodies costing thousands more.
-ISO quality is excellent up to 2000 ISO
-Quality of back panel LCD is fabulous. iPhone like pinch to zoom, swipe to scroll. Color and clarity is superb.
-Excellent layout for the Menu system on the back LCD. Very intuitive and easy to use.
-Love the pop out swivel screen/LCD on the back. Allows for very creative angles for stills and video.
-Inside EVF and on LCD you have immense amounts of information regarding all settings currently being used. If it’s too much you can switch it all off.
-Graphics on back LCD such as Exposure Compensation, Manual Exposure settings etc. are very polished and refined looking. Not a necessity but very easy on the eyes and we are photographers after all. It’s nice to see things that are beautiful and the graphics on the back LCD of the GH3 qualify in that department nicely.
-Love the idea of the WiFi built in. However I’m struggling to make it work with my iPad.
Con’s
-No Fn custom function for setting up Exposure Compensation for the onboard flash. My GX1 even has this option. Seems someone fell asleep at the design table on this issue.
-Shutter speed adjustment changes FPS rate for some reason. I’m not talking about changing from 1/500th to a 1/4 second. The frame rate change is very noticeable when changing from 1/500th to 1/250th. Not enough to effect actual capture time but definitely noticeable in how fast the camera is shooting. I can’t figure this one out.
-When in AFC the image in the EVF is slightly blurry as along as the GH3 is focusing continually. Shoot the image and it’s sharp. It doesn’t’ seem to be a problem other than bothersome to the eye. In AFS the image in the EVF looks sharp and properly focused.
-Color quality in EVF could be much better.
-EVF needs to be as sharp and detailed as the rear LCD or an Apple Retina display.
-Unable to shoot through EVF with sunglasses on without turning off the Auto EVF setting that detects when I would raise the camera to my eye. This is a nice feature when not using sunglasses. There is a sensitivity setting for this feature but it doesn’t seem to go far enough to allow the use of sunglasses and accurately detect when your shaded eye is pressed to the EVF.
-When moving the AF sensor around the LCD or EVF, the AF sensors outline turns bold and brighter yellow, signifying it’s now active. In this state, I have the ability to change the size of the AF sensor either larger or smaller. It would be nice if I could have turned off this option to resize. The reason being that I would have to press the shutter button to reactivate the AF sensor. Pressing the back focus button did not reengage the AF sensor. It was necessary to press the front shutter button first which added an additional step before AF was reactivated. This wouldn’t be an issue if you don’t use the back focus button for AF.
-On GH3 the front subcommand dial is placed behind the shutter button as opposed to in front and down from the shutter button on the Nikon cameras. It’s basically on top of the camera grip as opposed to being in front of the camera grip. Behind the subcommand dial is WB, ISO and +/- EV compensation. By having the subcommand dial on top, the WB, ISO and +/- button are somewhat difficult to reach. I found I had to raise my right index finger further backwards than is comfortable to access these buttons. By putting the subcommand dial in front of and below the shutter button, as Nikon does, would eliminate the difficulty in reaching these buttons.
-Would love to have seen them include a built-in GPS.
-I would love to see a nano coated version of the 100-300mm lens with a constant F/4 aperture.
-Manual zoom on the 100-300mm lens is a bit sticky and extends the lens out a great deal when shooting at 300mm.