

Editors Note: Under the heading of no surprises I want everybody who reads this blog to know that I’m what is called a Panasonic Lumix Luminary. In other words, I do get compensated a small stipend each year for working with Panasonic. However, I can tell you straight up, the small amount of money they pay me is not even 1/10th of 1% of my annual income which is derived from our NE Photo Tours and our editorial and commercial photography sales. I had an unofficial relationship with Nikon for almost 40 years and today Nikon Ambassadors and Canon Explorers of light make a mid five figure income from their respective programs. Would anybody in their right mind (Me) have given up a relationship like that if I didn’t’ believe in what Panasonic was doing? I can assure you, no amount of money can buy my loyalty and I’ll leave it at that. In the future I’ll make sure I include this information on all major Lumix reviews.
Sincerely, Daniel J. Cox
Panasonic LUMIX G85 Shooting Experience
This past fall and early winter have given us a couple of new and exciting additions to the Micro Four Thirds world in the form of the Lumix G80/85 and the Olympus OM-D EM-1 Mark ll. Just for clarification, the Lumix G85 is the model sold in North America and the G80 is sold in Europe.

 Sandhill cranes silhouetted in colors of the setting sun. Bosque del Apache NWR, New Mexico. Lumix G85 with Leica 100-400mm
Both Lumix and Olympus bodies are innovative from a technology perspective, but the G85 fits the average user’s needs more economically in a way that only Panasonic is consistently doing—giving photographers great tools with durability and professional aptitude at affordable prices. And it’s the qualities of the G85/G80 I’m excited to share with you in this Blog post.
A Review Based on My Kind of Photography
Keep in mind that my reviews of a particular camera are obviously from my own personal perspective based on how I use the camera. I won’t be getting into minute details unless those details affect how the camera performs in the situations I use it in. For more information on each and every possibility you should check out DPReview’s review of the Lumix G80/85.
I’ve been shooting the G85 now for a little over three months. In that time I’ve had a chance to get a solid feel for this wonderfully compact, sturdy advanced enthusiast’s camera. In short, it handles exceptionally well, has some of Panasonic’s newest technologies, and all at a price that won’t bother most photographer’s spouses. Just think how nice it will be not having to sneak another camera in under your jacket:) Yes, I’m talking to you.
The First Unboxing and Under the Hood
Let’s start with the obvious—when you pull this camera out of the box. First of all, like all the MFT cameras before it, the G85 is small and compact. Even so, it has a solid feel. Before the G85 there was the G7, a somewhat similar MFT camera missing many of the great new features of the G85. Many photographers criticized the G7 as feeling too plasticky, a bit too light, and seriously underwhelming in its ability to instill confidence in its durability. So Panasonic did what they’ve been doing since jumping into building still photo and video cameras, they made serious improvements in the follow-up model which is the G85.
A Metal Chassis
The first thing Panasonic did was replace the front plate with a solid aluminum frame. The G85 has much more metal, and though I never did have an issue of any kind with my G7, many feel the added weight and heft of the new metal body is a welcomed addition. It comes with a small price in weight but one could argue it’s worth the cost.
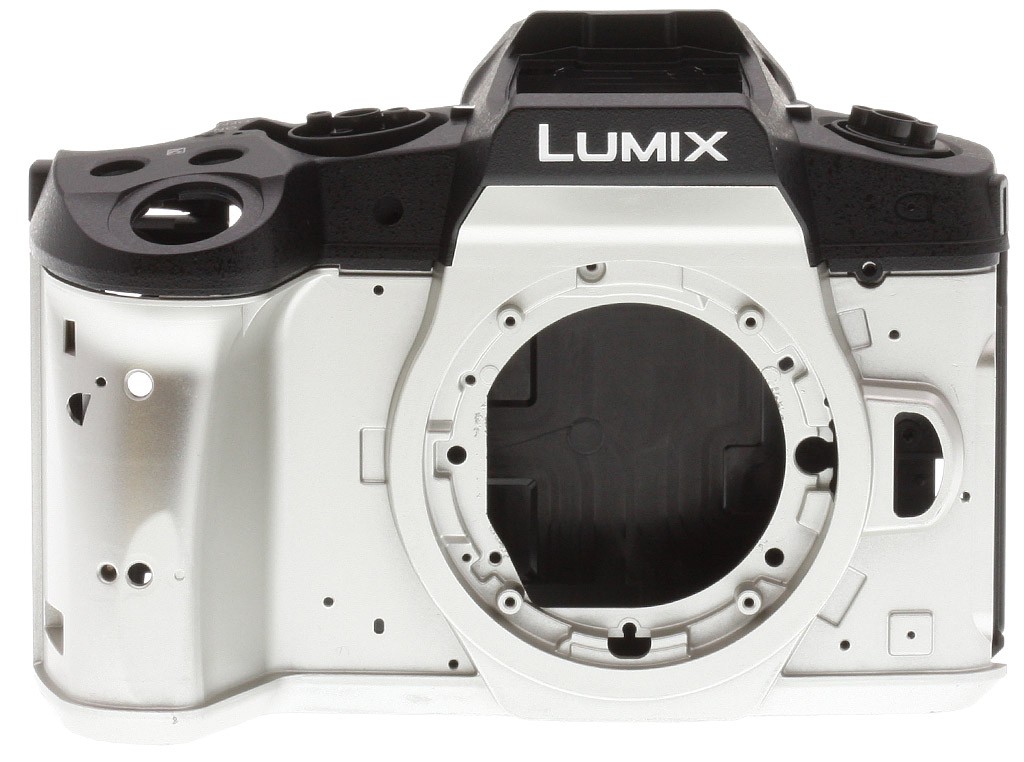
 Lumix G85’s foundation is based on a full die-cast magnesium body. It has a metal lens mount as well as a metal tripod socket. Photo courtesy of Imaging Resource. Visit their site for additional reviews on the new Lumix G85.
Serious Weather Sealing
One of the most popular advances photographers of all levels seem to really love is better weather sealing. The G85 ups that in a substantial way. The body and most lenses are now weather sealed to the point that you should have no issues staying out in a light rain. I’m not sure about a pouring rain—haven’t tested it yet—but no longer do we have to worry about a light drizzle or shower. Here’s my fellow Lumix shooter Mark Toal showing how much water the G85 can take.
Magnetic Electronic Shutter
The best way to explain the benefit of the new electromagnetic shutter is to compare it with that of the G7. The Lumix G7 had a shutter that was more traditional in design, and there were some complaints that the G7 suffered from so-called “shutter shock.” For those not familiar with shutter shock, it’s simply the vibration the camera’s shutter mechanism creates as it opens and closes during the exposure.
To solve this vexing problem, Panasonic engineers developed what I believe is a totally new shutter mechanism that’s triggered by magnets. It’s complicated to explain but suffice it to say it works extremely well. I’ve not experienced any shutter shock myself and have heard virtually nothing from others across the net regarding the same issue.
Though it’s impossible to really see how a new shutter like this works, the one thing that is obvious is the incredibly soft—nearly whisper silent–sound when taking the picture. It was the first thing I noticed when I pushed the shutter button for the first time. It’s so quiet you almost will never need the electronic version of Silent Shutter. The normal magnetic shutter gives this camera the feel of a finely tuned Swiss watch and is nearly as quiet as a soft breeze.
In-body Image Stabilization (IBIS)
In the G85 we get the most sought after technology of virtually anything being developed in photography today, in-body image stabilization (IBIS). For IBIS we have to bow down to the folks at Olympus. Yes, IBIS is part of the new Lumix G85. However, without Olympus pioneering this phenomenal concept, none of us would even know what we were missing. That’s just one little example of why I’m so excited about the world of Micro Four Thirds. Both Panasonic and Olympus are innovating in ways the larger companies seemingly only read about in science fiction novels.
With the new G85, you get the benefit of Panasonic’s Dual IS which is the combination of IBIS working in tandem with the traditional optical IS in Lumix lenses. With both of them functioning as one, Panasonic suggests we can shoot as much as five stops below the age old rule of “shutter speed equal to or greater than the lens you’re using.” In other words, if using the Leica 100-400mm at 400mm, which equals 800mm full frame equivalent, you can effectively shoot handheld at approximately 1/25th of a second. And yes, I’ve done just that. Dual IS is revolutionizing low-light, super telephoto photography, and the G85 is a great new tool that has it. Recently, on February 8, 2017, Panasonic offered a firmware update that substantially improves Dual IS to Dual IS 2 and gives the new 100-400mm lens even slower shutter speed capabilities.
Here’s a link with detailed info on how to update firmware
Here’s a link for the G85 firmware update. You need to scroll way down to the Firmware and Drivers section, close to the bottom of the page—screenshot of the section you want to find below.
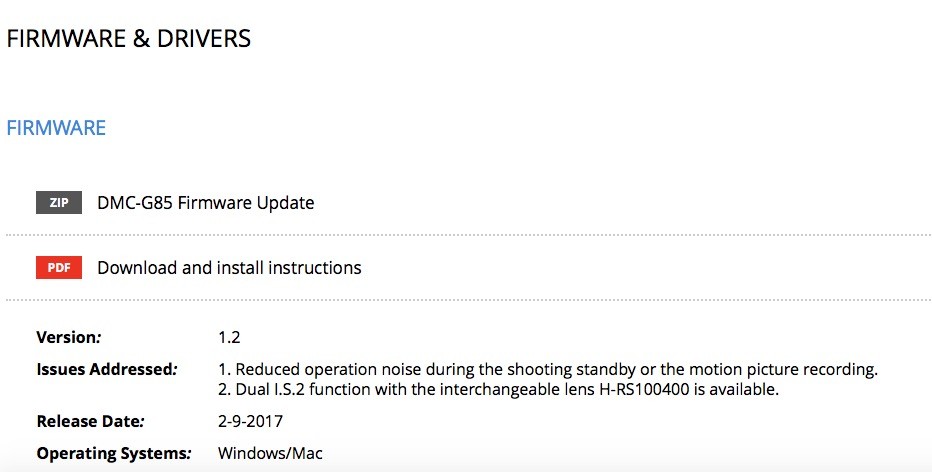
 This is the section you’re looking for towards the bottom of the page.
16 MP Micro Four Thirds CMOS Sensor
The big news about the G85’s sensor is its lack of a low pass filter. 16 megapixels seems small in today’s world of 36 and 48 megapixels full frame sensors from the big boys. But I’ve been shooting a GH4 for almost three years and it too has a 16-megapixel sensor. I’m doing prints from the GH4 as large as 40×60 inches and they’re stunning. But that’s for a future Blog post. Suffice it to say that I regularly print much, much larger than 90% of all photographers. I’m fortunate to have a 44-inch printer so I have the luxury of big prints without having to hire out.
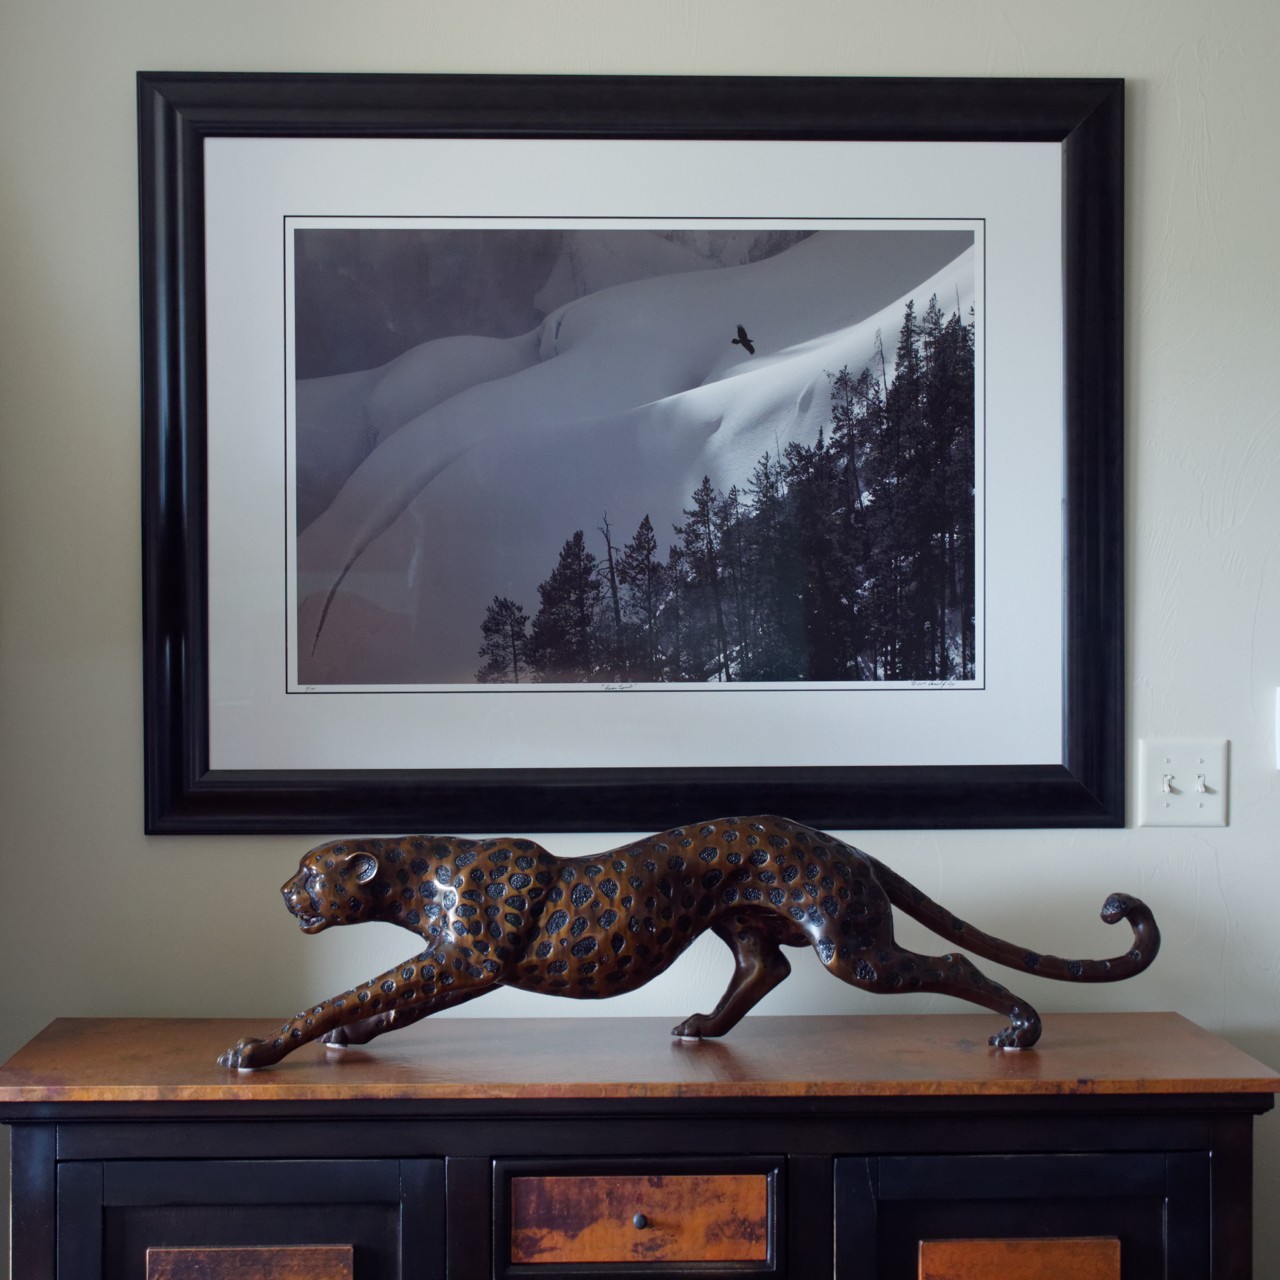
 Raven Spirit, a fine art print 24×36 inches in size without the frame, hanging in our home in Bozeman, Montana.
The question I ask all my students is, “What are you doing with your pictures?” If it’s anything less than billboards, you most likely won’t be disappointed in the images you get from a 16-megapixel sensor. The one caveat is low light which we’ll discuss shortly. The G85’s 16-megapixel sensor is excellent and it’s great to have the additional sharpness removing the low pass filter provides.
Low Light Is Micro Four Thirds’ One Achilles, Heel
At this point in time, Micro Four Thirds cameras all have less ability to give us images without some noise with long exposures and high ISO’s. I wished it weren’t true but it’s a fact of the MFT system. At least for now. But the G85 does very well in low light. I often shoot it at 1600 ISO and have shot it as high at 3200 ISO. I will agree that there is more noise at these speeds than I like to see but good software solves the problem most the time.

 Starry skies over the African veld in Samburu NP, Kenya. G85 20 second exposure, 12mm F/1.4 Leica lens wide open at 3200 ISO. This is a JPEG that was processed in DXO Optics Pro 11.
I’m a huge fan of DXO Optics Pro 11 which has what I consider the best noise removal tool of any I’ve tried. You can clean up a lot of noise with good software. I will warn you that DXO Optics Pro 11 does not yet support the G85. I heard that’s supposed to change some time in February 2017, and once that happens I’ll be back in high spirits concerning noise removal. Thankfully using DXO to remove noise is a once in awhile thing so it’s really not a huge deal.
Even so, once again, you have to know what you’re going to use your pictures for. Even without DXO, the G85 images at 3200 ISO would look fine for social media. But you have to decide. Owning a full frame system that shoots amazing low light images is substantially more expensive, with monstrous lenses in size and weight and more importantly, cost. The benefits of a full frame sensor is dramatically negated by the benefits I’m getting with MFT.
Exposure Mode Dial
Like all of Panasonic’s cameras, the G85 harkens back to the past while embracing the future. On the top right side, you have the simple to use and easy to grasp Mode Dial. Whether it’s switching from 4K Video to Program Mode, it’s a simple twist of a tried and true wheel, with ruffed up edges that are easy to grasp. All the common options are on the main Mode Dial including Program, Aperture Priority, Shutter Priority, Manual, and Movies. Other options include Custom 1 and Custom 2 along with iA (Intelligent Auto) Scene Mode and Creative Mode. I won’t be going into details of what all these options can do since I use only a few such as Program, Aperture Property, Shutter Priority, and Manual and once awhile Intelligent Auto (iA). iA is a great option that allows me to hand my camera over to a stranger who I may want to photograph me and my wife just being tourists. That stranger will have no idea my camera is set to back button AF or other custom settings they may need to adjust. iA saves the day by turning a highly sophisticated pro-oriented camera into a virtual point and shoot.
Unlike the GH4, there is no lock for the Mode Dial, but so far that’s not been an issue. Not once in the three months of shooting has the Mode Dial been accidentally moved from the option I’ve selected. I must admit I love the lock on the GH4, but thankfully it doesn’t seem to be needed on the G85.
Drive Mode Dial
On the top left side of the G85 is the Drive Mode Dial. Once again easy to find, easy to use, and doesn’t get moved easily. Here you have the ability to switch from Single, High-Speed Multiple FPS, 4K Photo Mode, Bracketing, Time Lapse, and Remote Timer. This well placed, knurled knob is a welcomed feature. Panasonic definitely seems to have a great understanding of just the right amount of combining the old with the new. They seem to have an innate ability to integrate older styled retro dials and knobs with new push buttons and touch screens and do it in ways that makes a lot of sense. Retro can look nice, but I prefer a combination of the old with the new, each doing what makes capturing images fast and efficient. Fuji and Olympus have some great retro bodies from a visual standpoint, but only Panasonic is doing retro when there’s a need and using high tech, like a touchscreen, because it’s a better idea.
Front Dial
The front dial on the G85 is something I’ve really come to love. I have to admit it had to grow on me, and for the first two months of shooting the G85, I was convinced I wanted the front dial version of the GH4. During my recent 12 days in Kenya, I slowly began to change my mind. I’ve been convinced the GH4 controls are the best of any camera out there, and I still feel that’s the case with the placement of the WB, ISO, and +/- EV controls. But having the front dial directly under the shutter button, as it is on the G85, is absolutely brilliant. Once again we have to pay homage to Olympus for this feature which I’m pretty sure first showed up on the OM-D EM-1. Whatever camera in the Olympus line introduced this new design idea, it was a great new concept and one I’ve come to highly appreciate.
Why do I like this so much? It’s because of the ability to set it up to control my exposure composition so I can quickly adjust my histogram before I press the shutter button. As many of you know who read this Blog, I’m a huge fan of Program Mode. Yes, I said Program Mode. Believe me, I’ve had this discussion with my students in places like a Tundra Buggy where there are other pros or advanced enthusiasts around. When I go into my “Shoot Program” routine the snickers and guffaws ensue in mass. But suffice it to say, if you don’t understand the power of the modern day Program Mode, you haven’t read your camera manual. Nikon pioneered Flexible Program Mode by allowing us to change what the camera chooses to any shutter speed or aperture the camera provides. Thankfully, Panasonic Lumix cameras work in exactly the same way. If the camera chooses 1/250th of a second at F/8 and I have a F/2.8 lens, all I have to do to get a faster shutter speed is spin the rear dial to the right. Doing so, the shutter speed goes up and the aperture follows. If I want better depth of field, I spin the rear dial to the left, the aperture goes down and the shutter speed follows. In short, they work in perfect tandem with each other. You can read a more detailed description of Program Mode with Nikon and Lumix cameras by following this link to Photography Using Program Mode.
One caveat to Program Mode in some other cameras—and you will have to test for yourself if you’re not using Lumix—is whether or not the camera resets itself to what it wants when the camera goes to sleep. This does not happen with Lumix or Nikon but is an issue with Canon and Olympus. I’m not sure about Sony. But if your camera resets itself when it goes to sleep then you lose the Aperture/Shutter speed combination you thought you set. This is a problem if you’re shooting birds for example. Let’s say you’re shooting a bald eagle in a tree and you want the decent depth of field to have good sharpness from beak to tail. He’s just sitting there so you take your photo at 1/250th at F/8. Once you have that shot you then move the dial to the right for a faster shutter speed in anticipation of the eagle eventually flying. You’re standing there shooting the breeze with a photo buddy when the eagle finally gets ready to fly, and when you reach for your now sleeping camera, it wakes to a shutter speed and aperture that may not be the speed you set it to stop the action. I’ve been testing Program on the Olympus and the camera doesn’t go to sleep for quite some time, but when it finally does, this changing of the selected shutter speed and aperture is modified to what the camera wants.
Rear Dial
Pretty simple functionality regarding the rear dial which we covered above. It has other options other than the Flexible Program Mode mentioned, but for me, it’s mostly to control shutter speed and aperture.
Other Buttons, Levers, Doors
The top deck has the Movie button and an additional Fn button that I’ve set up for unlocking +/- Exposure Compensation in case I want to disengage Exposure Composition on the front dial. The front dial can be bumped quite easily and some may find they want the lock of the Fn button for +/- EV options. Either way, it too can be set up for almost anything.
On/Off Switch
Placed right beneath the Mode Dial and is similar to most the other Lumix cameras which I think is a big plus. You turn the camera on by pushing it forward and off by bringing it back. Not much here to say other than it’s easy to access with your right hand, unlike others who put their on/off switches either on the base of the camera or on the left side where it takes two hands to start shooting. Seems simple but Panasonic is doing this right.
SD Card Access
Panasonic finally changed the placement of the SD card door, and I’m now happy to say it’s placed on the right side of the handgrip, just like most other cameras made. Simple but very positive update just like the GH4.
Focus Mode Lever
In the days of shooting Nikons, I almost never set my cameras to AF-S. It was always set to AF-C for numerous reasons, but the main one being my desire to capture action if it happened unexpectedly. Unfortunately, switching from AF-S to AF-C on Nikon cameras is still extremely difficult. Even on the newest Nikon, the AF-S and AF-C buttons are on the front of the camera on the left lower side of the lens mount and impossible to access in a moment’s notice.
On the Lumix cameras, the AF-S/AF-C switch is right below the top deck, backside of the camera, encircling the AF/AE lock button. I use Back Button Focus on all my Lumix cameras so my thumb is constantly right above the AF-S/AF-C switch and in a position to move the dial instantly.
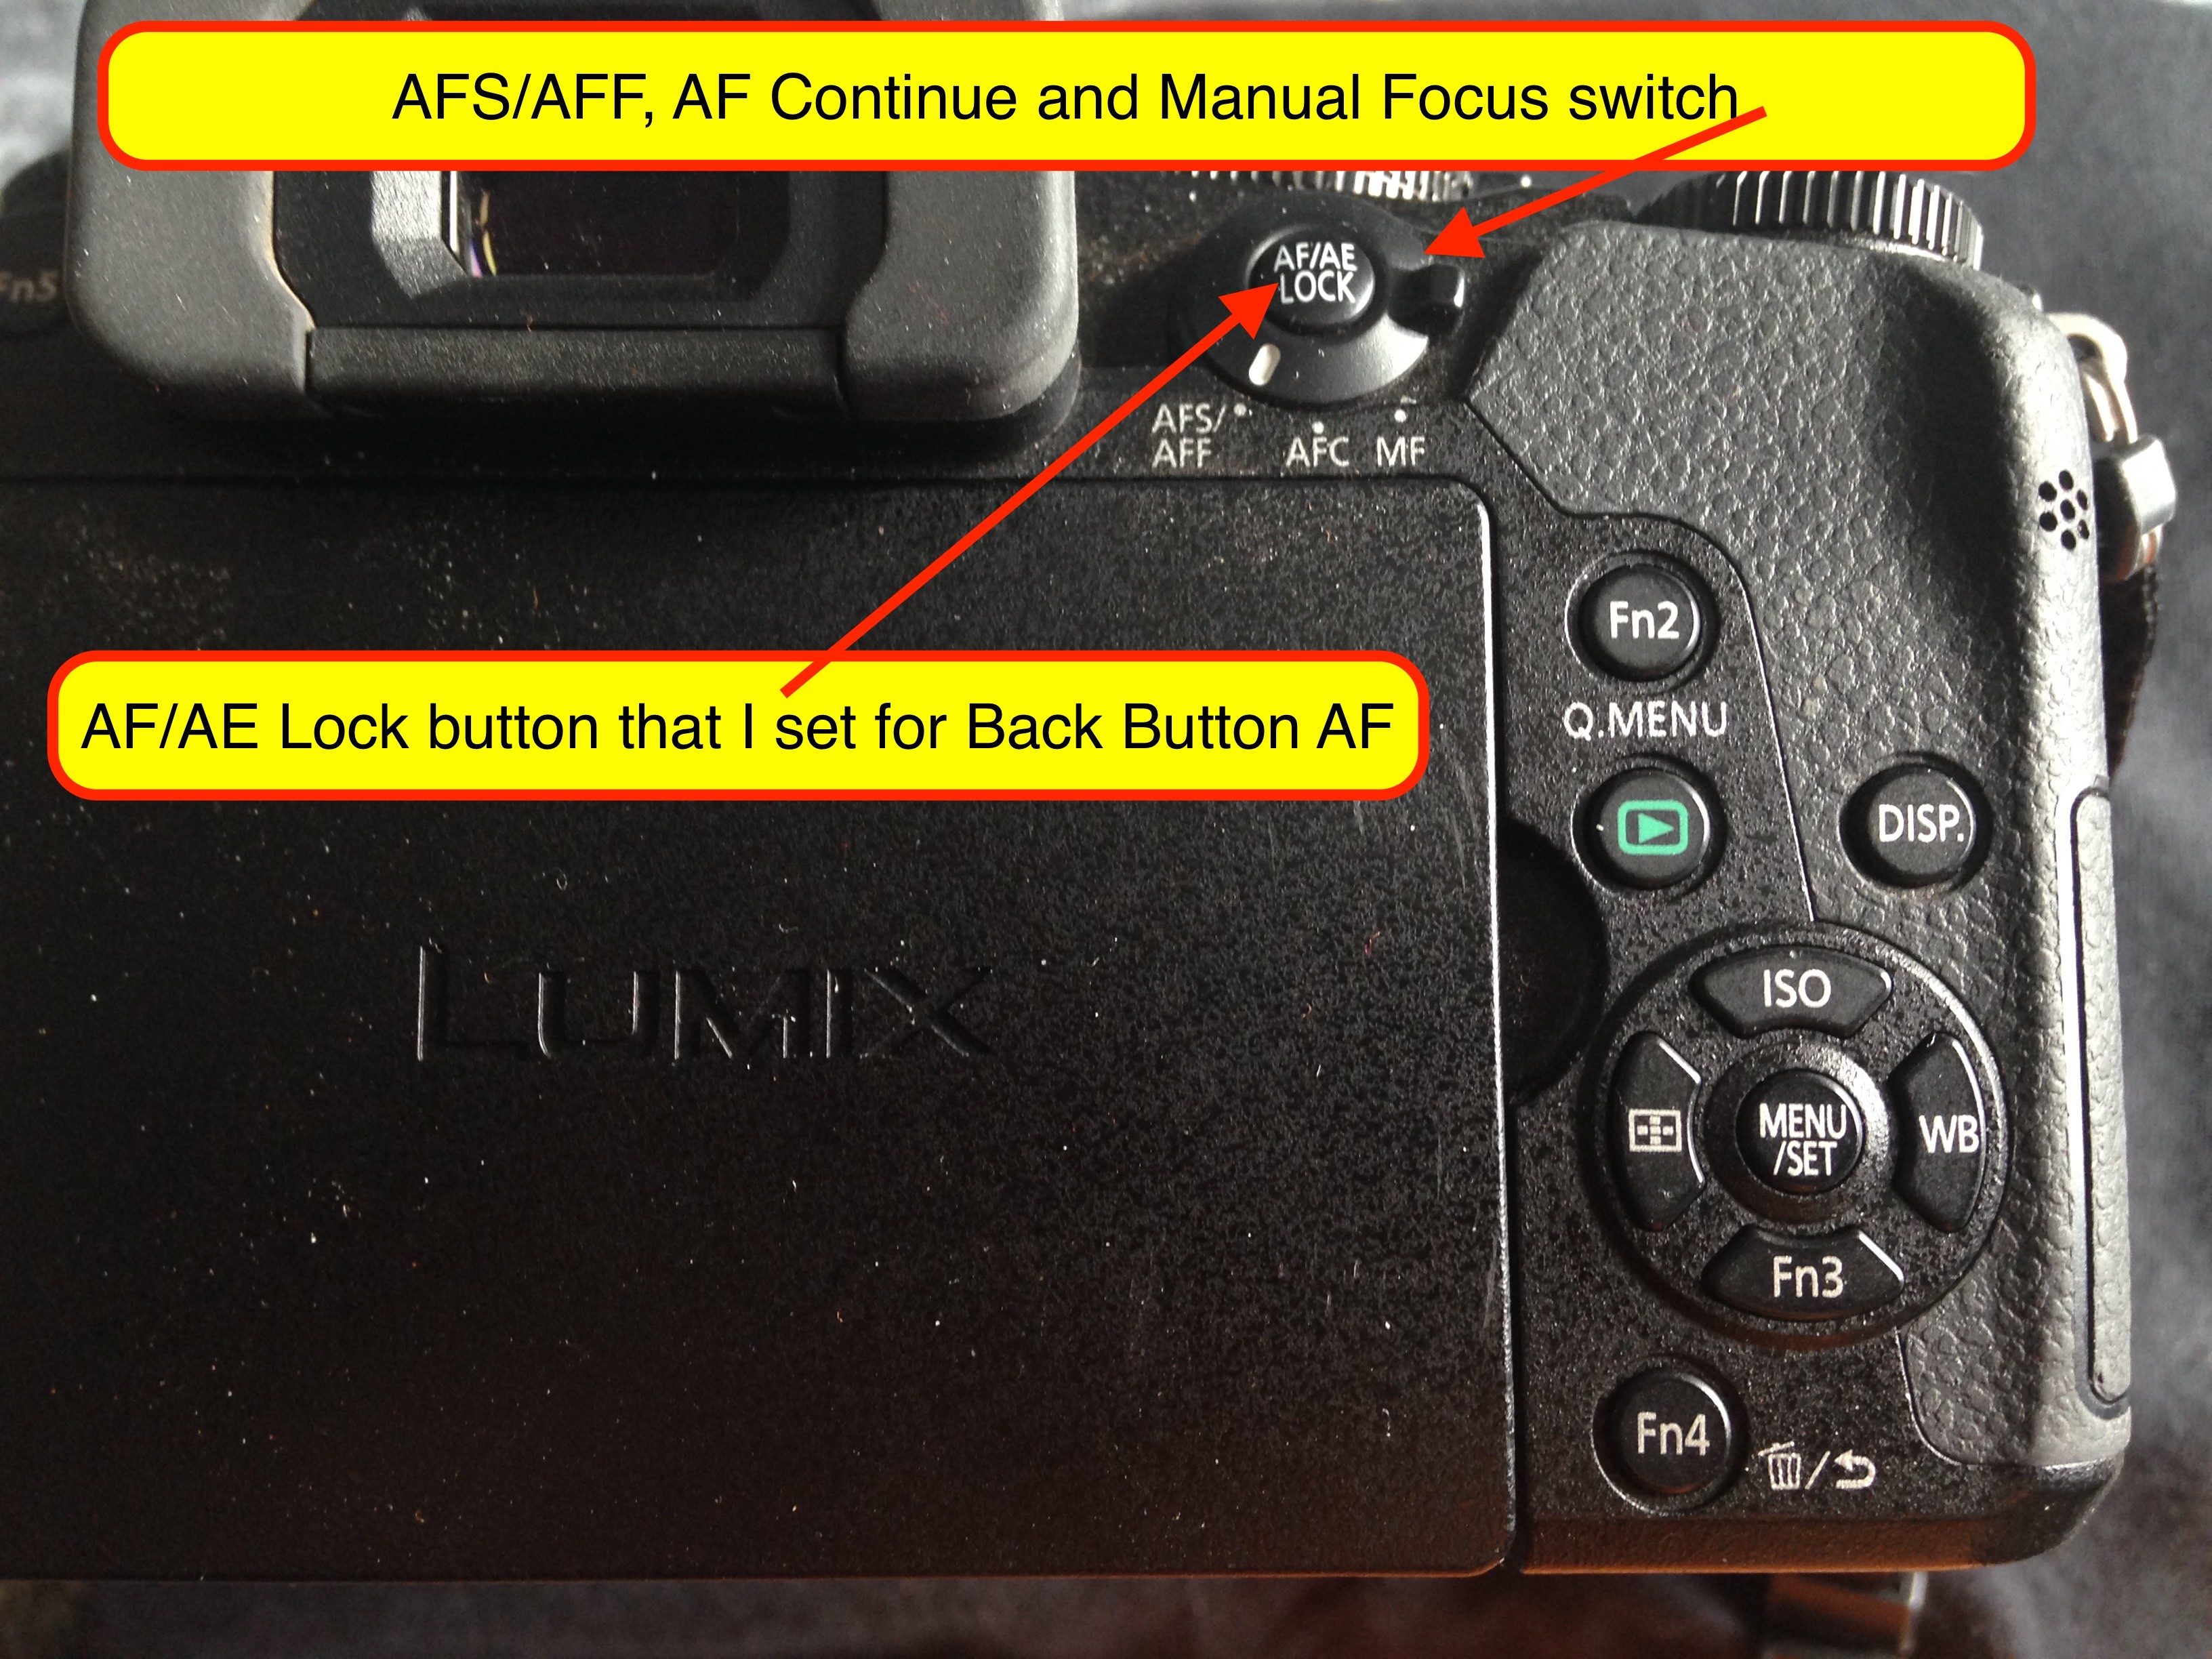
I still most often shoot with AF-C, but I think we all know there are times it’s nice to have the confirmation of a tiny beep when AF-S has connected. Having the ability to move between the two positions is a nice option but not totally necessary if you use Back Button AF.
AF/AE Lock Button
This little button encircled by the Focus Mode lever gives up more power and efficiency than most realize. Back in 1989, Canon introduced the exceptionally great idea of disconnecting focus from the front shutter button and allowing us to place AF activation on the rear of the camera. Nikon followed suit with the F5, and virtually all camera makers have seen the light and provide something similar. Lumix is no exception, and with the AF/AE button, we have the ability to program it to act as our AF Start button. This is such an essential part of any serious camera today. Back Button AF is all about giving us the ability to choose the exact spot within the frame we want in focus. Pointing the AF sensor at the subject, pushing the Back Button AF to engage focus, letting up to lock that focus, then recomposing, makes it much easier to create well composed, interesting photographs. With Back Button AF there is no longer any need to focus on your subject, push the shutter button half way down, recompose, and shoot. Back Button AF simplifies focus and recomposing dramatically.
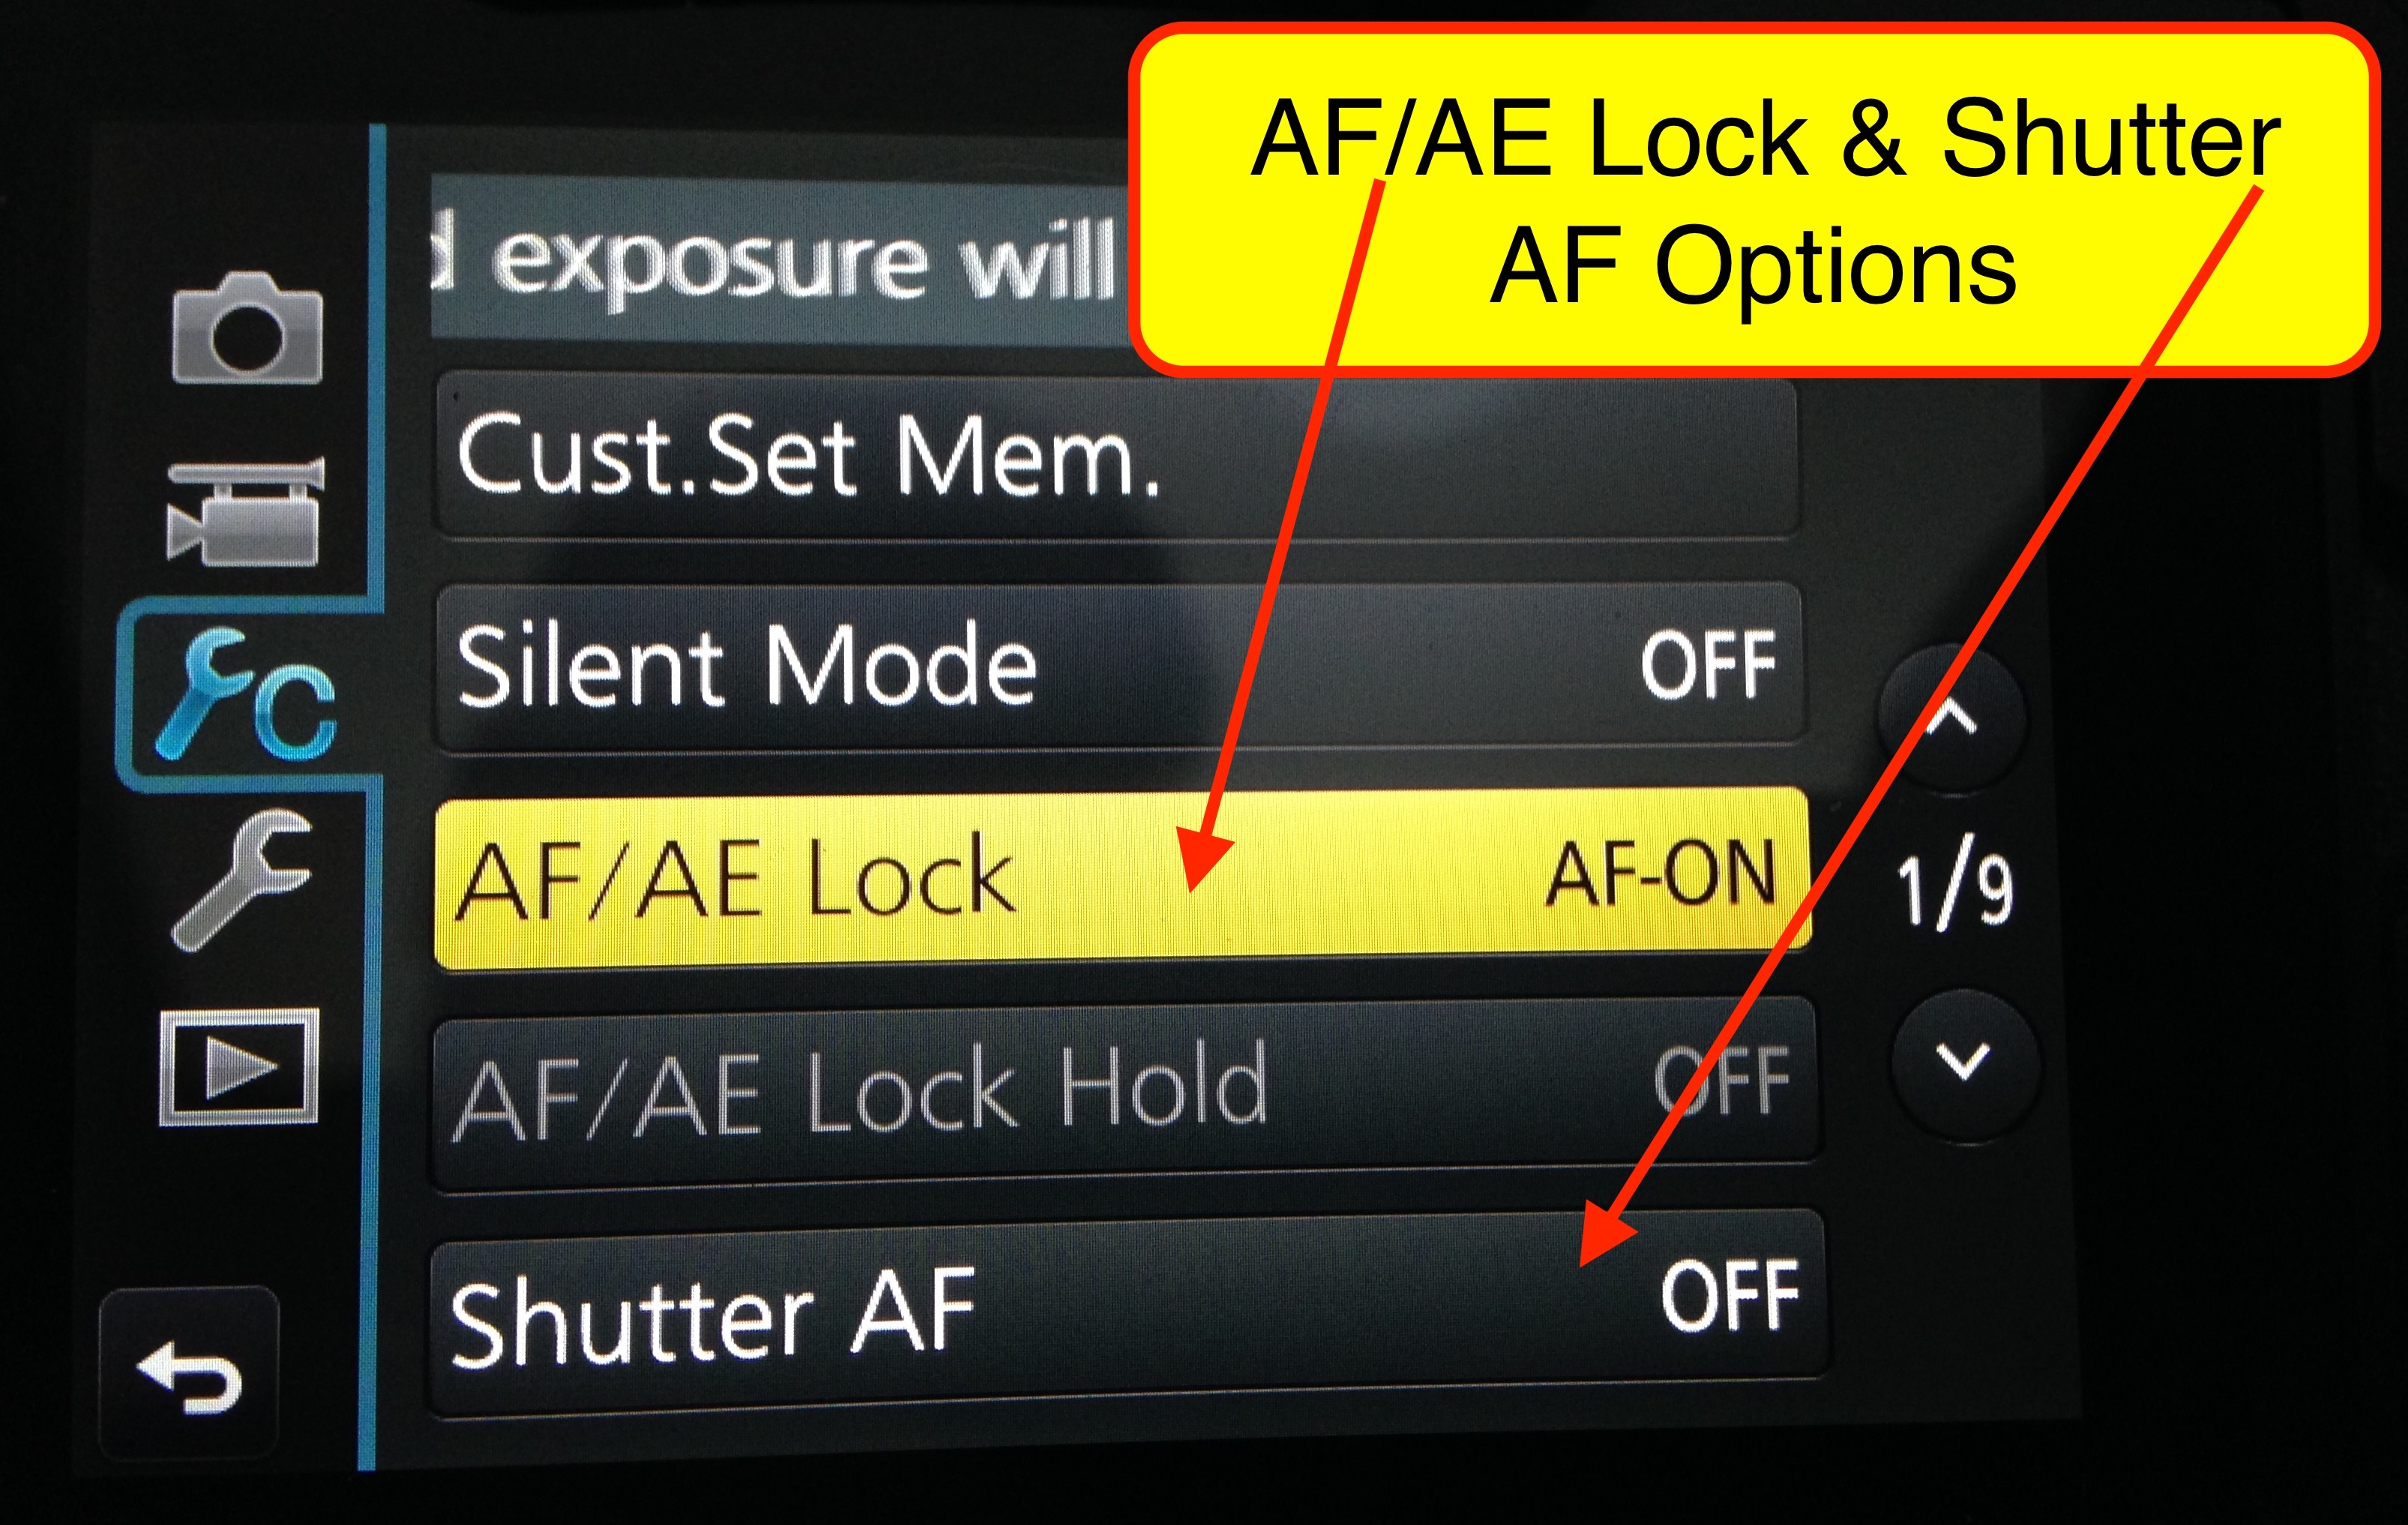
To get the G85 set up for Back Button AF, you first have to turn off the front shutter AF. To do this you simply go into the Menu to the Custom screen (wrench with C). Shutter AF is on the first page of the Menu, last item on the screen, 1/9 pages shown on the far right. Move the selection over to the Shutter AF, select it, and turn it to OFF. Next, look two options up from the Shutter AF and you’ll see AF/AE is to setup the AE/AF Lock Button to AF. Set these custom functions and you’re now ready for the easiest, most effective us of your AF system.
Other Back of the Camera Buttons
The G85 has what’s become Panasonic’s standardized button layout for most of their second tier cameras. On the right side of the back of the body, there is Quick Menu, Display, Review, ISO, WB, AF Pattern, and three different Fn buttons that allow almost limitless custom settings.
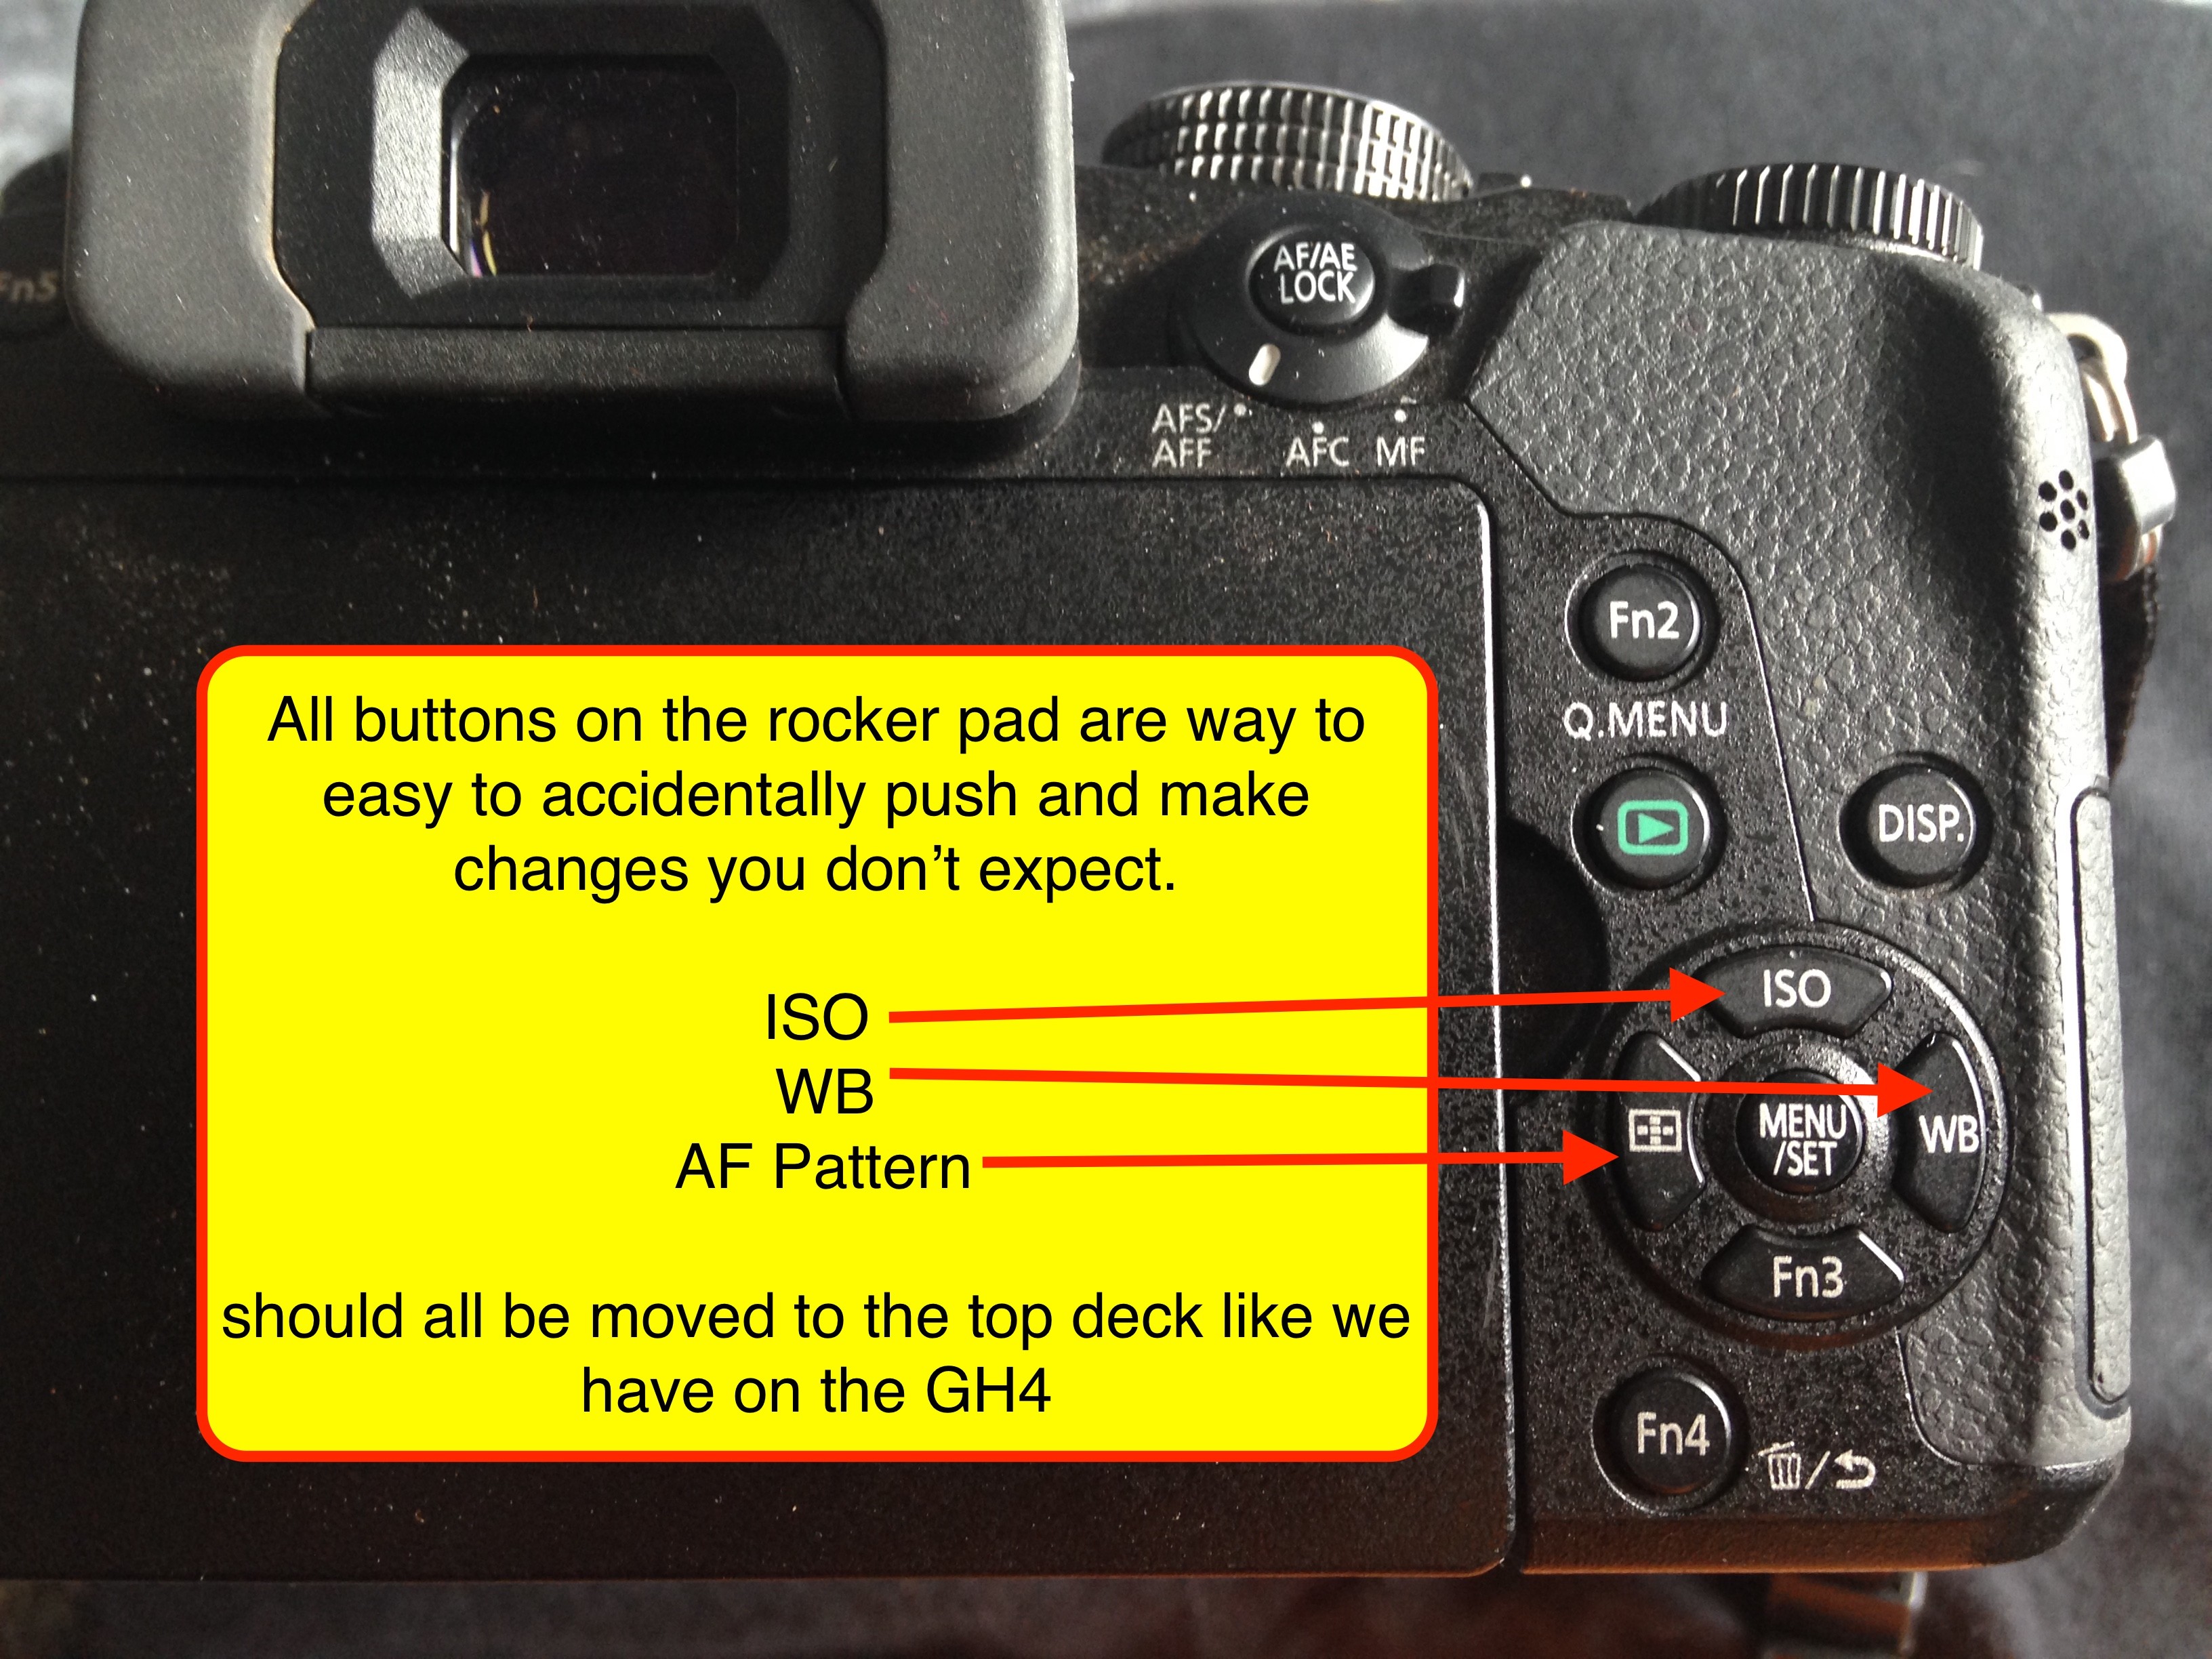
The format and placement of these buttons are very straightforward which is a good thing. However, they’re also very easy to accidentally push without knowing you did so, throwing your camera into changes you don’t expect.
While on my recent trip to Kenya, it finally became clear that the placement of these buttons is very difficult for some people. I’ve spent a great deal time with our NE Explorers trying to help them figure out which of these buttons they accidentally hit and how to remove the unintended changes. Thankfully, Lumix has a very helpful feature in the custom Fn button to “Lock Cursor Pad” which I will describe momentarily.

 NE Explorers with their Lumix cameras in Madagascar. Lots of models, many with the buttons on the back of the camera I just discussed. This is just one of our many groups that now shoot Lumix, and having access to so many users gives me a unique perspective to understand what is working and what is not. The back buttons are not working, unfortunately.
Fn Buttons Galore
Customizing the G85 by way of function buttons (Fn) is almost limitless. Olympus is given a lot of credit for being able to modify their camera settings in almost unthinkable ways, but Panasonic is equally customizable. The number of Fn buttons on the G85 is ELEVEN. Yes, 11 different Fn buttons for changing the way your camera operates, so it’s more intuitive for YOU. I’m not going to describe all that each button can do except one, the Fn11 button. Why the Fn11 button? Because it helps solve the accidental button pushing I mentioned above.
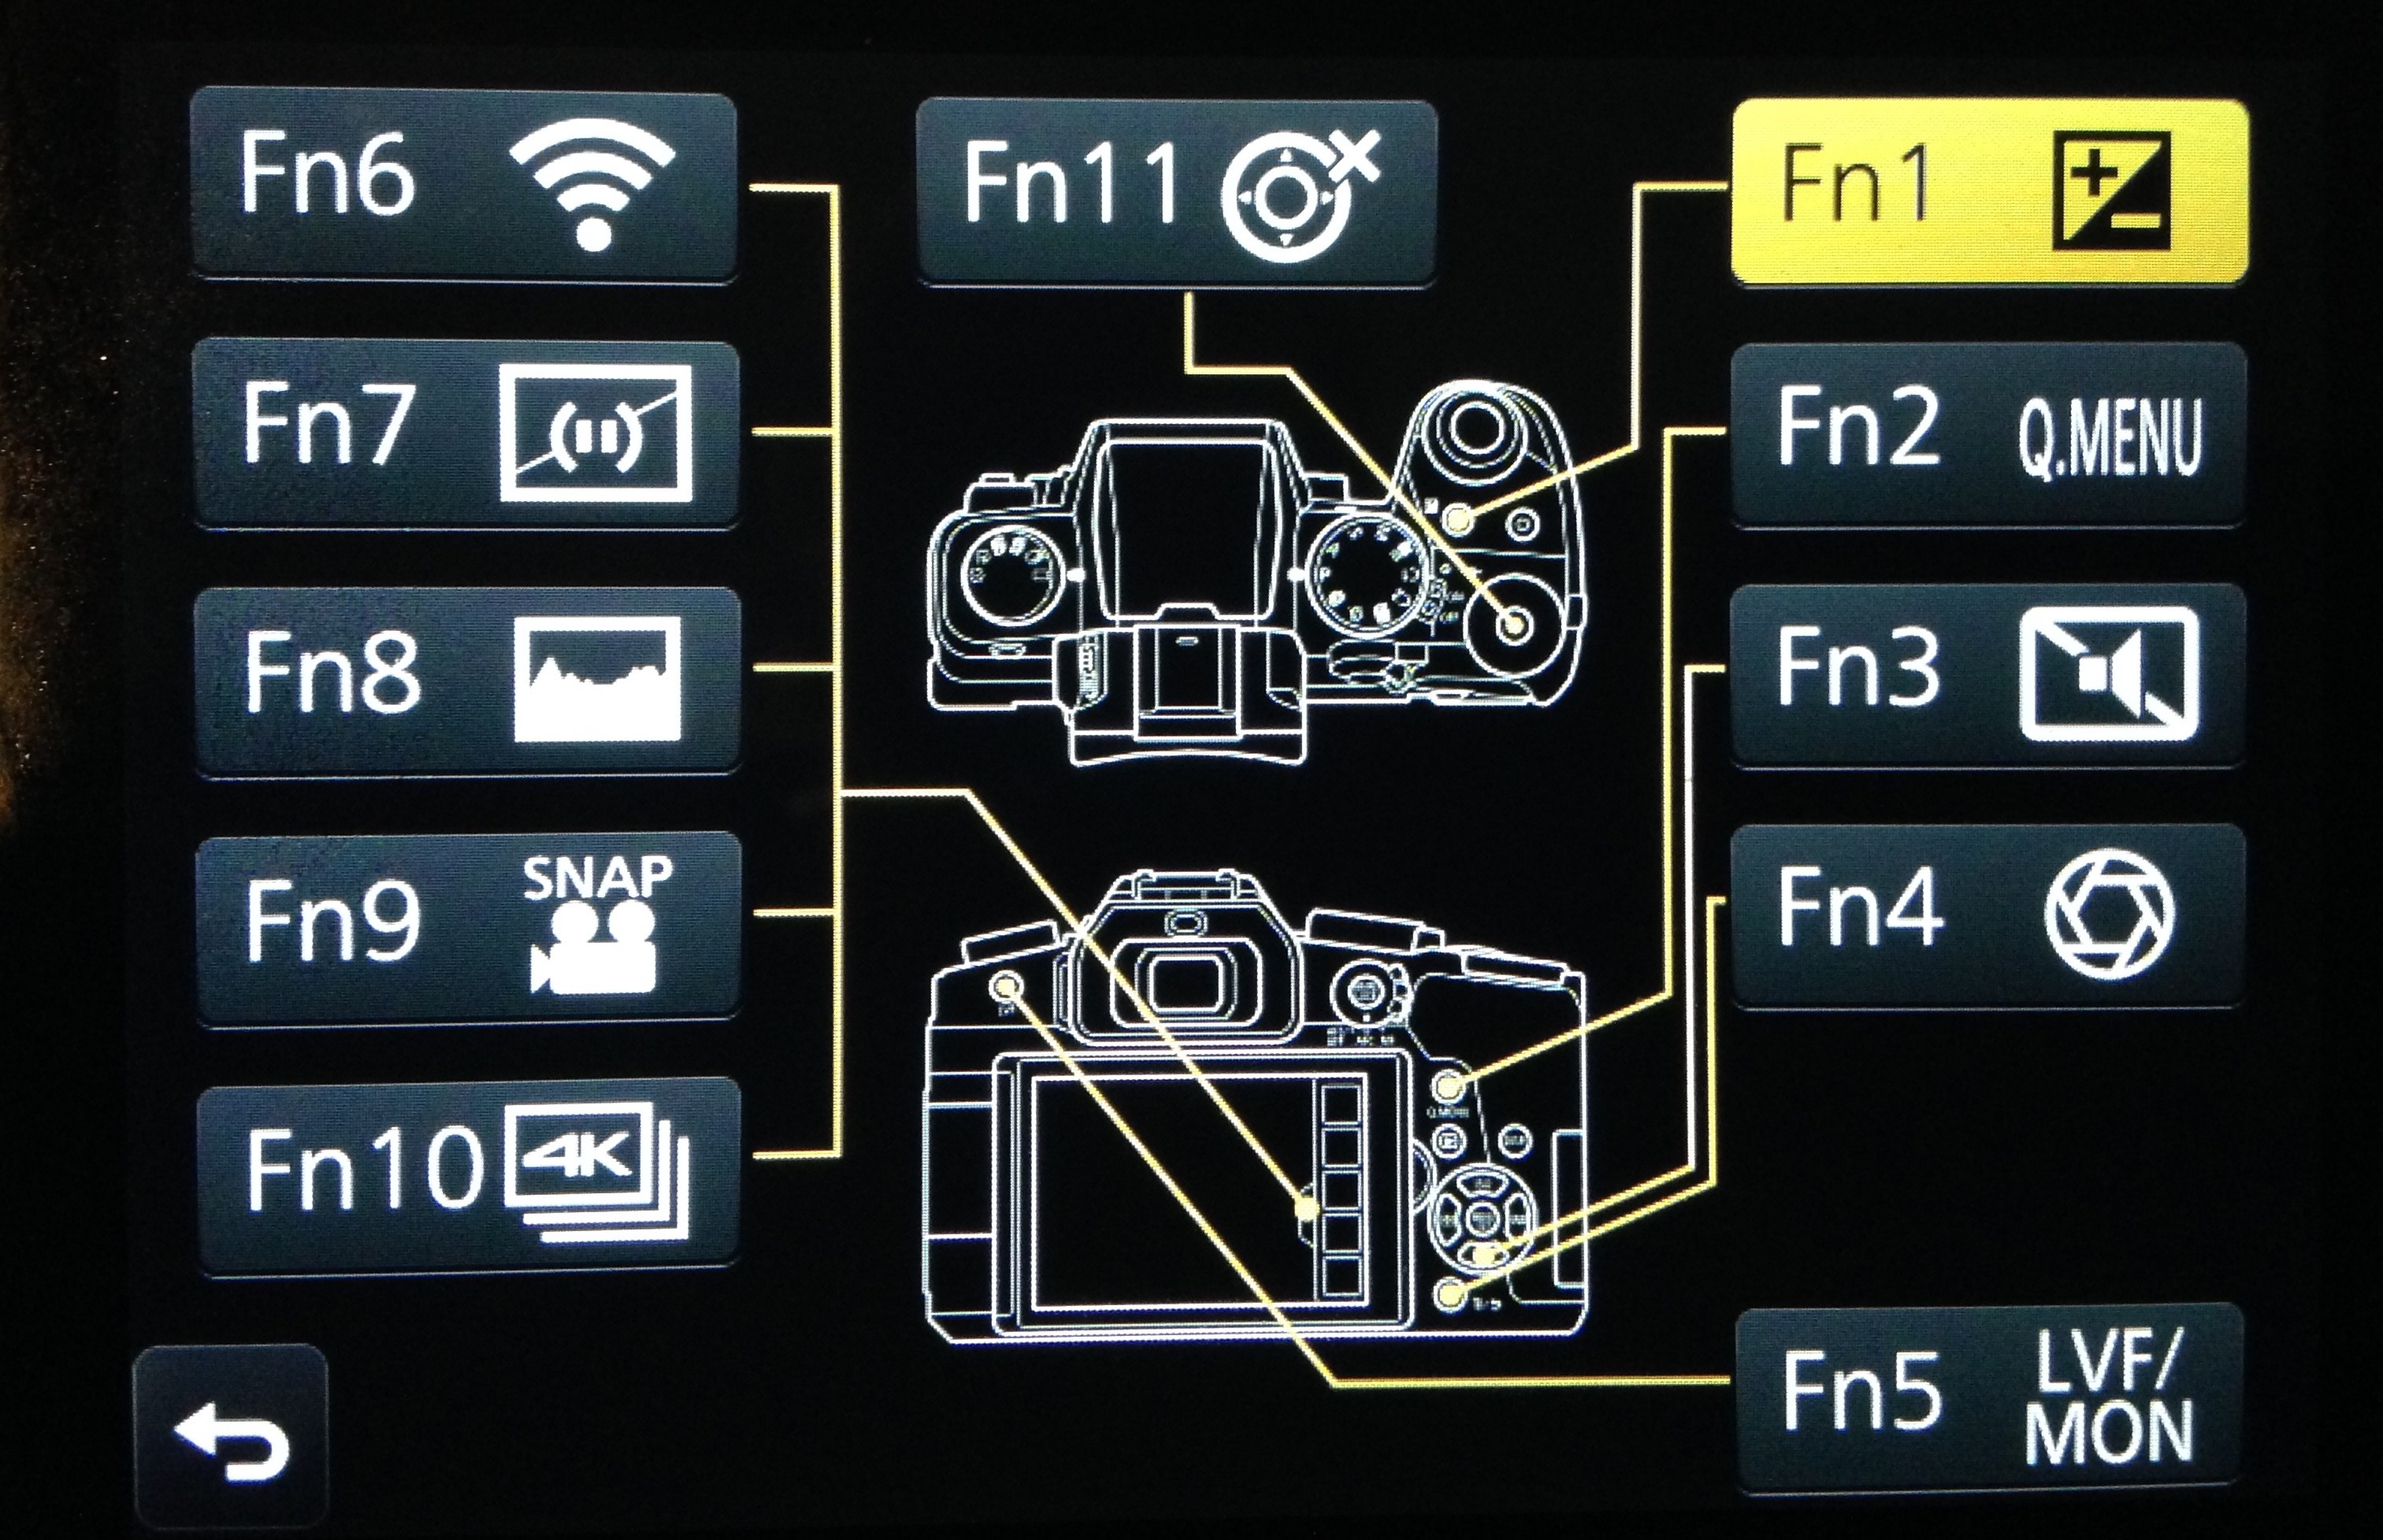
 Fn button diagram in the Menu of the G85 showing the many different Fn buttons and what they do in the default mode. There are numerous more options for each button you select.
The Fn11 button is located in the very center of the Rear Dial. By setting this button to lock the Cursor Pad you help solve the issue of hitting buttons you don’t intend to push. One downside, however, is each time you want to change the options on the Cursor Pad like WB, ISO, AF Pattern, Menu Set, or the Fn3 button, you have to unlock the Fn11 button on top of the Main Rear dial. Not a huge issue but something that takes a bit more time if you’re having to work quickly. Once I get this set up for our Explorers it’s a feature they very much appreciate. The Quick Menu button then becomes the go-to option for making changes if they don’t want to unlock the back Cursor Pad.
Finally, if the rear buttons is not your cup of tea there is the GH4 and now the GH5 that places the most important buttons on the camera’s top deck. These two cameras incorporate the ultimate design for quick changes and ease of use.
Rear LCD
The G85 has a flip-out LCD that allows you to angle it up, down, and forward. Some other cameras either have an LCD that doesn’t move at all or one that just angles up or down. I prefer the version Lumix gives us which allows for more overall options. One of those options is Touchscreen technology.
Like all Lumix cameras, the G85 has a fabulous touch sensitive LCD. Once you get used to maneuvering a camera via touch, you won’t remember how you lived without it. Ok, you might be different than me, but that’s how I feel about the superb touchscreen technology Panasonic has pioneered. Like video capture in still photography cameras, touchscreens will eventually be on all models. But for right now Panasonic is the king when it comes to quality touchscreen technology that helps us move through the Menu options at lighting speed.
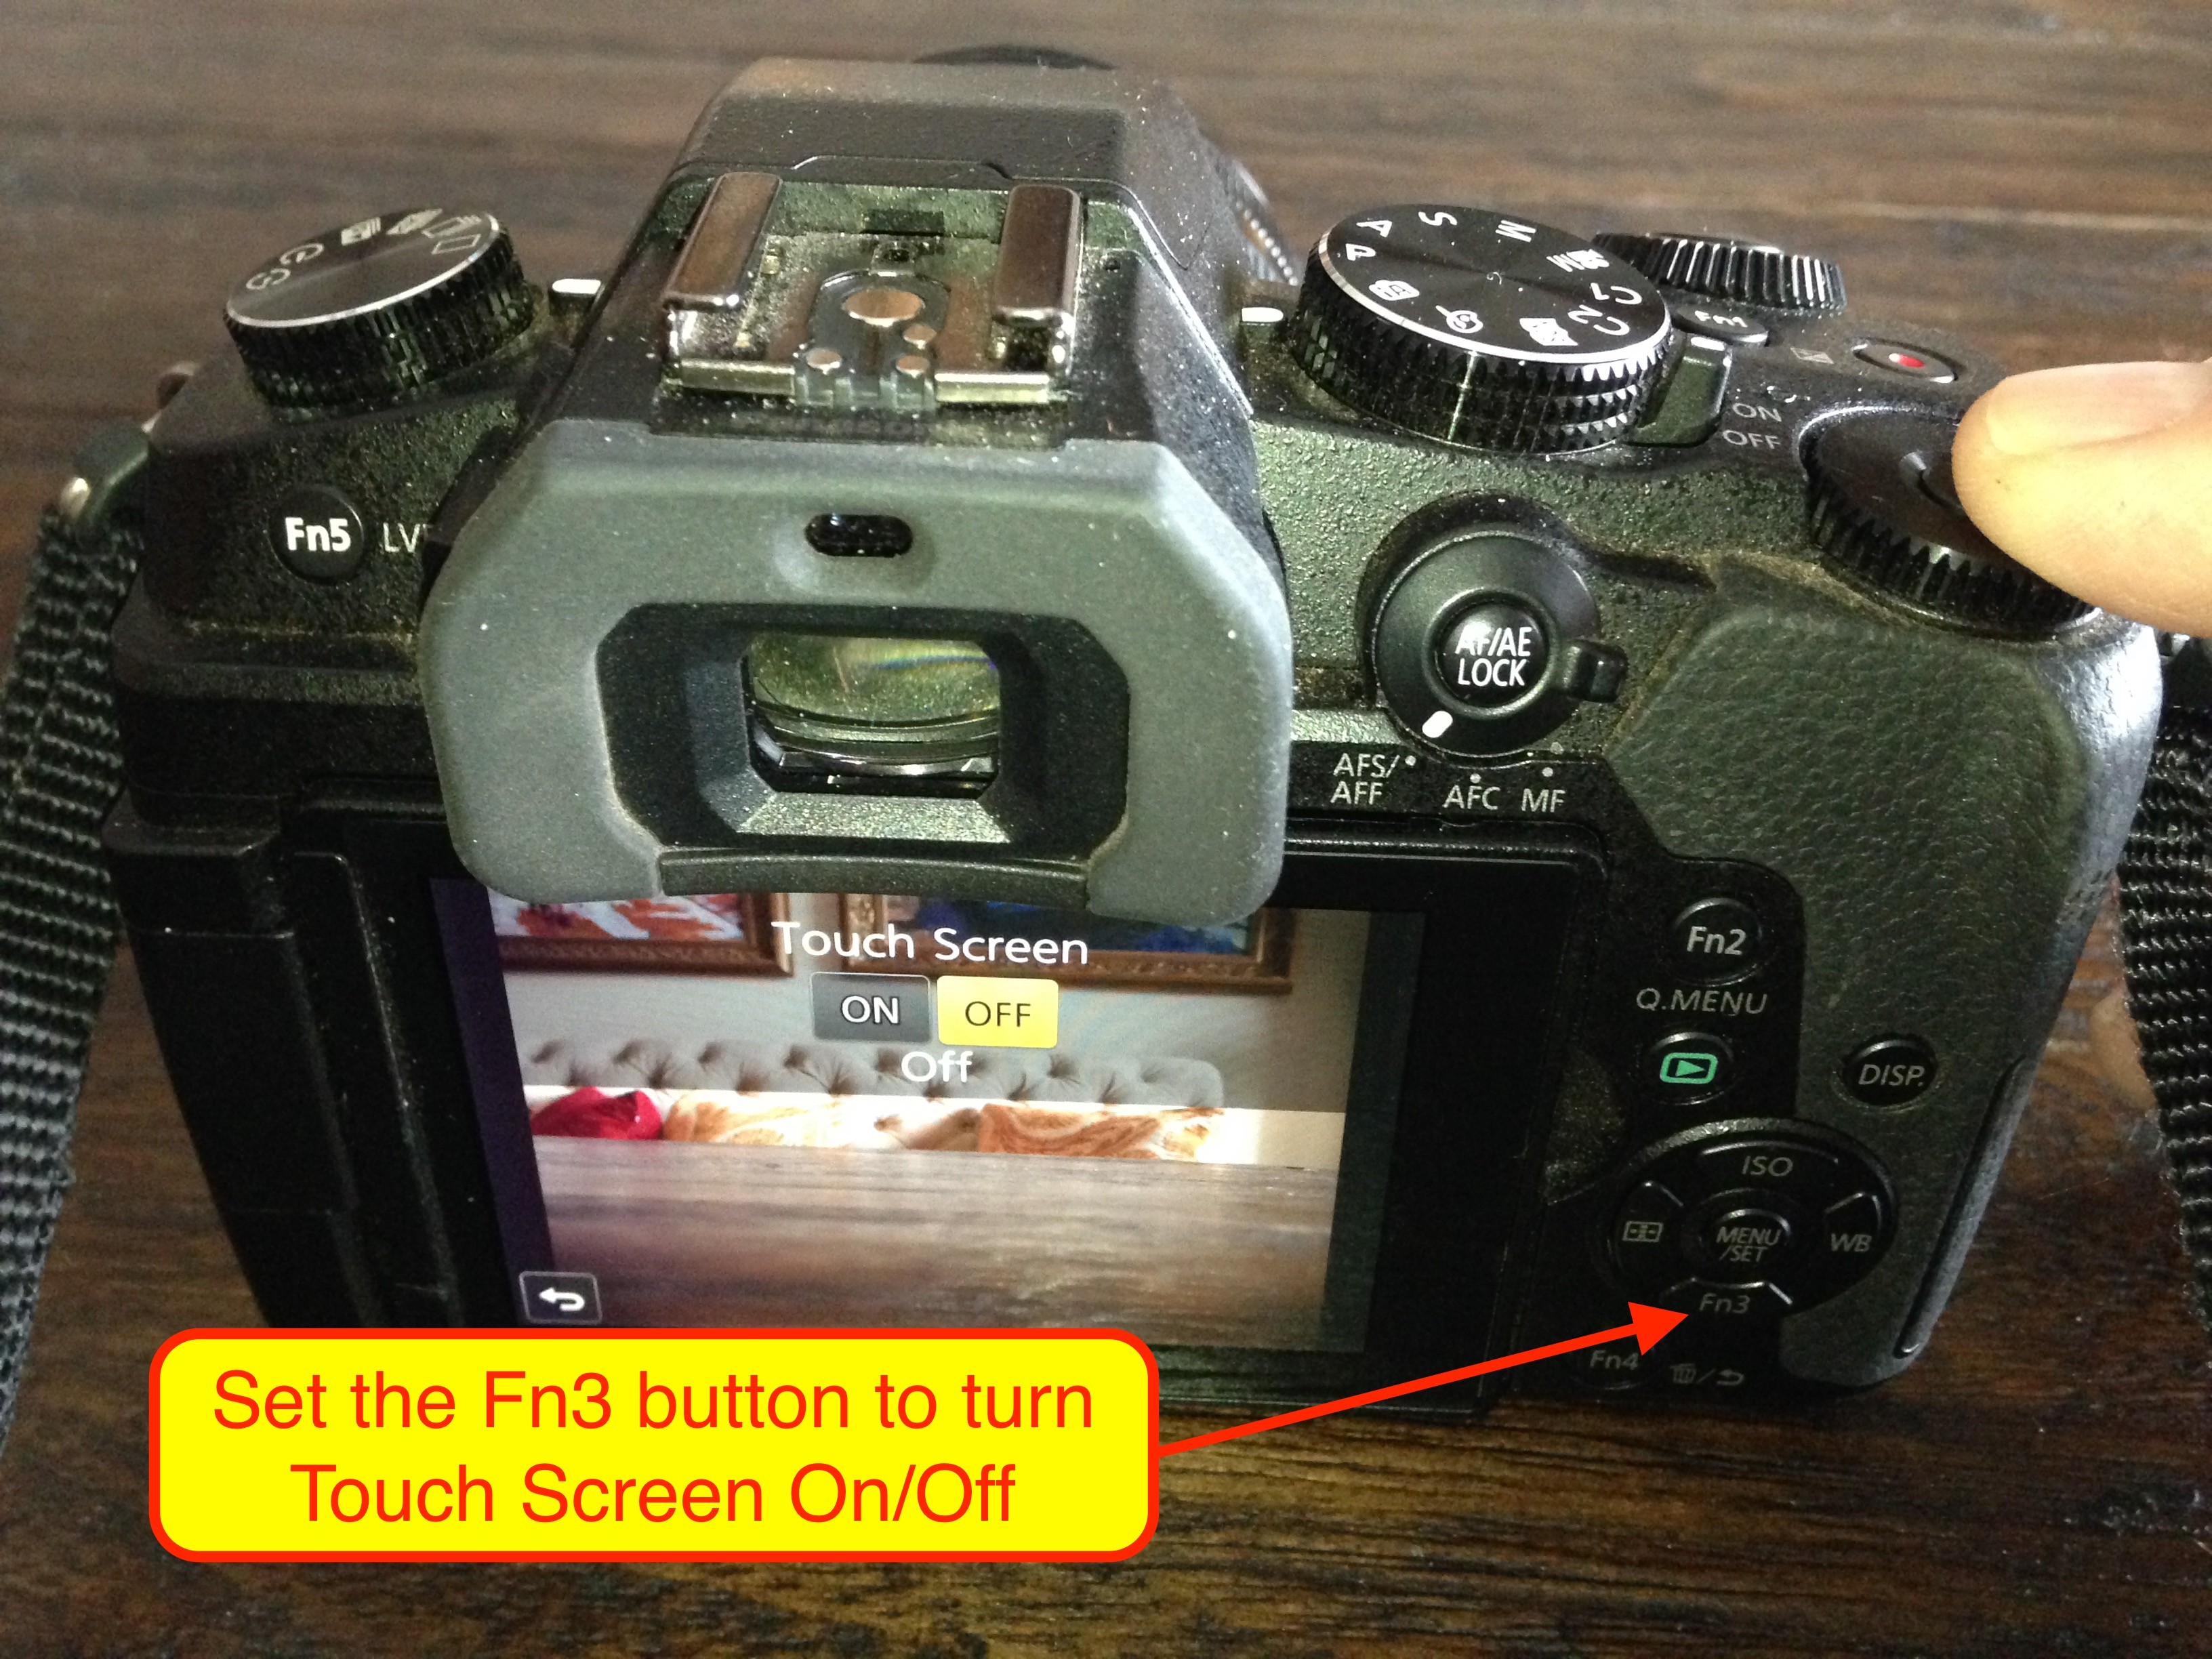
My favorite of all touchscreen options is the ability to move the AF sensor with my thumb across the back LCD. Even better is the ability to do the same when the camera is placed to my eye. It’s without a doubt the fastest way to move any AF sensor I’ve ever experienced. One slight downside is how easy you can move the AF sensor by accidentally touching your nose to the screen. To solve this you can turn the rear LCD Touch capabilities off. The touchscreen takes a bit of practice for AF, but I feel it’s well worth it.
One simple option I do that helps keep the sensor in a position I expect is to touch the middle of the screen with my shooting hand’s thumb as I pull the camera to my eye for each new session of pictures. By doing this, I move the AF sensor to the middle position, no matter where it may have gotten knocked off too. After awhile this becomes a habit and solves the issue of “Do you know where your AF sensor spot is?”
 Another option is to lock the AF spot in place. When shooting with the Back Button AF, I’ll often place the AF sensor in the middle of the LCD/viewfinder and leave it there, using the Back Button AF to focus, compose, and shoot, release it to lock focus, and then recompose and shoot. This is exactly the way I operated my Nikons for over two decades. In other words, we can replicate the same shooting experience we’ve had with both Nikon and Canon.
Electronic Viewfinder AKA EVF
Electronic viewfinders have always been a criticism of all the new mirrorless cameras. Although the G85 has a reasonable EVF, it’s not the experience you get when looking through a traditional glass viewfinder of a DSLR. That said, there are some definite advantages when shooting in very dark light; an electronic viewfinder is actually easier to see. In very bright light, it sometimes darkens too much for easy viewing so it’s a trade-off. There may be a custom setting for having the camera not darken the LCD so much. If anyone knows of this option I would love to see the answer in the comments.
Another benefit to an electronic viewfinder is it shows you a wealth of information. For me the most important viewable item is the histogram. To have the histogram visible before I shoot, is one of the best tools mirrorless cameras have given us. It’s absolutely indispensable. The number of items you have visual access of are too many to document, but they are fabulous to have.
High-Speed Shooting
The G85 has some impressive high-speed shooting options, but there are limitations. And because of this, it’s not my first camera I reach for when action is the primary goal. There is Super High Speed, High Speed, Middle Speed, and Low Speed.
In Super High Speed, at 40FPS, you only get JPEGs. In High Speed, what I typically shoot most the time, you get as many as 9FPS in AFS or 6FPS in AF-C. Middle Speed is 6FPS for AF-S and AF-C and Low Speed is 2FPS in both AF-S and AF-C. Below is information from the Lumix G85.
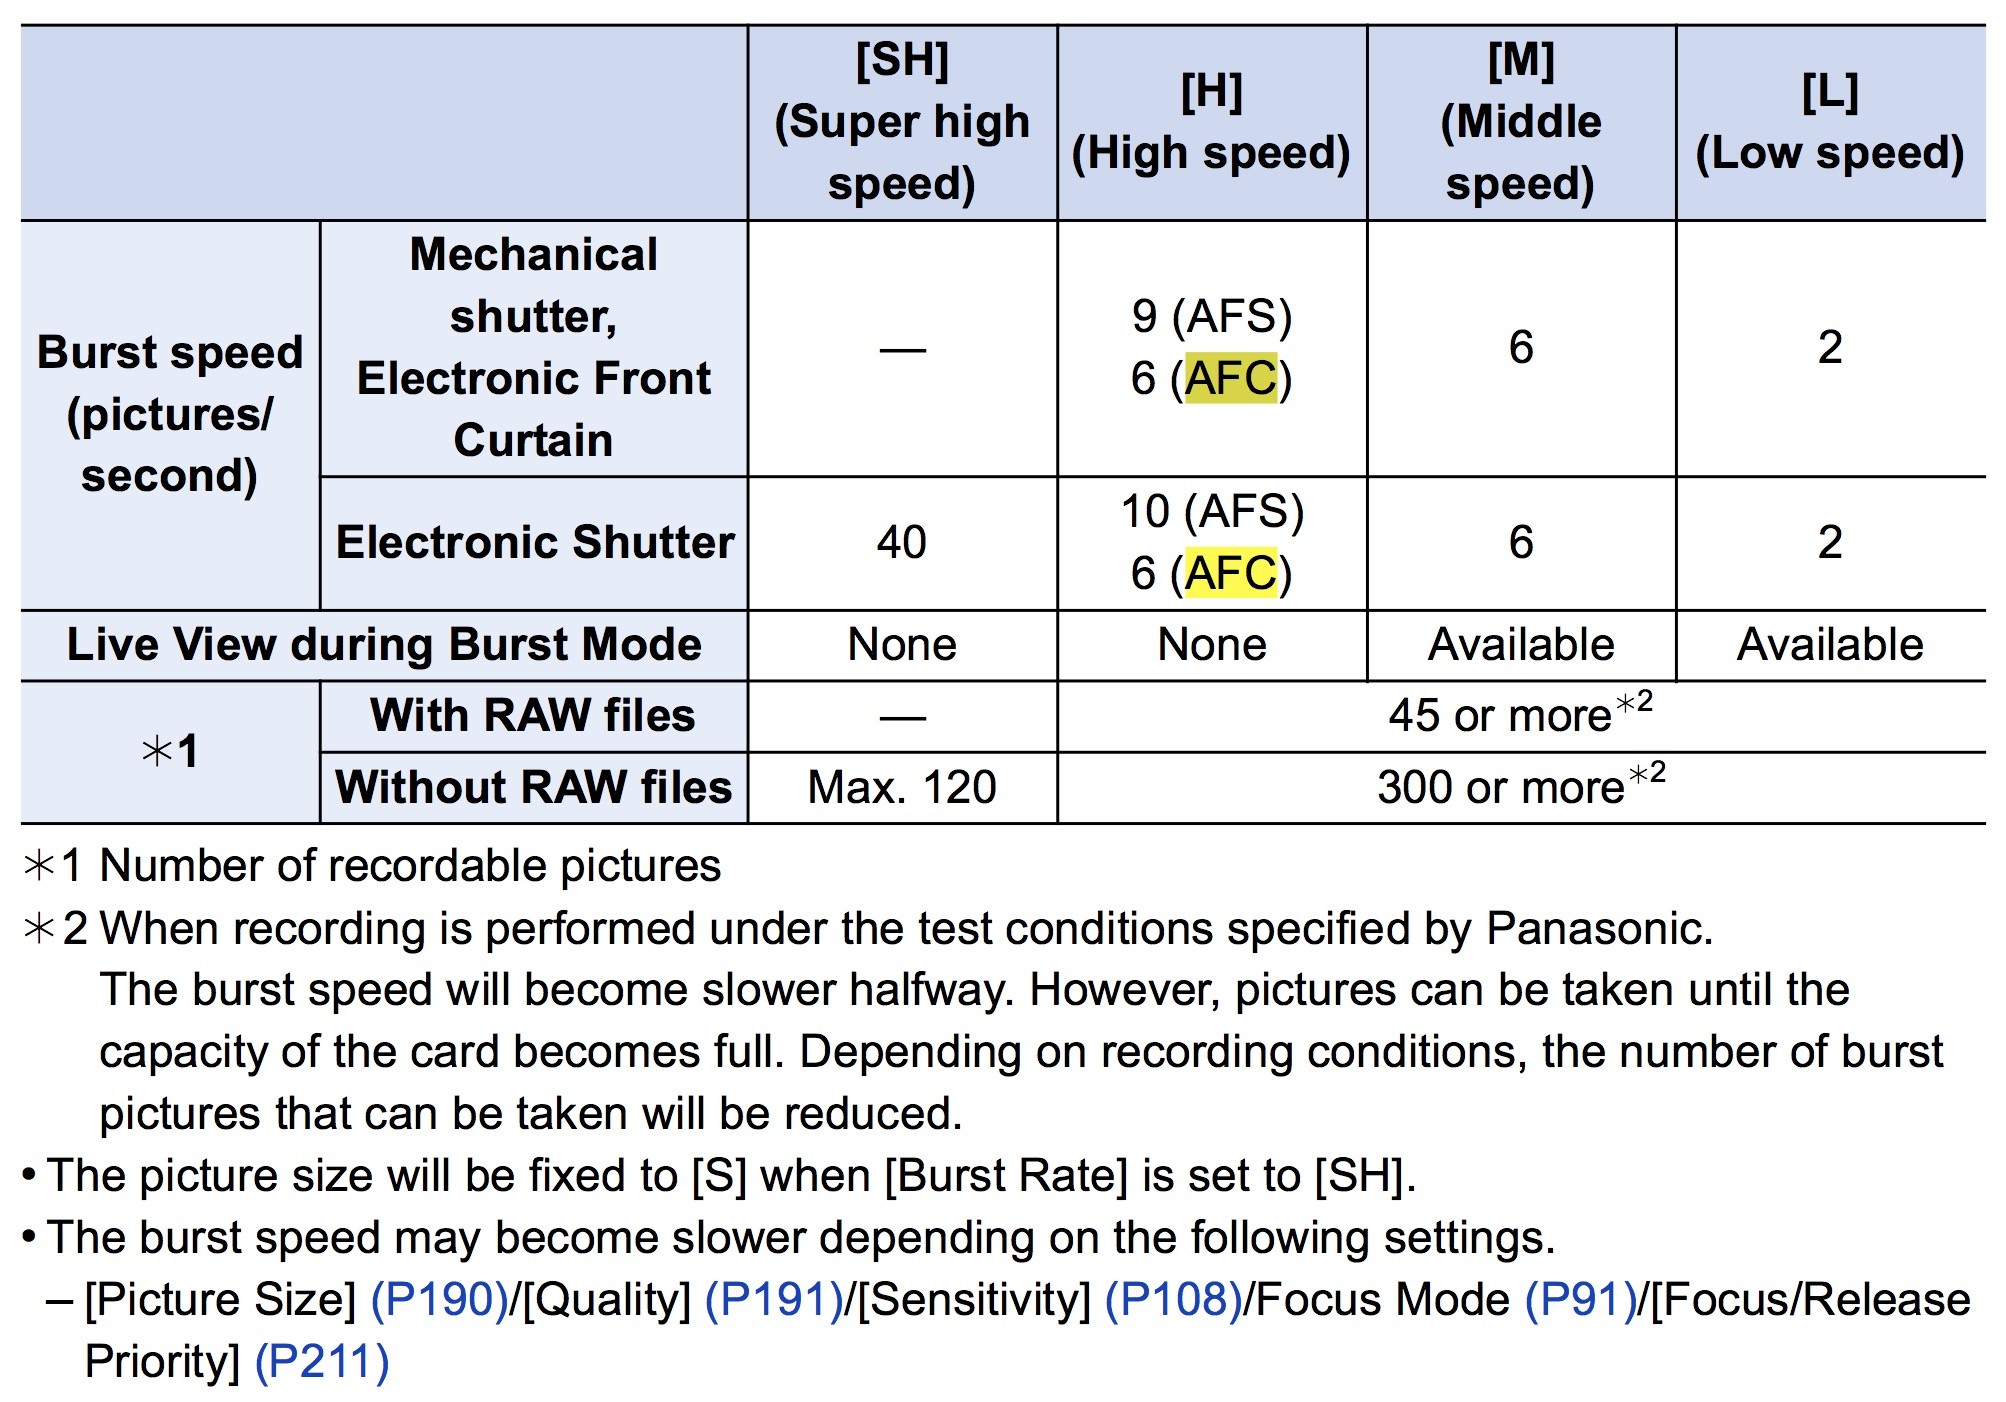
 Page 115 from the G85 manual showing the different AF settings and burst rate speeds.
Economy Mode
One of the biggest complaints of any mirrorless camera typically has to do with how long the battery lasts, or I should say doesn’t last. There are two major reasons why all mirrorless cameras have less than optimum battery life. First is the fact that the bodies are smaller than the large traditional DSLRs. The second is that all mirrorless cameras have to run a mini TV screen either in the viewfinder or the rear LCD. Running these video screens takes power and with that the smaller batteries seem to be at a disadvantage compared to a traditional DSLR.
To help solve this issue Panasonic has introduced a new feature in the G85 that none of their other cameras have. It’s called Economy Mode. Economy Mode simply turns the camera’s LVF off more frequently which you can control by setting a specified amount of time you want. I’ve heard photographers shooting as many as 900 images per battery with this feature turned on. I’ve not had a chance to test this yet so I can’t claim to know, but it’s worth being aware of and trying for yourself. My way of solving the battery issue is to carry 3-4 batteries for a full day’s shoot. Typically I won’t get into even the third battery, but I have them if needed.
This amount of battery consumption could be considered a downside, but frankly there are so many upsides to these Lumix mirrorless cameras that I just accept the shorter battery life.
Wi-Fi Connectivity
Having the ability to get your photos over to your phone or tablet on a moment’s notice is a nice option. The G85 gives you this ability and makes it even easier than earlier Lumix models. Along with the wireless transfer option that’s part of the Panasonic Image App, you can also record GPS locations by way of your phone, and then transfer the GPS data to your camera. The App syncs the date and time of the GPS info with the date and time of your camera and the photos shot. It’s a nice feature but unfortunately transferring this data from your cell phone takes much too long. I would love to see Panasonic speed the GPS transfer speed up.
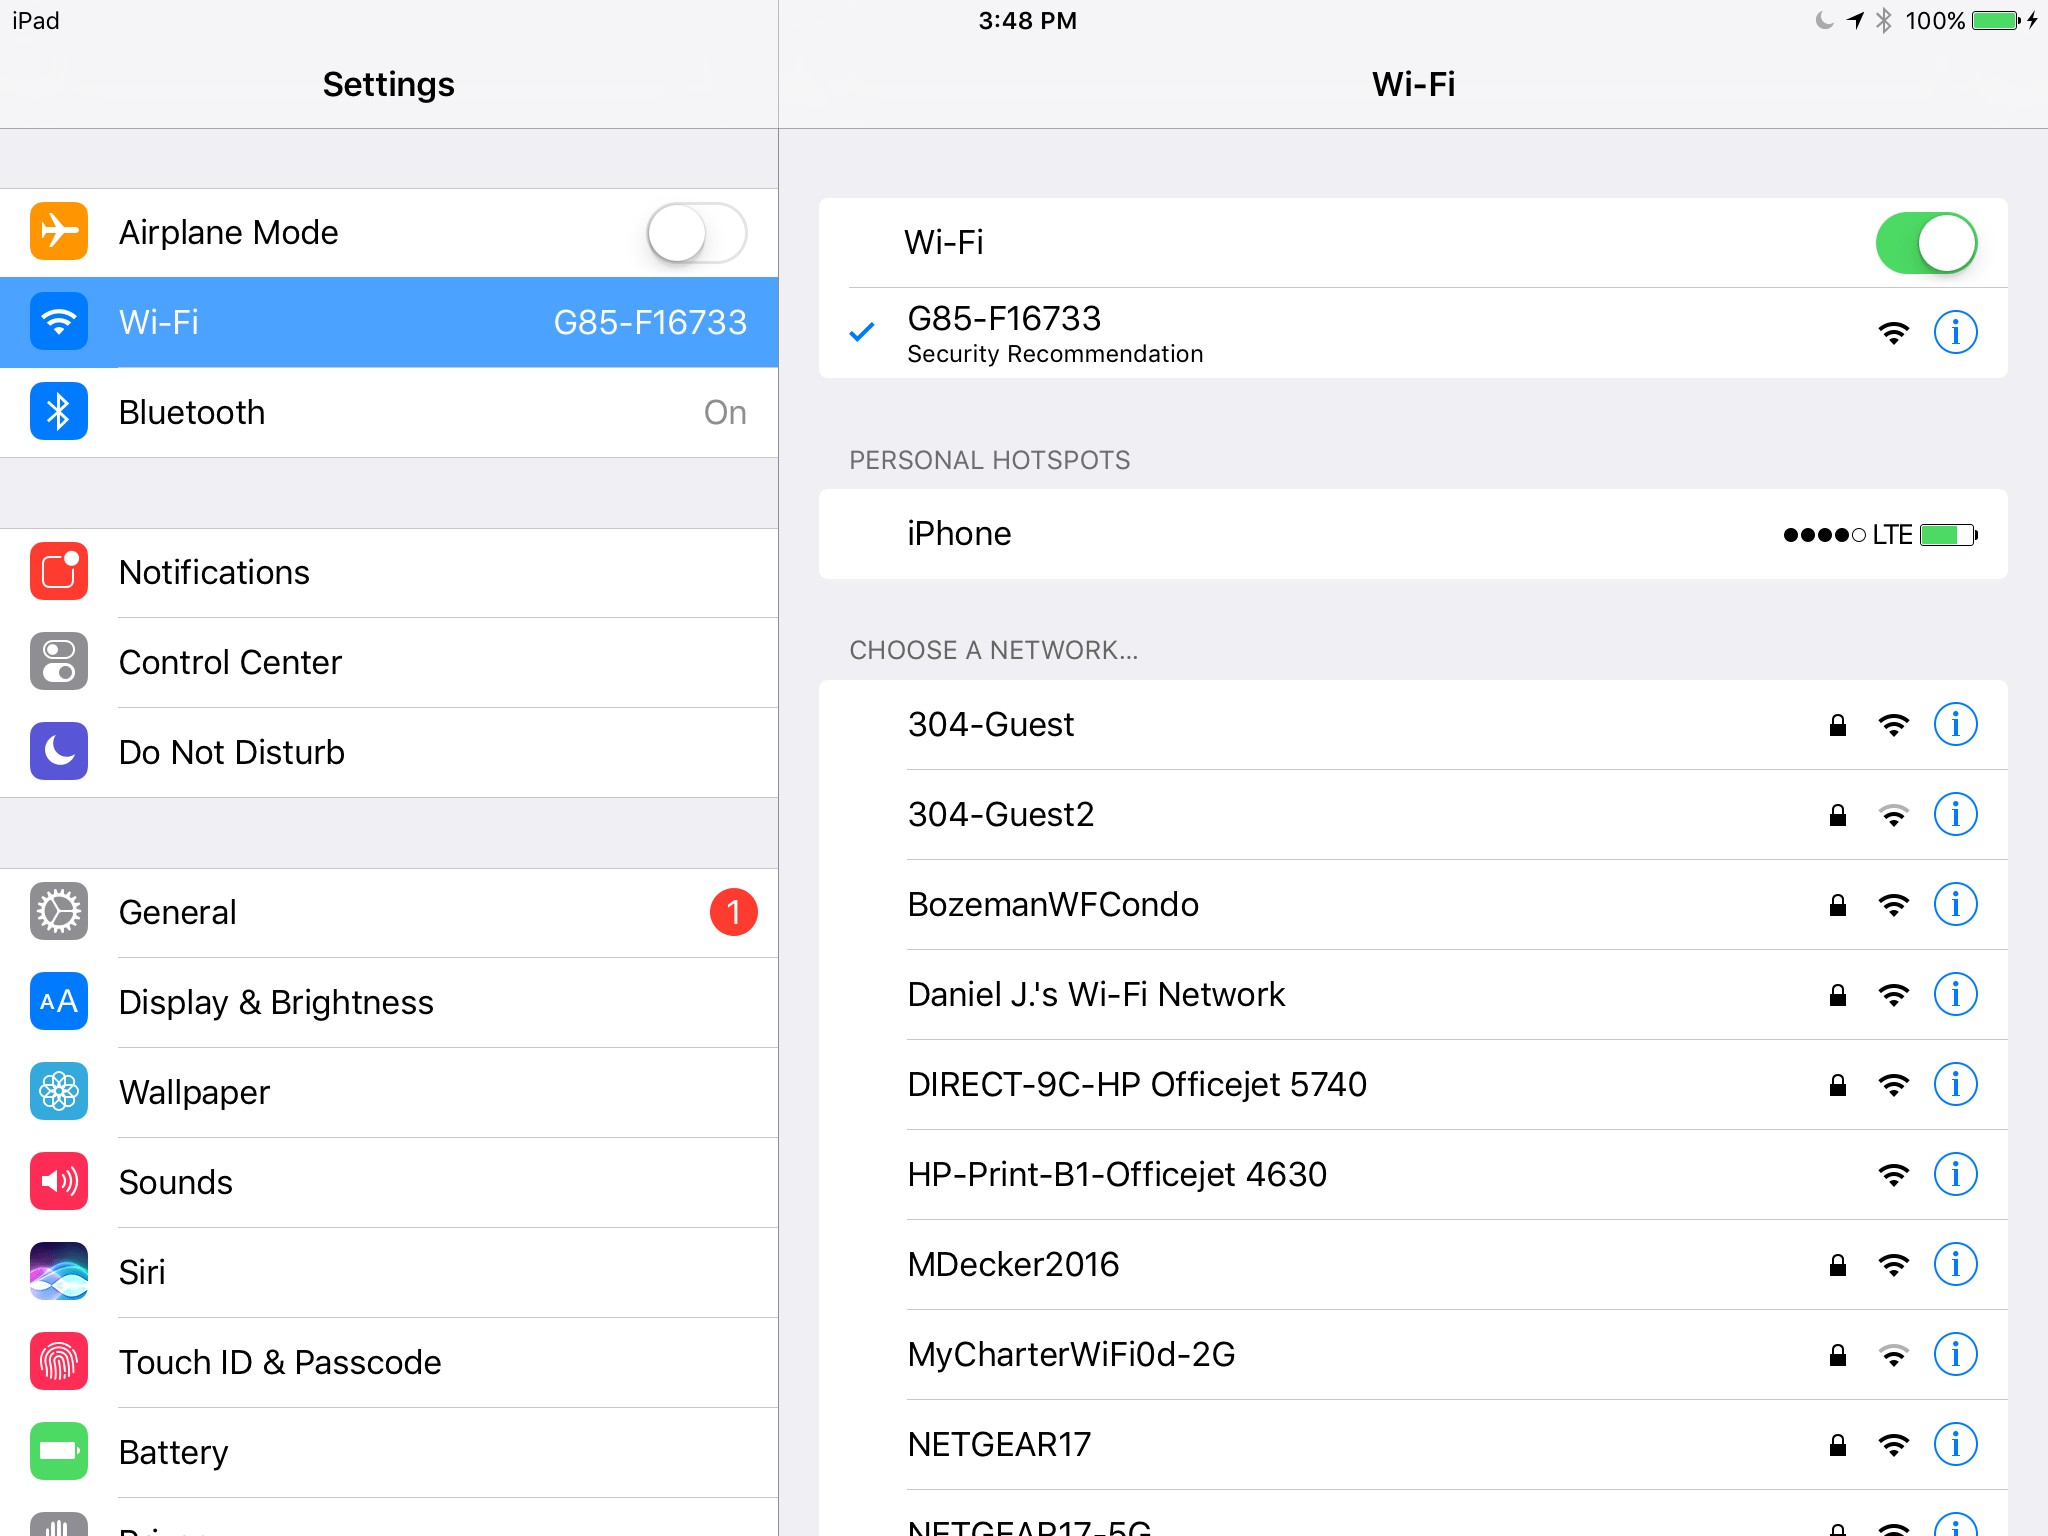
 Notice I’ve selected the G85 to be hooked up, not my normal router for the Internet that my iPad is normally hooked to.
One of the most important things to know about setting up the Panasonic Image App is that before you can see your camera you have to connect the G85 to the wireless router. When I first started using Lumix wireless transfer I was regularly frustrated . I solved that problem by remembering that before even starting your Panasonic Image App, you need to open the Settings in the menu of your mobile device. Make sure your camera’s Wi-Fi is on. You do that by making sure the G85’s touchscreen is on, tapping on the little < tab on the right side of LCD. That < is a tab for opening additional items; tap on it, and at the top right corner of the LCD you’ll see a wireless icon that looks like what we have on a Mac laptop. It looks like a pizza:) and similar to the image you see shown to the right. Tap on it and it will bring you to the next screen that asks if this is a New Connection or Select Destination from History.
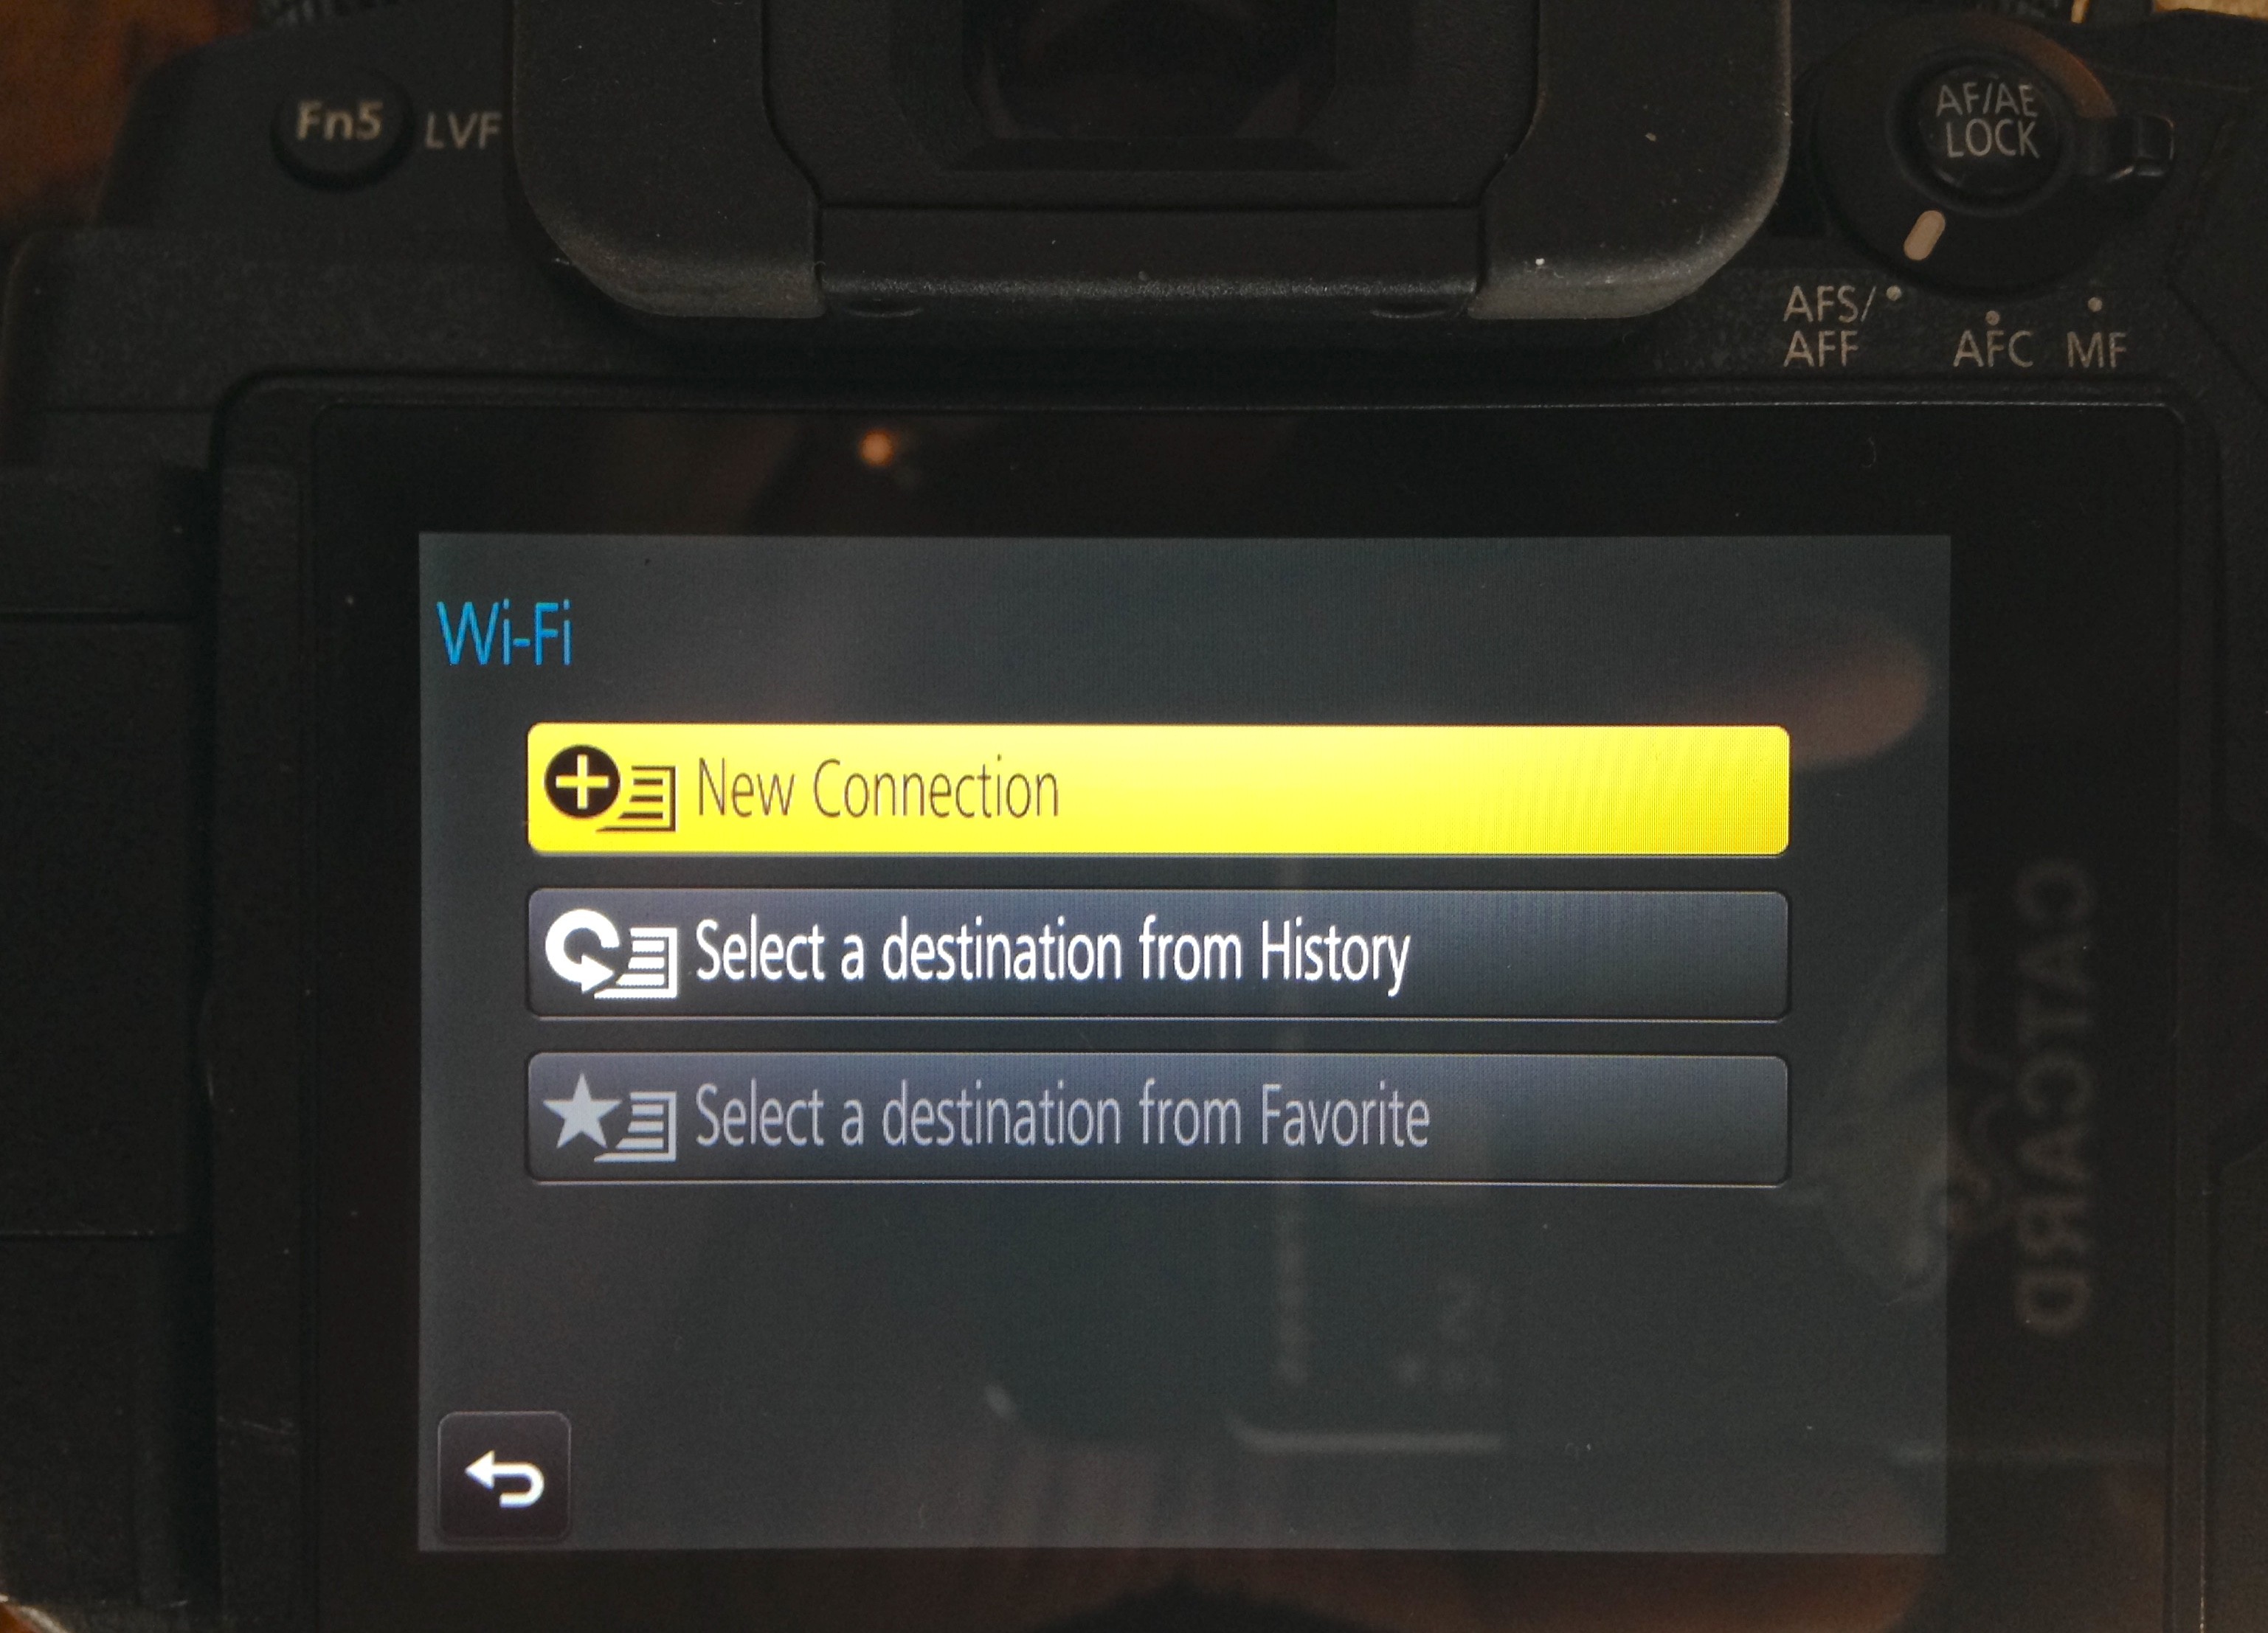
 This is the screen you will see if you’ve never connected before.
If you had hooked up THE SAME CAMERA before, it would be the second option, but if it’s the first time, then you want the New Connection tab. After you select one of the two, the next screen asks you what you want to do. The photo below shows the options possible.
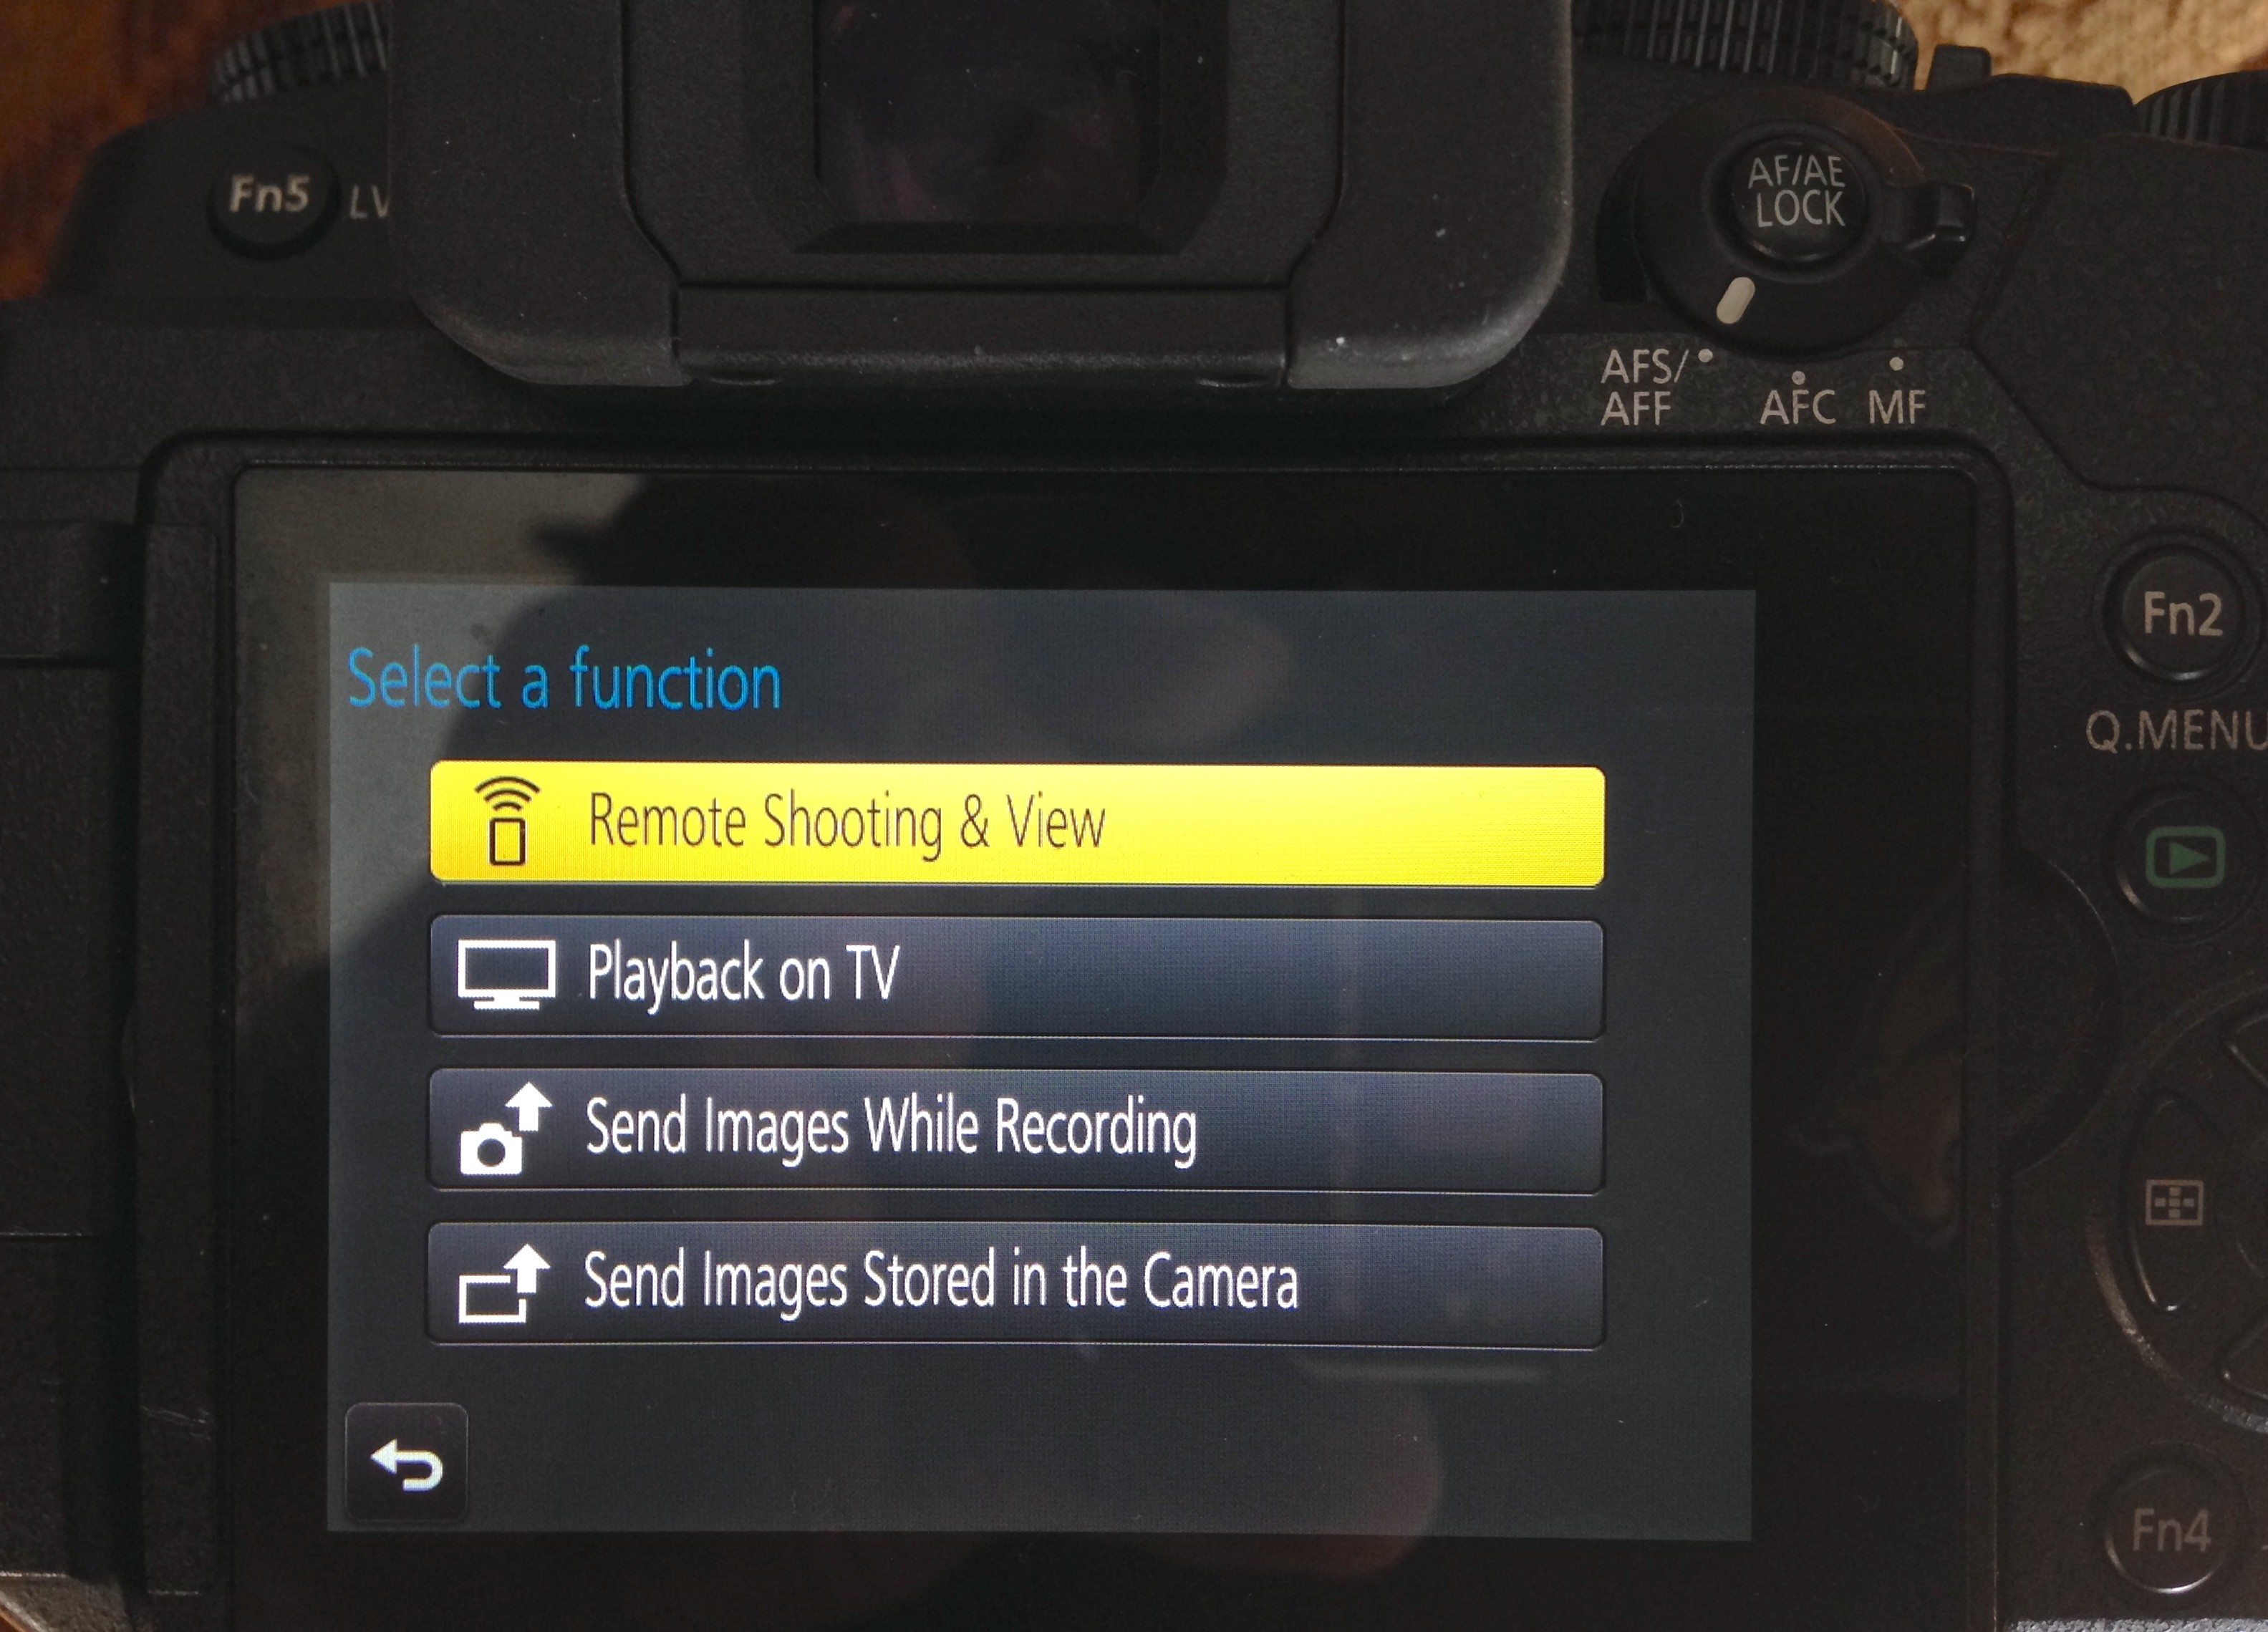
 Options for Remote Shooting and Viewing, Playback on TV, Send Images While Recording, and Send Images Stored in Camera. The last Send Images Stored In Camera is what most people want to get their images out ASAP.
That should get you connected to your G85 or any other Lumix camera. All Lumix models have the same wireless connection, so this will work for other models as well. Below is a great video by Lumix rep and friend Mark Toal showing how the wireless system works.
G85 Menu
One of the main criticisms of virtually all mirrorless cameras, whether MFT, APS-C, or full frame models, is the menu system layout and navigation. Panasonic has followed a similar layout and design to what Nikon uses and I’m a big fan of both systems. The fonts and color design of Panasonic’s is a bit larger and easier to see with possibly a few more options than Nikon’s system, but I feel Lumix has the easiest menu to see and navigate. The G85’s larger menu text allows me to navigate without having to reach for my reading glasses. That’s a big plus, especially in cold winter conditions. I don’t have to tell anybody who wears glasses what a pain it is to need your eyewear in situations with rain and snow.
You can also see the menu from within the EVF. Meaning if it’s really bright out and I’m having a difficult time seeing the changes I want to implement, I’ll often navigate the EVF with the camera to my eye. Once again, not all systems allow this.
Quick Menu Fn2 Button
The Quick Menu—also labeled as the Fn2 button—is a faster way to navigate some Menu options. You can activate the Quick Menu via the Fn2 button on the back of the camera which shows Image Size/Quality, WB, ISO, and many others. The mode or display style the camera is in will determine settings shown. It works relatively well but is not nearly as comprehensive as the main Menu. Olympus has done something similar with their Super Control Panel that has many more options than our Quick Menu option on the Panasonic cameras. Something similar would be a nice addition to our Lumix system.
4K Photo Technology Tools
Back in the summer of 2015, Panasonic revolutionized the industry by releasing what they call 4K Photo Technology. 4K Photo is the ability to shoot 4K video, which has 8-megapixel stills in each frame of the video footage and extract those stills, one frame at a time, from the moving video footage. What makes this so interesting is the 4K video is capturing 8-megapixel JPEGs at 30 frames per second. You can imagine the possibilities of capturing just the right image at 30FPS. Not only did this open the door for capturing that special photo, but it also ushered in other tools that use the same basic technology.
- 4K Focus Stacking – Camera shoots numerous images with different focus points and puts them all together in one JPEG
- 4K Post Focus – Ability to choose the spot you want to be in focus after the image has been taken, final image is JPEG
- 4K Photo Mode – Camera shoots at 30FPS at any shutter speed you choose, light dependent, gives you 8-megapixel JPEGS
Auto Focus Technology
Depth from Defocus Contrast AF
Another new technology Panasonic is pioneering is something they call Depth From Defocus (DFD). DFD technology calculates the direction and the amount to move the lens focus in a single movement by predicting that movement with two images that have different depth of field. Below is a video showing more about DFD.
The Lumix AF system is also based on Contrast Detection AF as opposed to Phase Detection AF. There are some inherent benefits to both systems, but Contrast Detection AF is generally considered more accurate. Why? Because it makes its decision about focus accuracy directly on the sensor. The downside is it’s always been slower in Predictive AF mode. But Panasonic’s ongoing DFD Technology is changing all that. I’ve not had a chance to put the G85 through the Speeding Pooch AF Test yet, but I’ll be doing that in the next month or so. I’m waiting do the Speeding Pooch AF Test with the new GH5, G85, and the Olympus OM-D EM-1. But even now I’m finding that the G85 is doing extremely well with relatively fast moving subjects like birds in flight.

 Lappet-faced vulture, Masai Mara National Reserve, Kenya. Lumix G85 with Leica 100-400mm zoom
One of the other benefits to Contrast Detection AF is there’s no need for this crazy tool in most high-end Phase Detection cameras known as AF Micro Adjustment. This whole AF Micro Adjustment idea was first implemented by Canon due to the terrible either front or back focus issues Canon EOS 1 Mark III experienced. It took them forever to get it figured out, and if I recall correctly, the problems only ended once Canon released the Mark lV. Nikon also had their problems with back focus issues that I dealt with for two years in their D2H and D2X cameras. Eventually, both Nikon and Canon added the Micro Adjustment AF option to all their high-end bodies.
Adjusting the AF is just not an issue with Contrast Detection AF or at least not that I’ve experienced. Like MFT in general, DFD is new, and as they continue to update this technology, it just keeps getting better. Soon—possibly even now with the GH5—we will have the speed of Predictive AF combined with the accuracy of Contrast Detection AF. That will be different than every other major camera company on the market (even Olympus uses Phase Detection AF), and eventually, it will be a clear advantage. As I said, with the coming GH5 it may already have that advantage. As I like to say, only time will tell.
Built-in Flash
Something I’ve come to absolutely love on all the Lumix cameras is the built-in flash. Many think it’s a gimmick but I regularly use the G85’s built-in flash to brighten shadows of people wearing hats or put a catch light in a bird’s eye up to 15-20 yards away. And even more importantly, using it to trigger the FL-360 off camera strobe when shooting macro photos. It’s a great tool and a good reason why I’ll most likely always have at least one Lumix camera with a built-in flash in my camera bag.
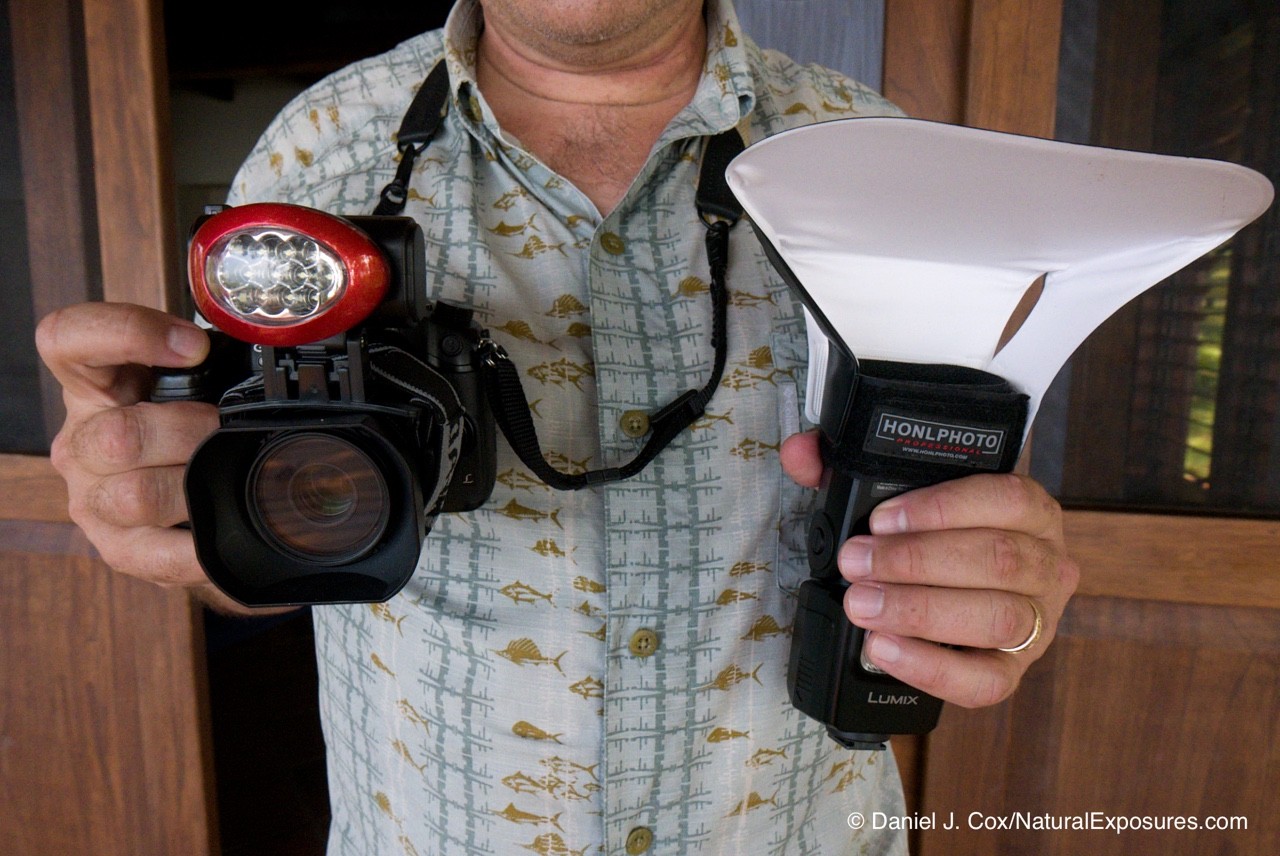
 This is a photo of my favorite macro setup. The camera is a GH4, but the G85 would work exactly the same as far as the how I use the wireless flash, the FL-360 with a diffuser. The large red light on the lens is a headlamp and I use this for illuminating the subject, in dark conditions, for quick AF.
AF Patterns
Panasonic has some of the best thought-out AF pattern options of any camera I’ve used. Below is the list with my thoughts on each and a photo of what they look like on the back LCD.
- 1-Area is my main go-to AF pattern. I regularly change its size but generally use it in about the size of a dime.
- Pinpoint AF is very often handy when shooting through the thick grass like we often have in Africa. You can’t use Pinpoint AF or AF-C, only AFS. If the camera is in AFS/AFF in the Menu you have to switch it to AFS only or the Pinpoint AF will not be accessible and will always show as grayed out.
- Custom Multi gives you the ability to create your own Multi Pattern. This can be nice for flying birds giving you a larger target.
- 49-Area is basically where the entire EVF is selected and has 49 AF points placed around the entire area. Great option for flying birds against the sky where nothing will come between you and your subject in flight. Not good for almost anything else.
- Tracking AF: This option is something I’ve not performed any serious tests with. I do need to give this a try since in theory, it could be fabulous. One of my concerns is that Nikon used to have the same feature and it didn’t work very well. I understand Nikon has improved their version greatly. The theory is that whatever you first focus on, the camera actually remembers the color of the subject and follows that color wherever it goes in the viewfinder. However, with my Nikons, they used to grab colors in the background if they were the same as the bird or subject I was trying to track.
- Face/Eye Detection: I love this AF setting for events. I often do conferences or other types of events for Polar Bears International where I’m mainly shooting people, scientists, etc. This setting grabs the faces easily and makes capturing images of people quick and efficient.
Panorama Mode
This is an amazing tool that I absolutely love and use quite regularly. For those who have shot panos with their phones, you know how fun this can be, and the G85 works very similar to the way our phones shoot panoramas. Shooting panos is as simple as putting the G85 in Pano mode which then shows you an arrow pointing the direction to move the camera while taking the picture. This feature is not new to the Lumix line and when I show this feature to our Explorers it becomes addictive.
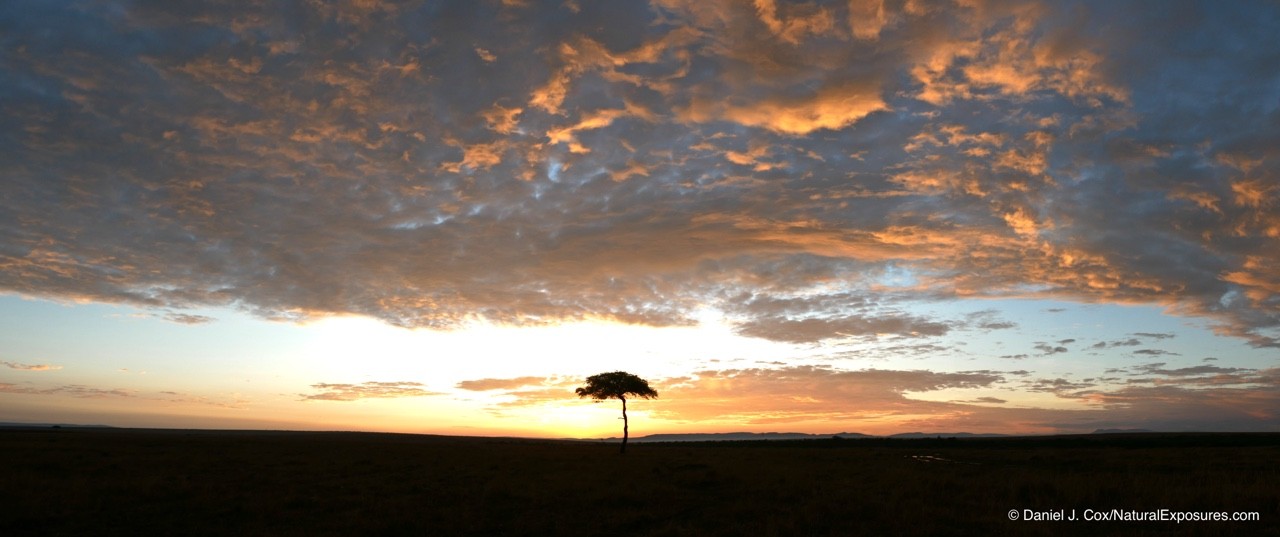
 A lone acacia tree stands tall on the plains of the Serengeti, Masai Mara National Reserve, Kenya. G85 with 12-35mm Panoramic Mode
There is one caveat, however, though I’ve made some gorgeous images with Panoramic Mode, this technology on the Lumix cameras does need some additional love. It works properly maybe 75% of the time. It seems that any scene with a very contrasty line, the camera has difficulty merging the images properly and will show severe stitch marks. This issue has gotten better over time; the first camera I tried it in was the Lumix LX100 which had the same issue. The GX8 and G85 work much better than the LX100, but I still get a few duds that show the stitching. I’m hopeful Panasonic can continue to make this even better since it really is so much fun to use and people absolutely love this feature.
Conclusion
So there you have it. That’s my take on the new Panasonic Lumix G85 and to put it into three simple words: this camera rocks. It gives you a lot of technology that produces exceptionally high-quality stills and video. I’m now shooting two of these bad boys and will continue to do so until the GH5 arrives and possibly even after.
Below are a couple of publications that have used my work produced with all MFT Lumix bodies. You can also view more of my work published by Professional Photographers of America on their website at http://ppmag.com/gallery/daniel-j-cox.
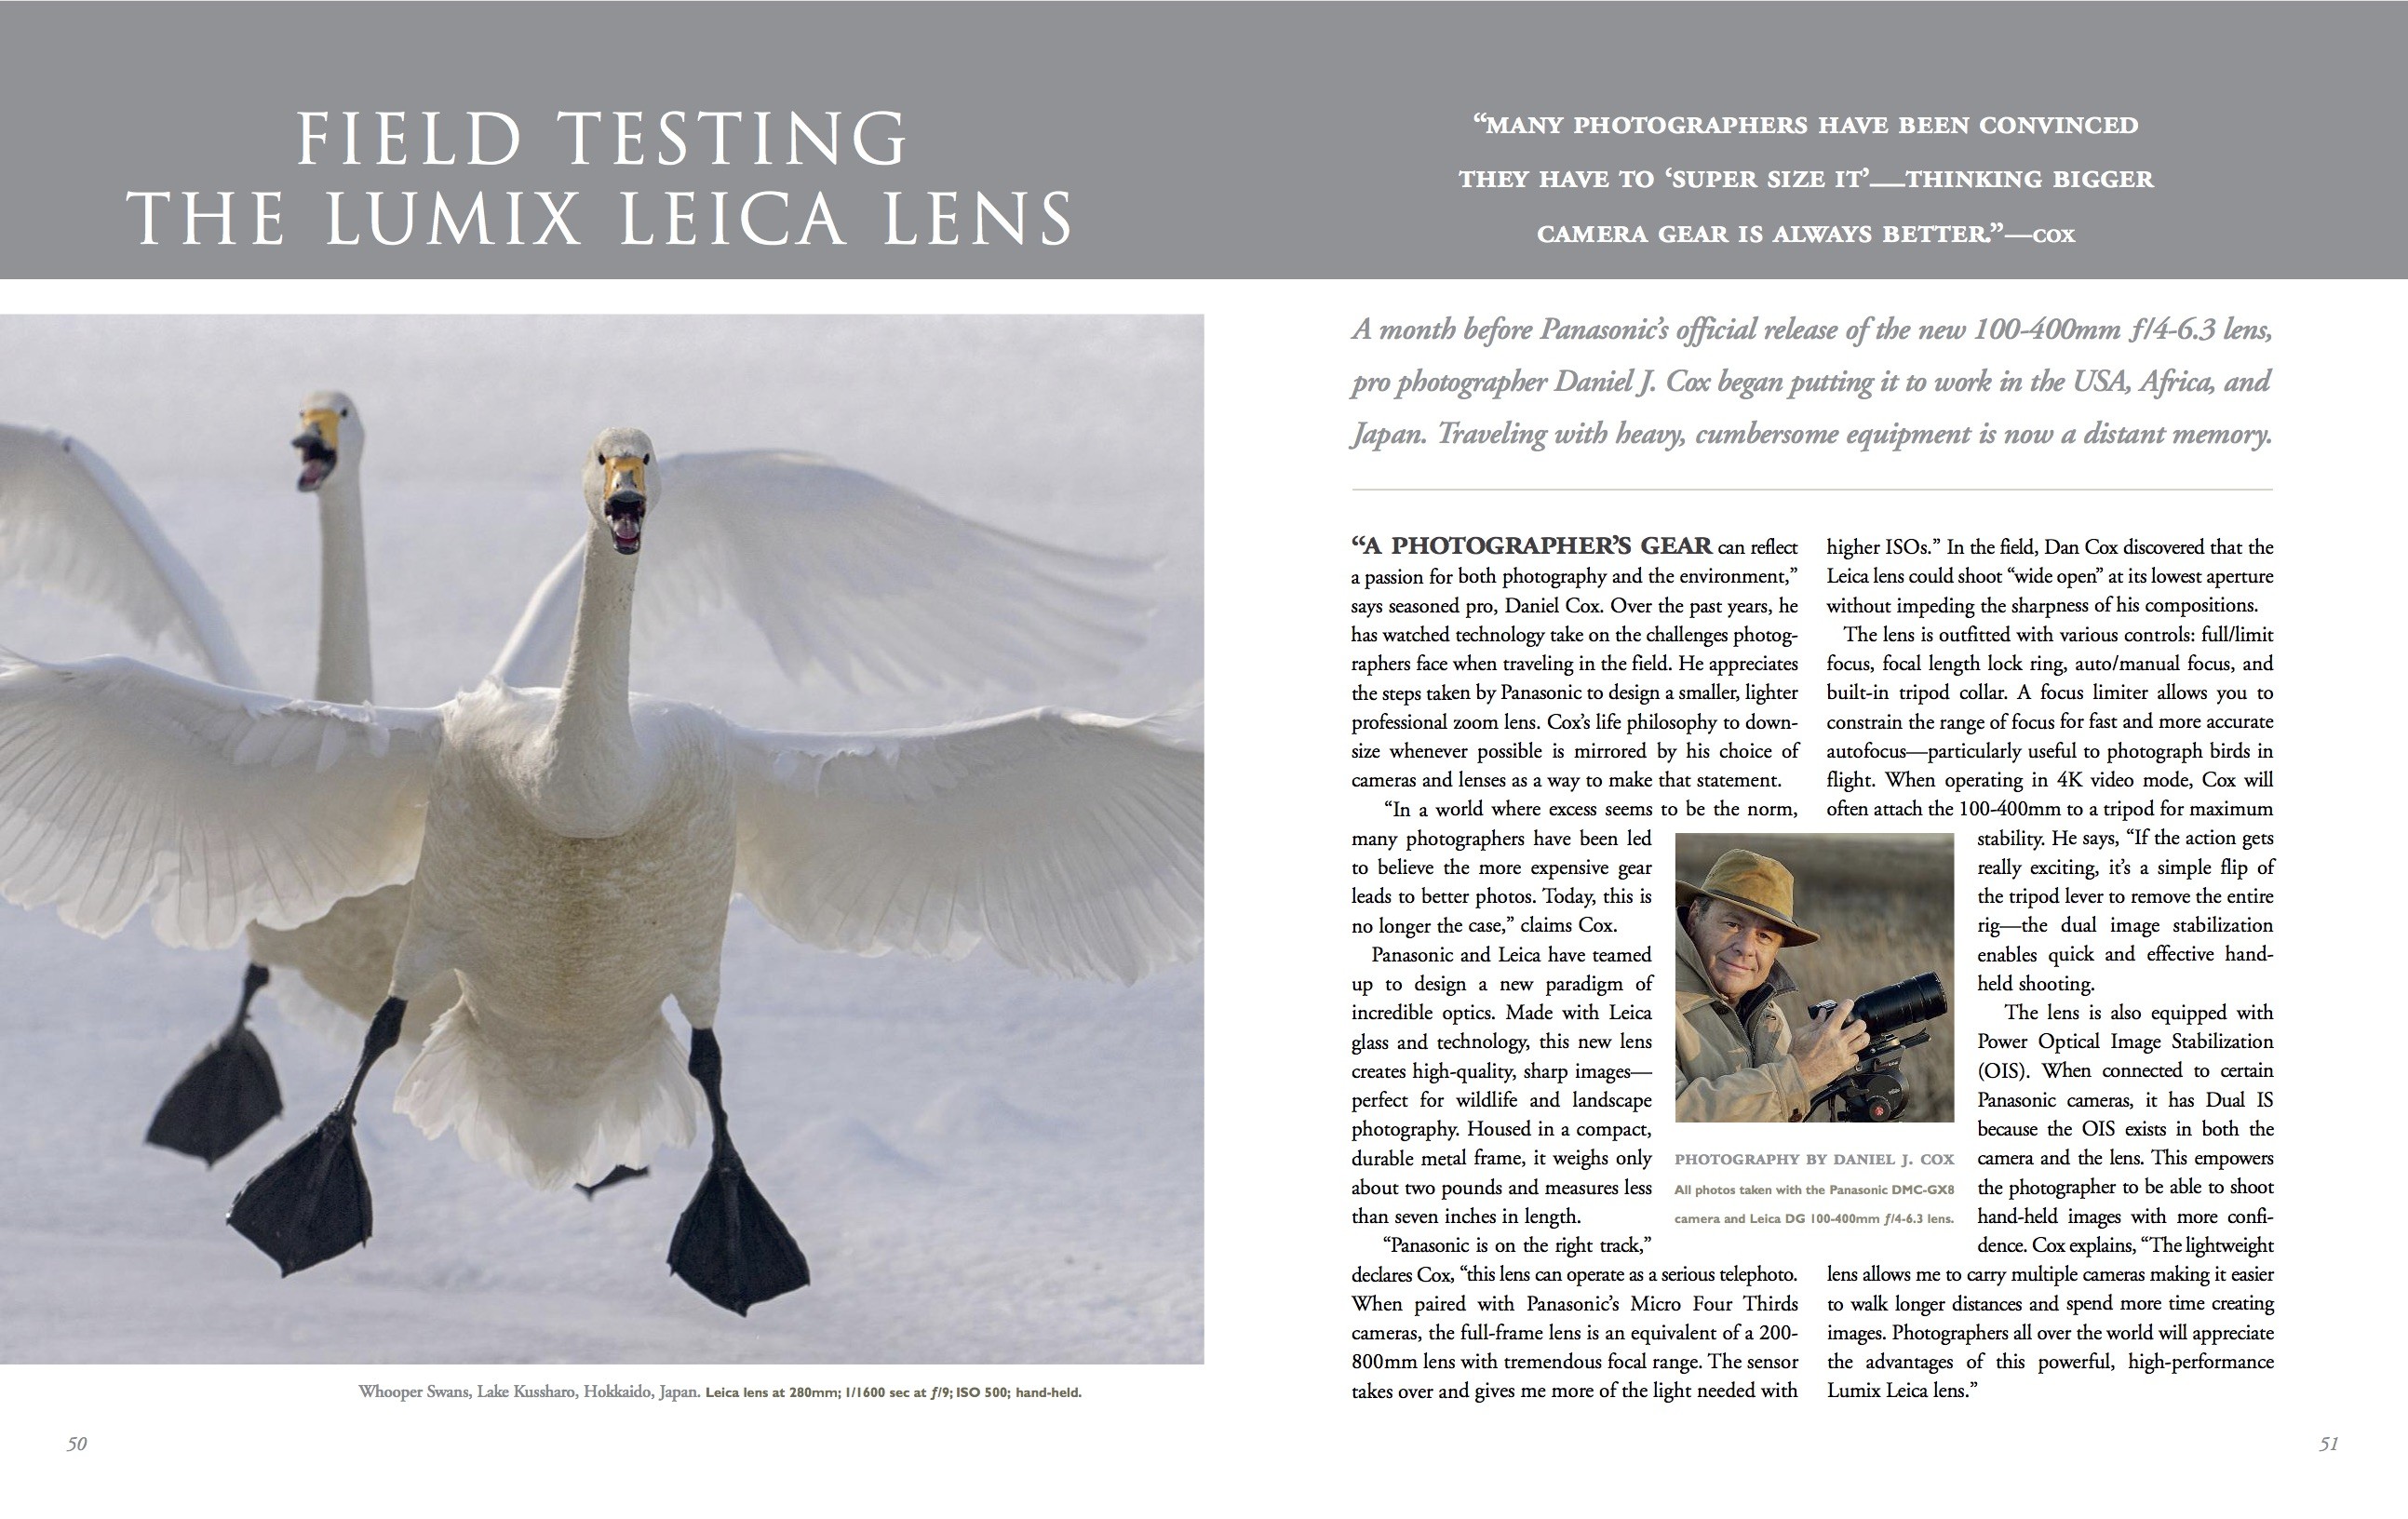
 Nature’s Best 2016
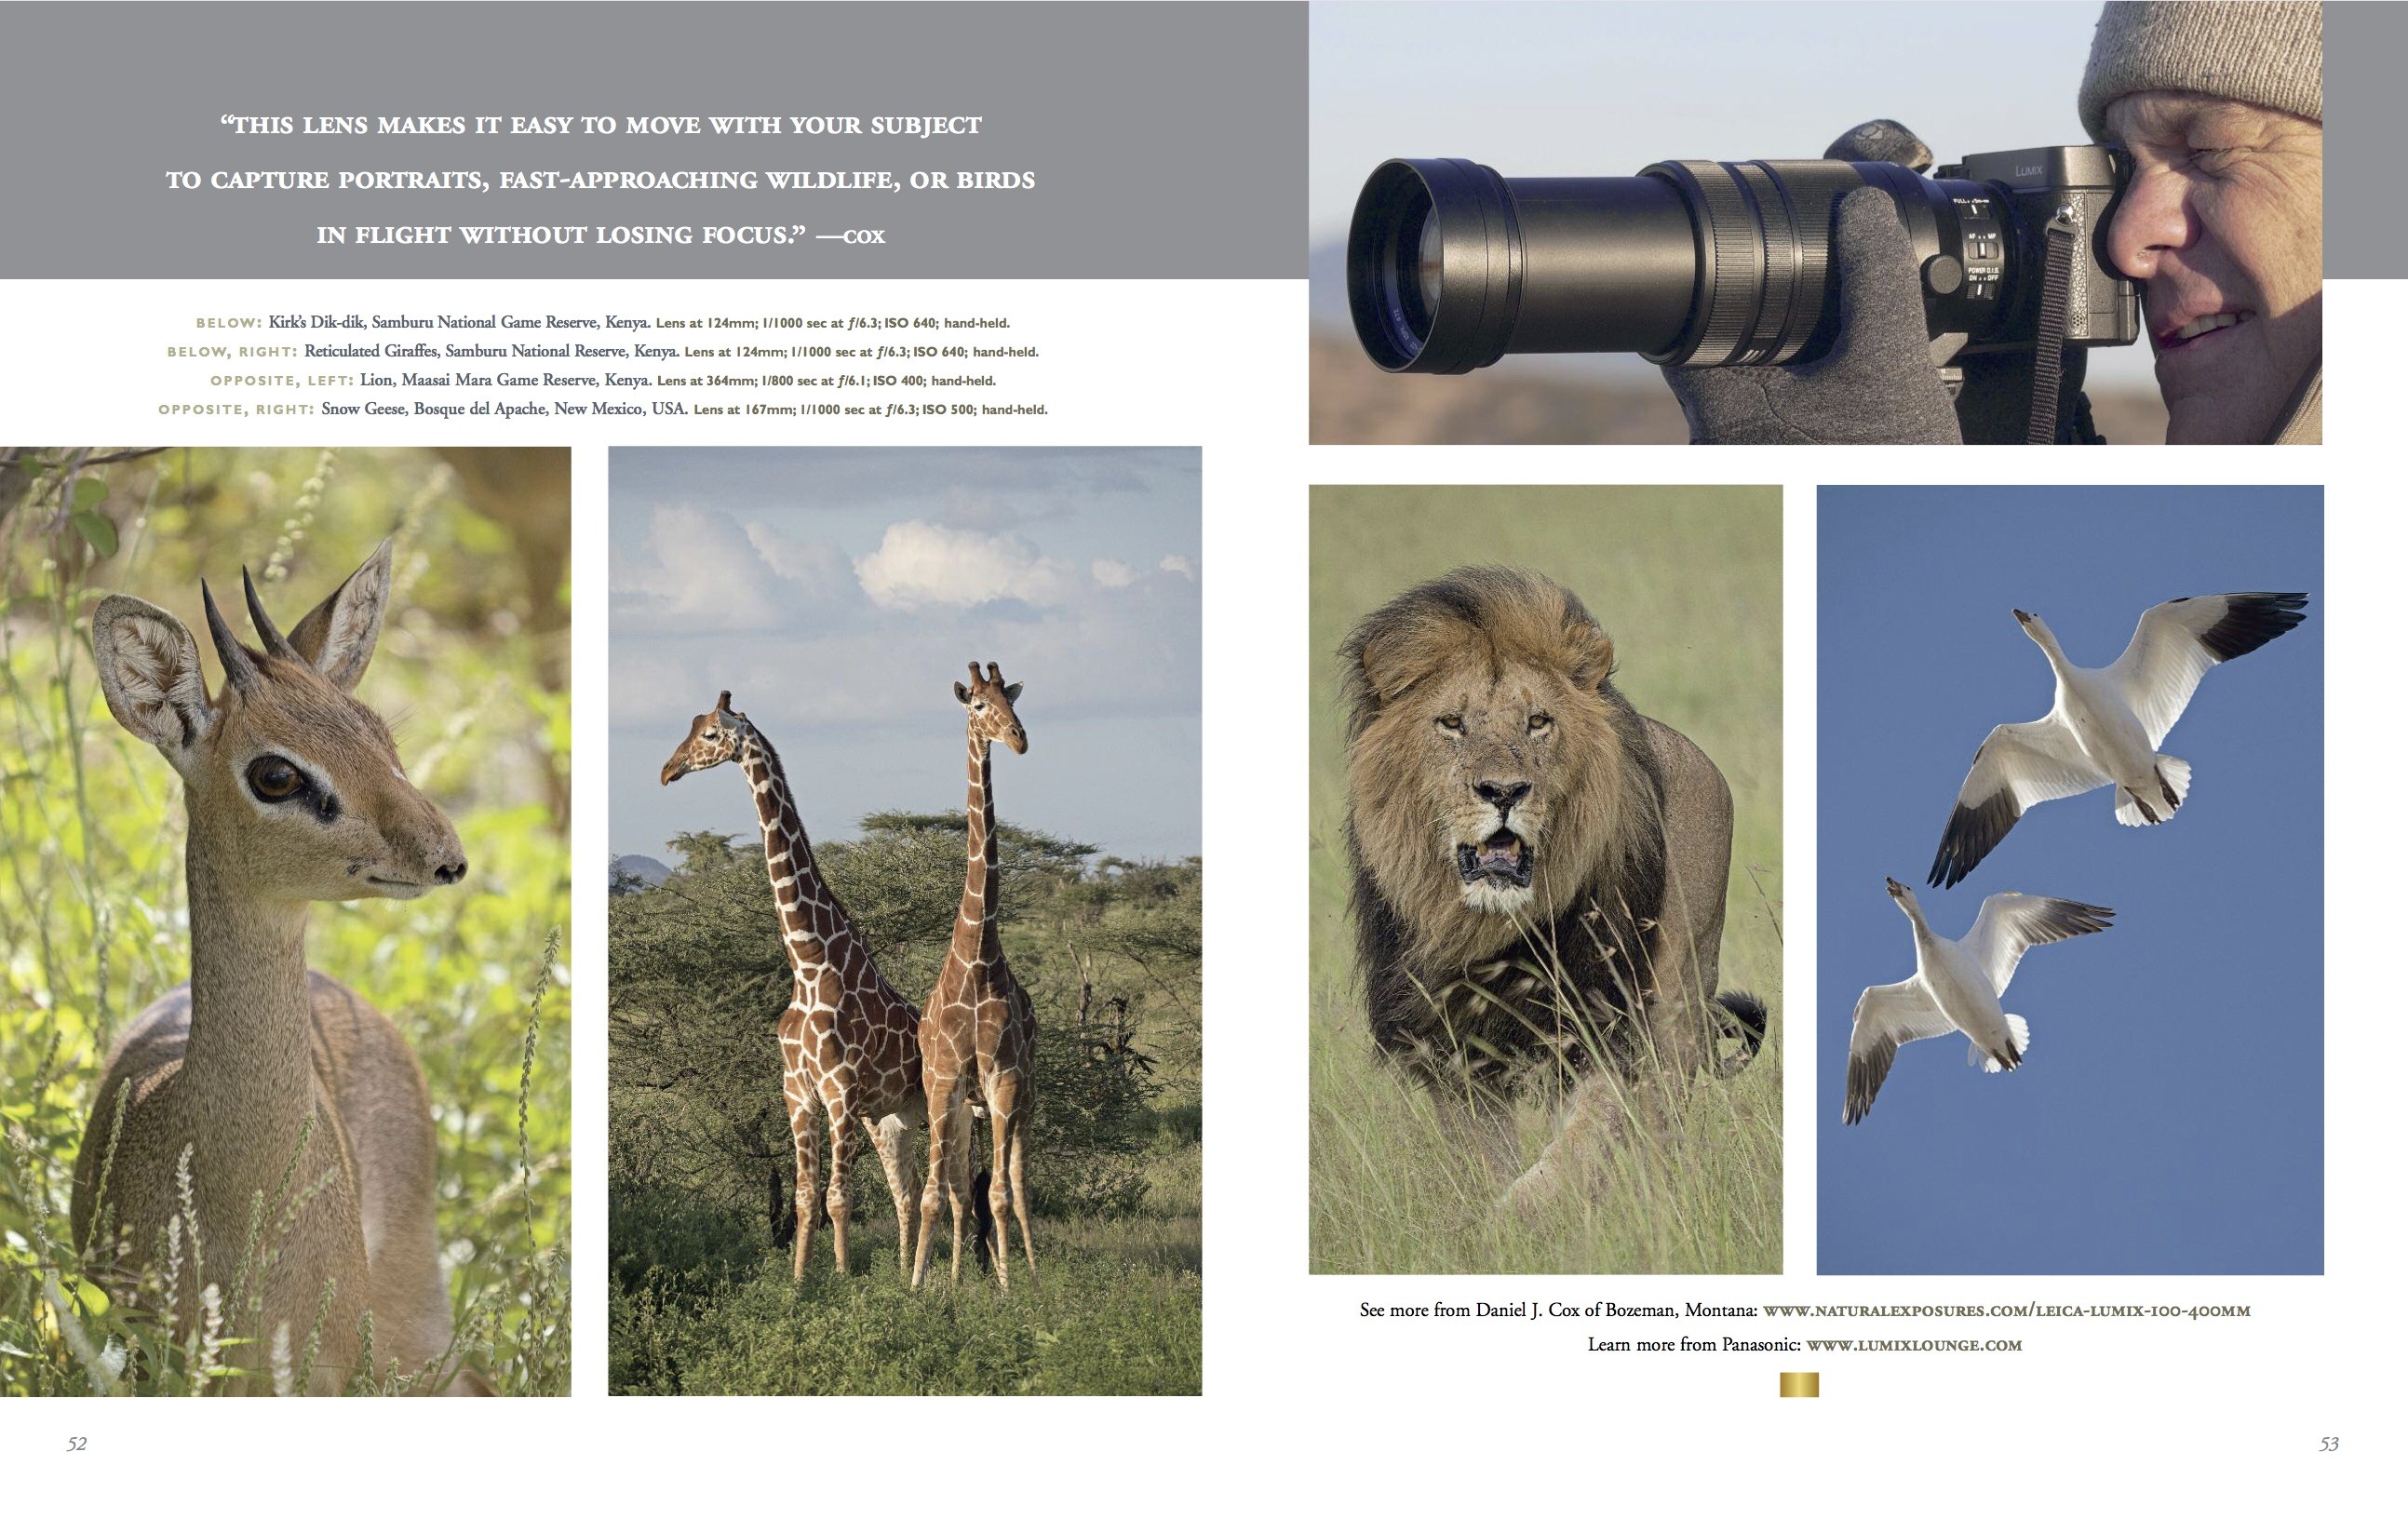
 Nature’s Best 2016
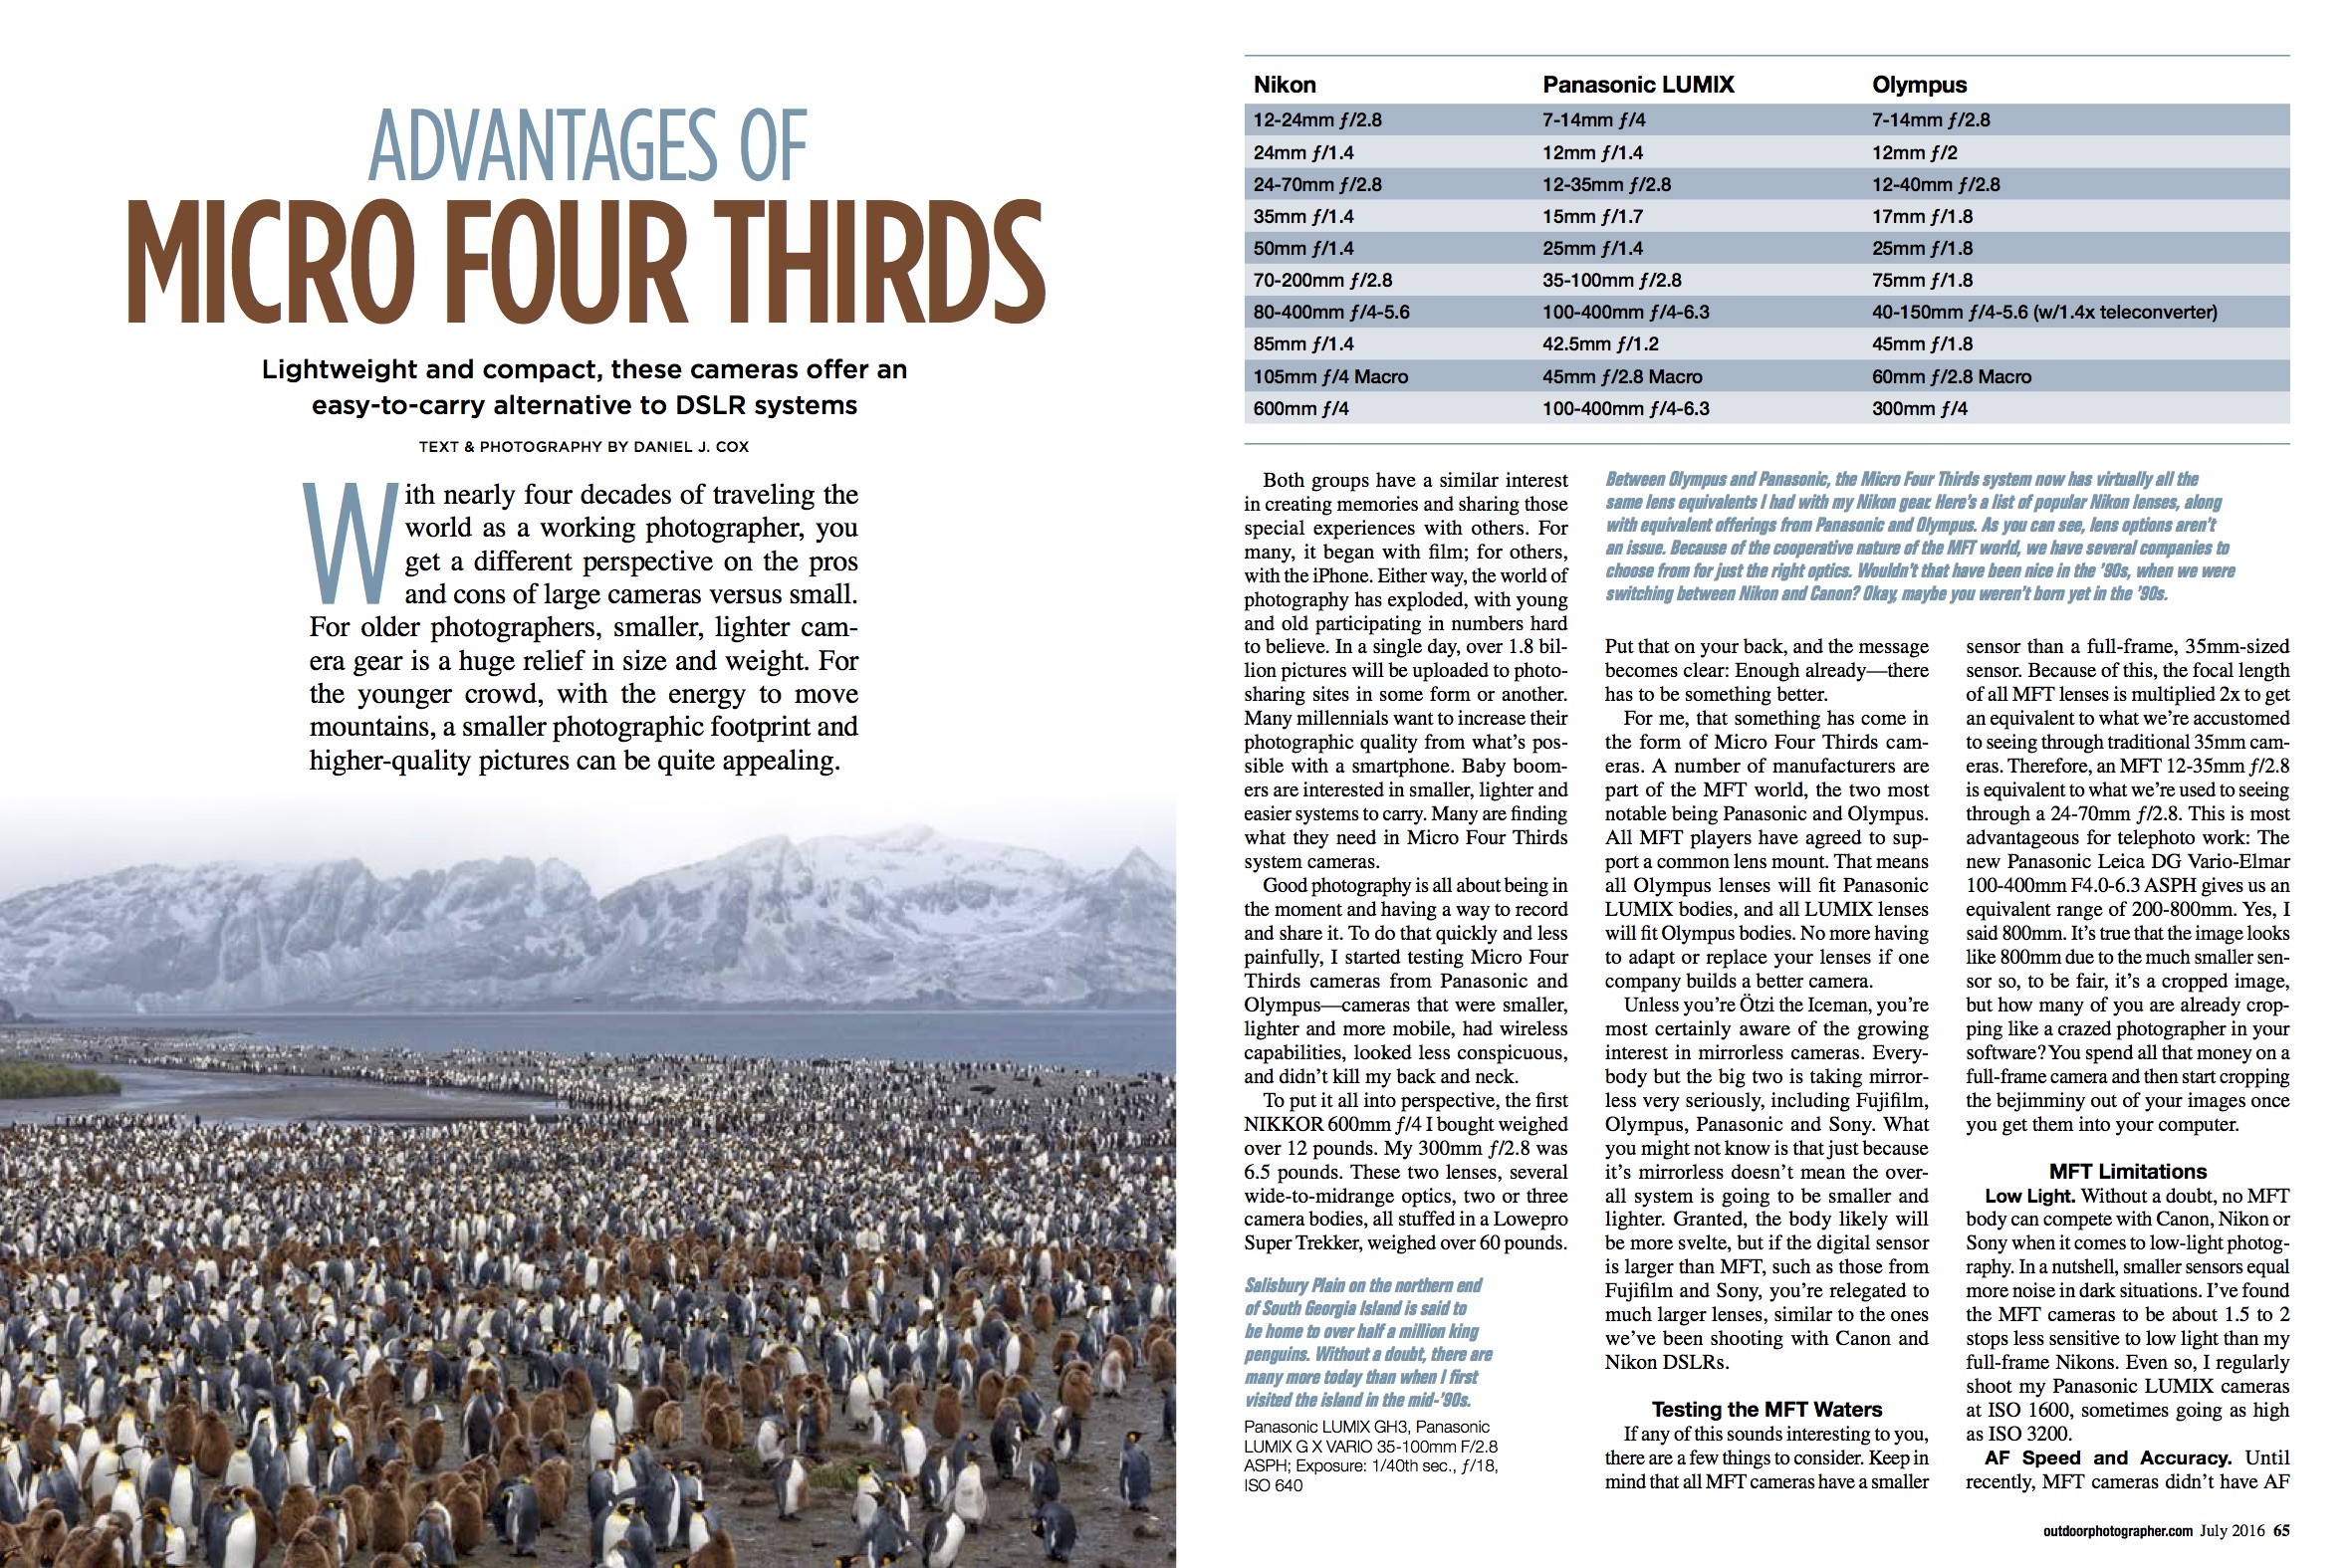
 Outdoor Photographer July 2016
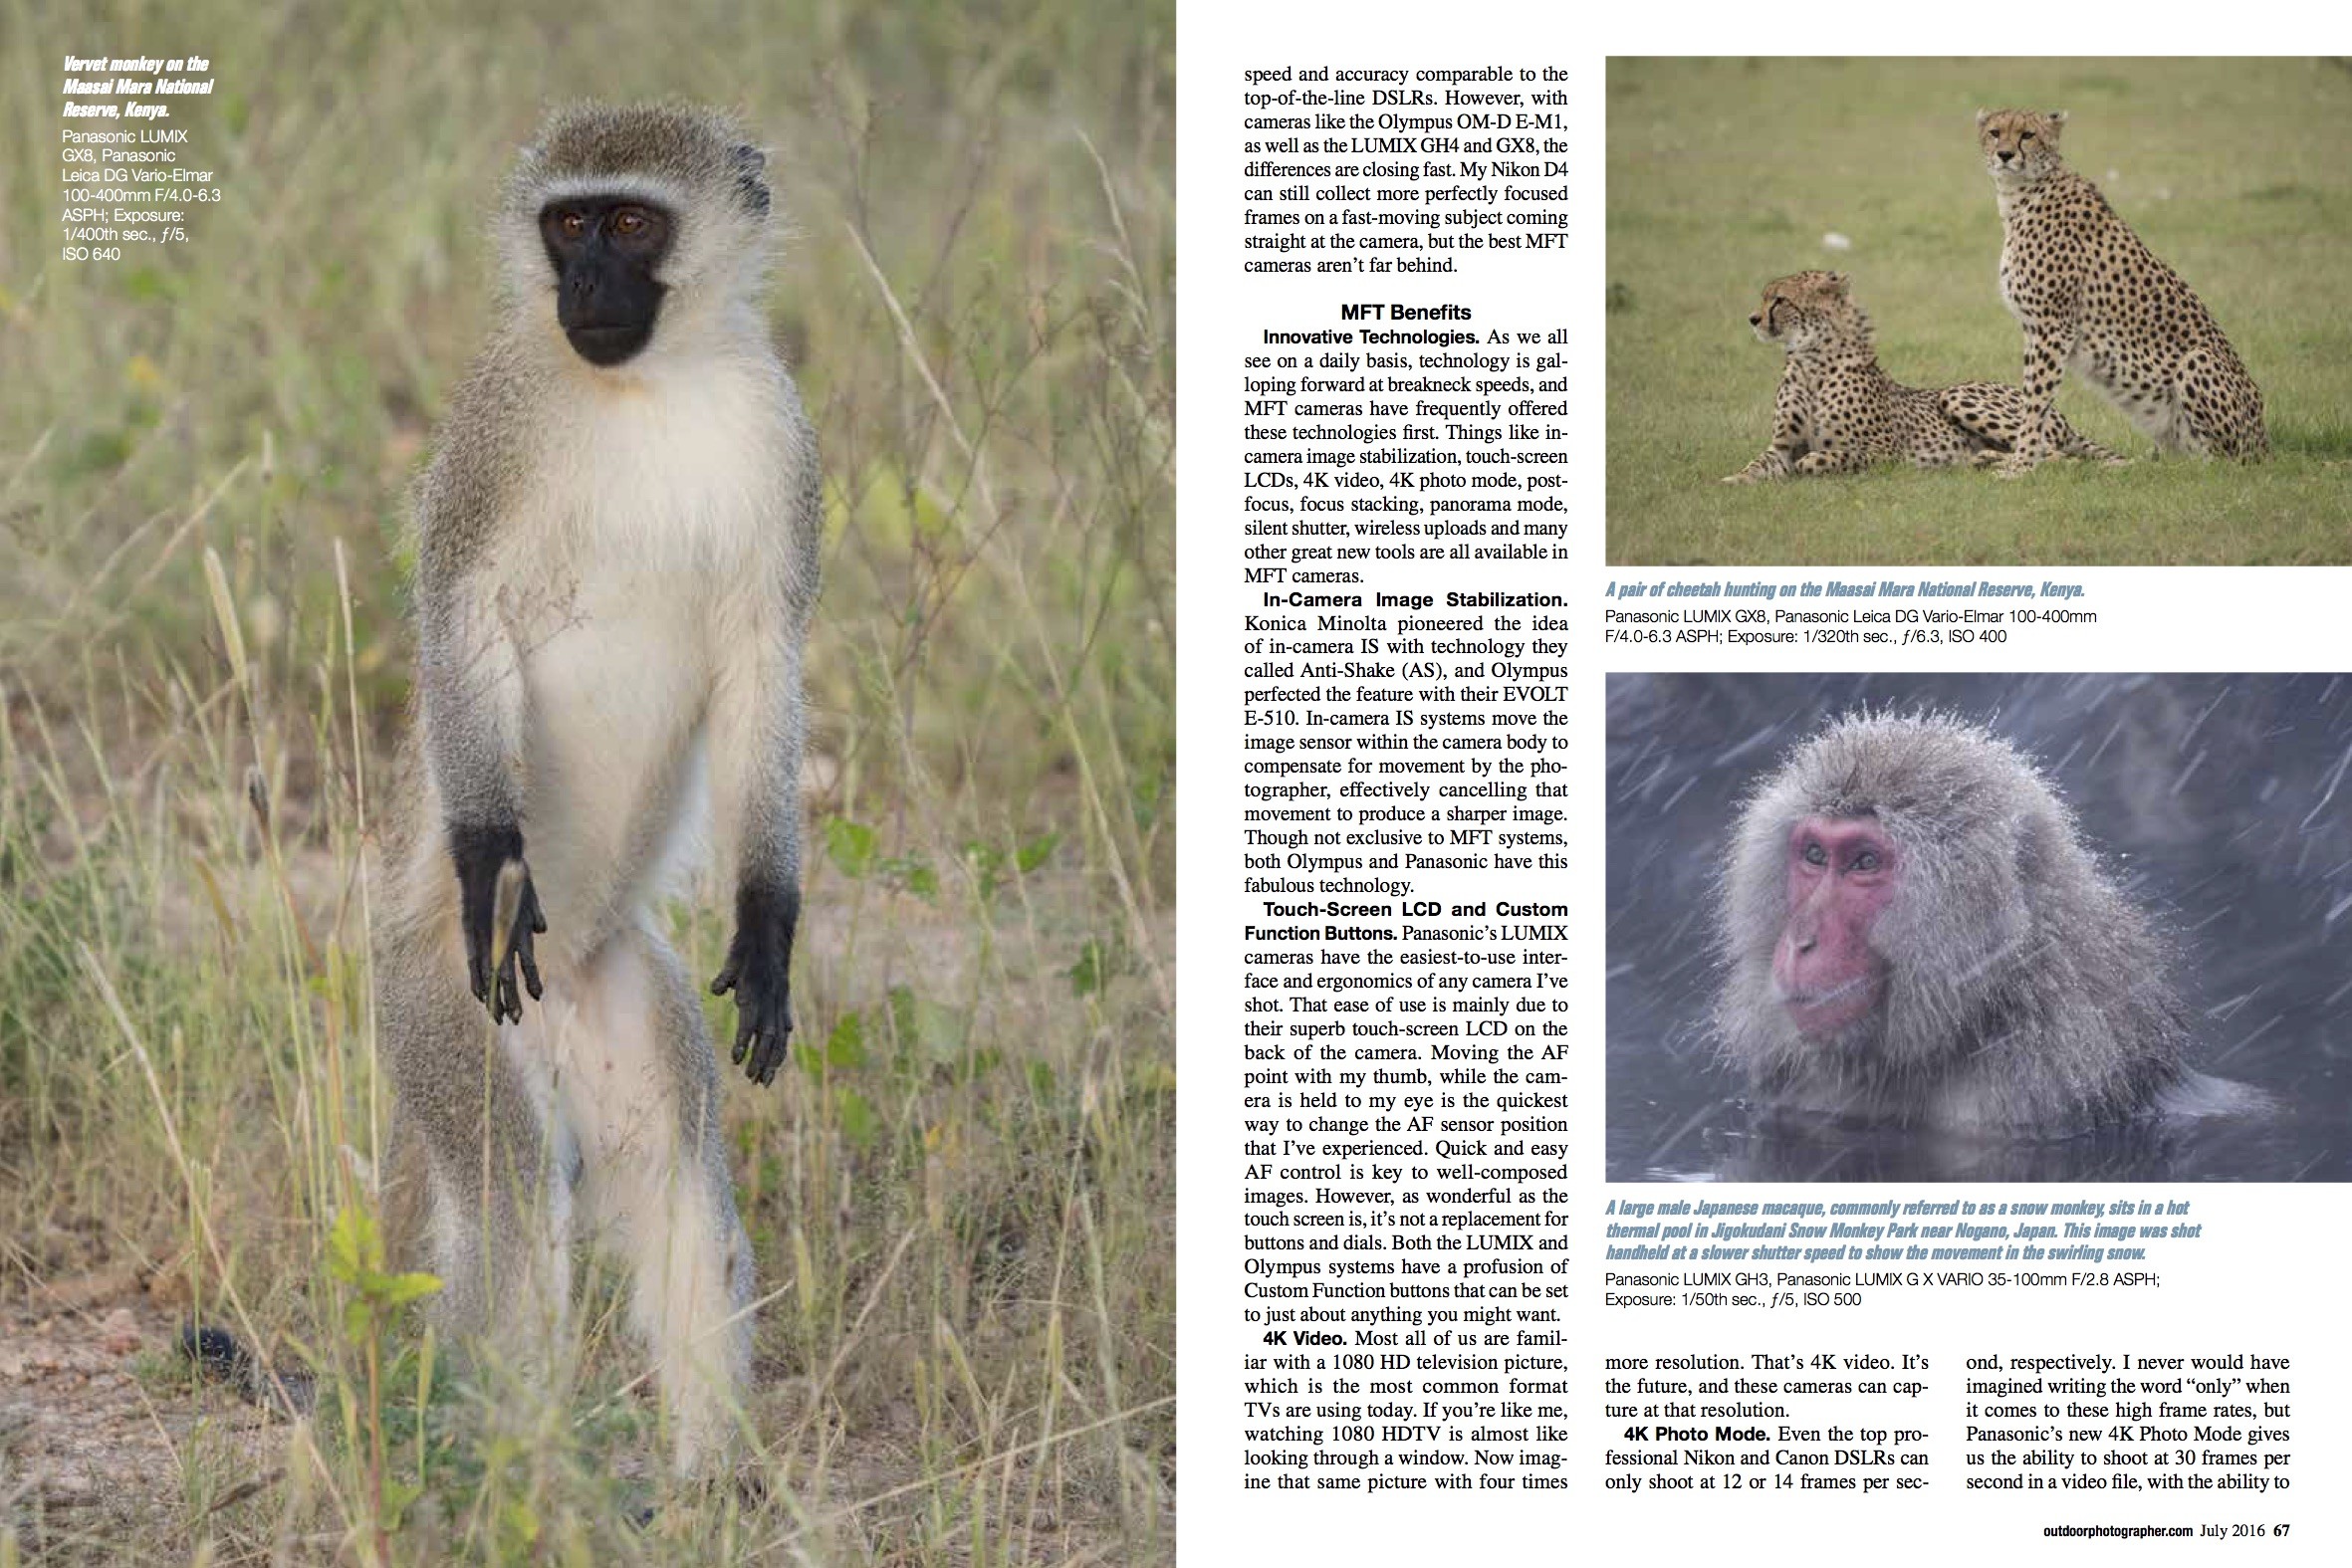
 Outdoor Photographer July 2016
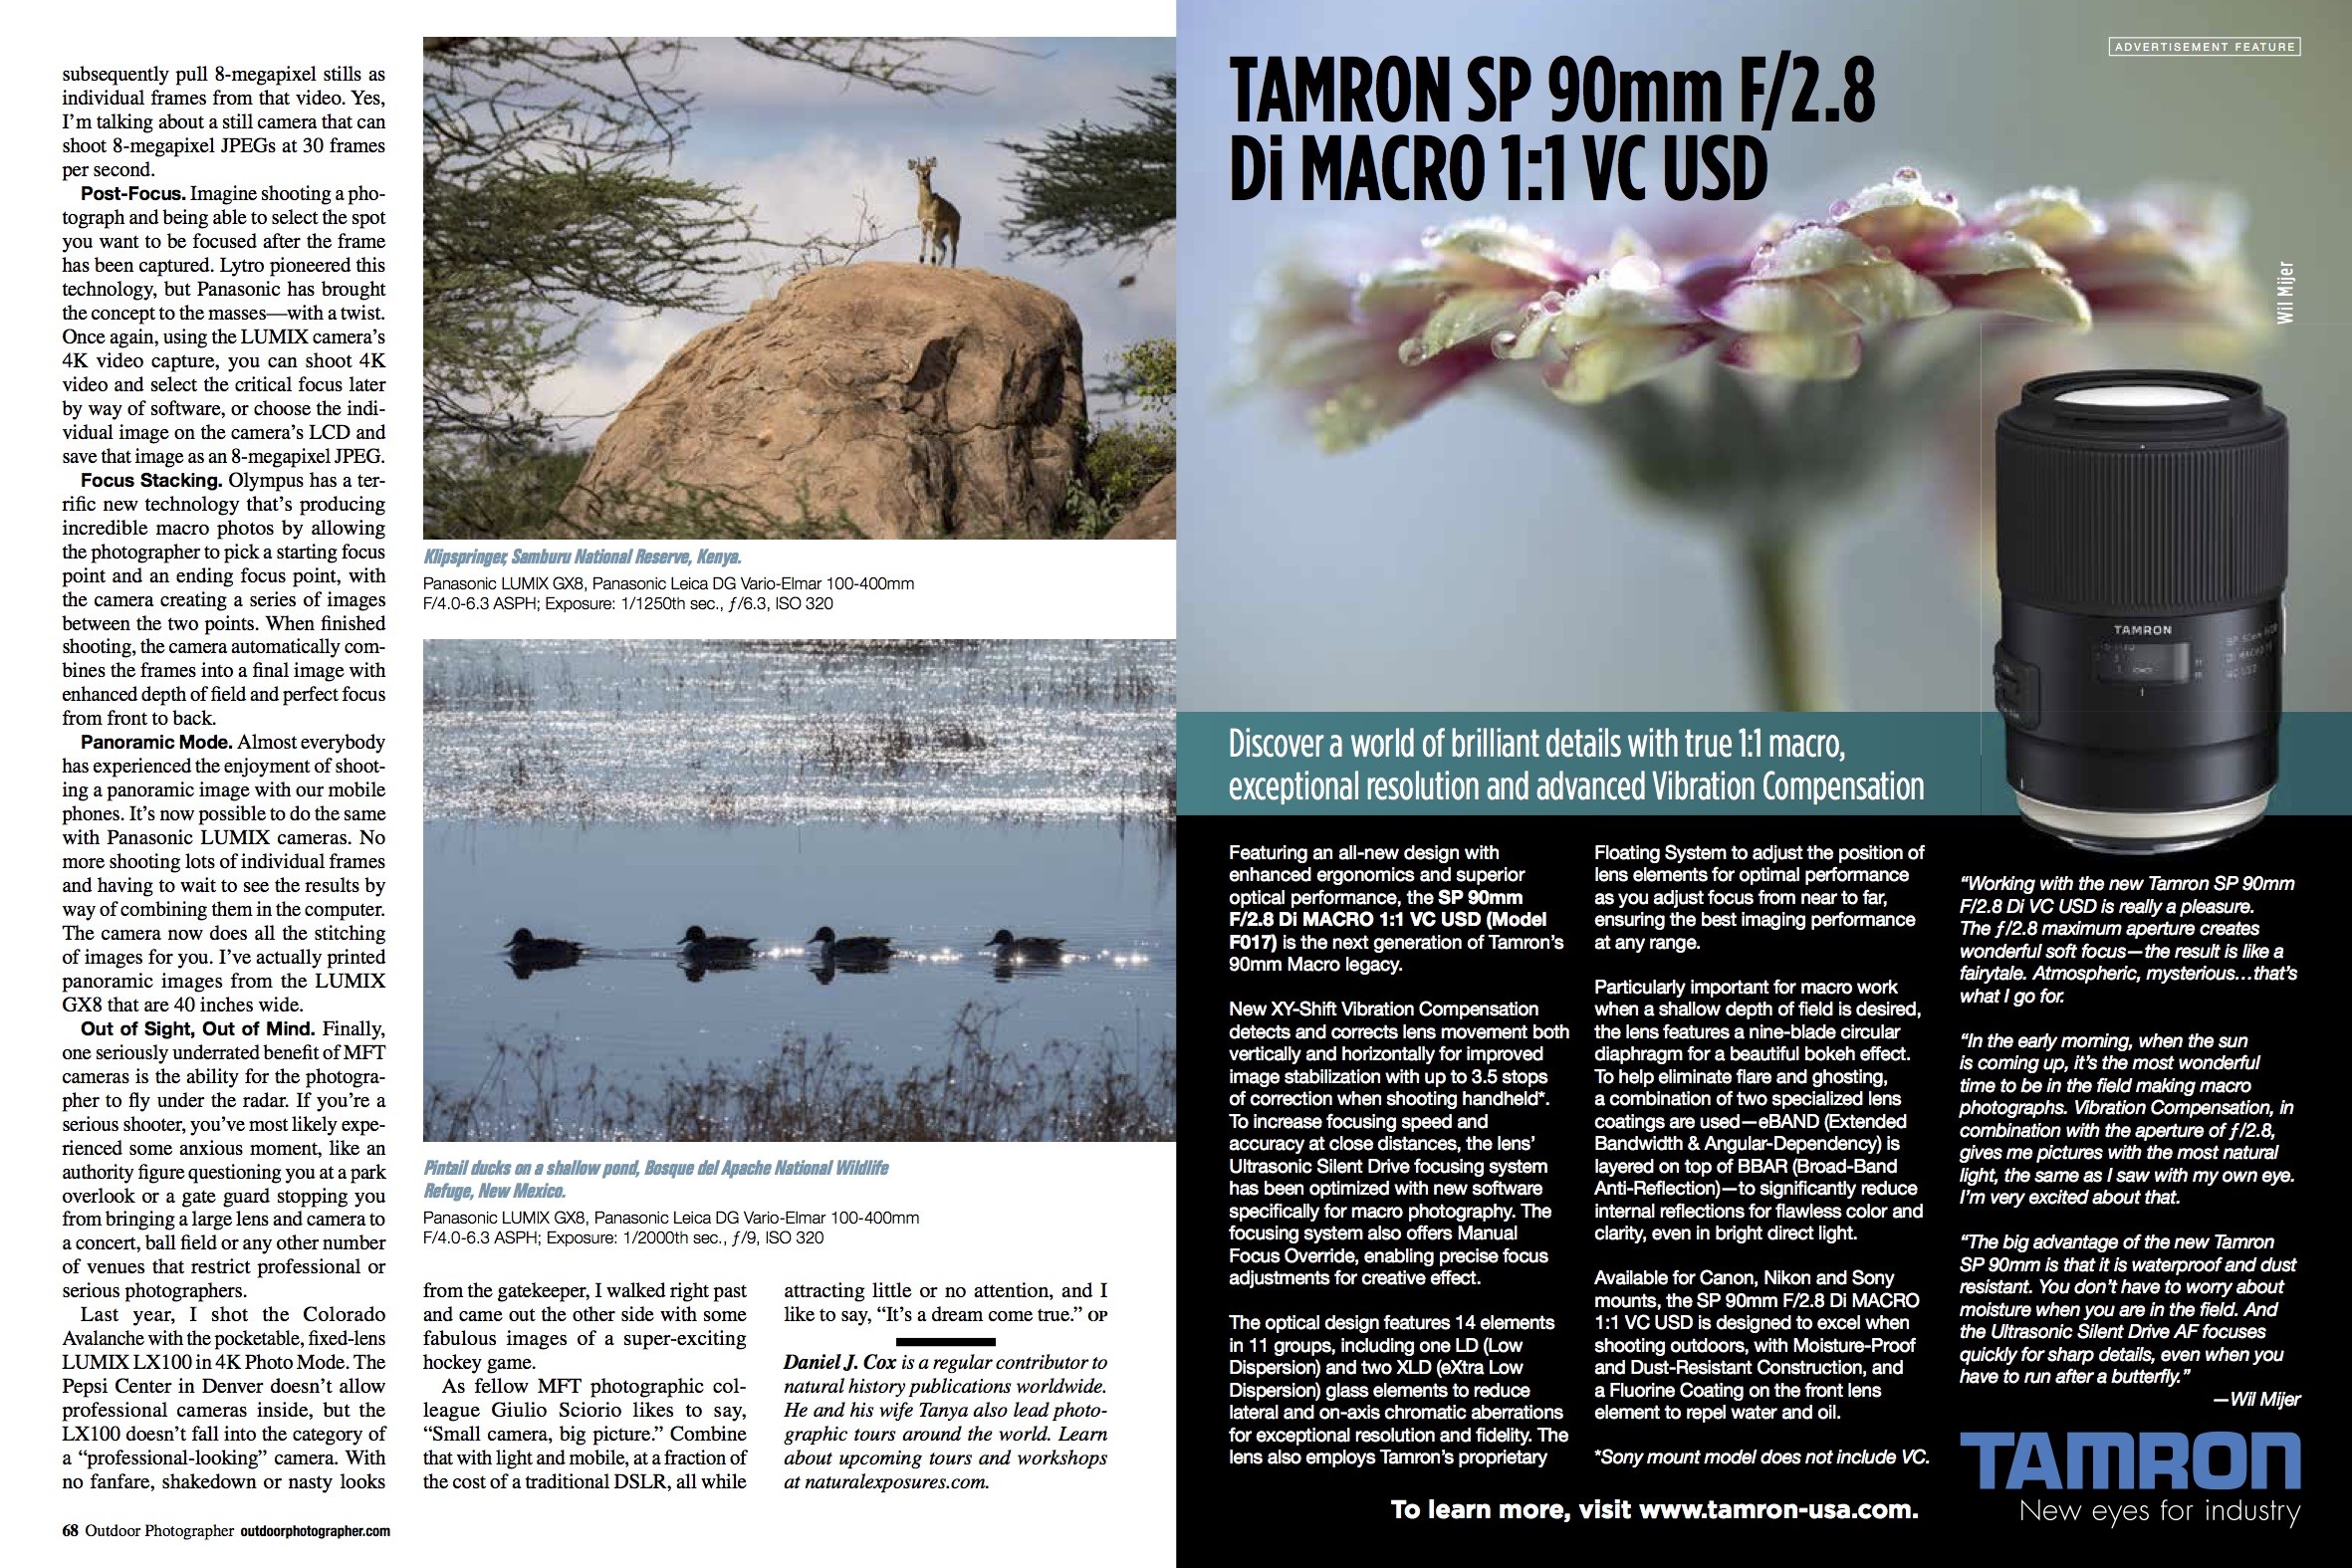
 Outdoor Photographer July 2016
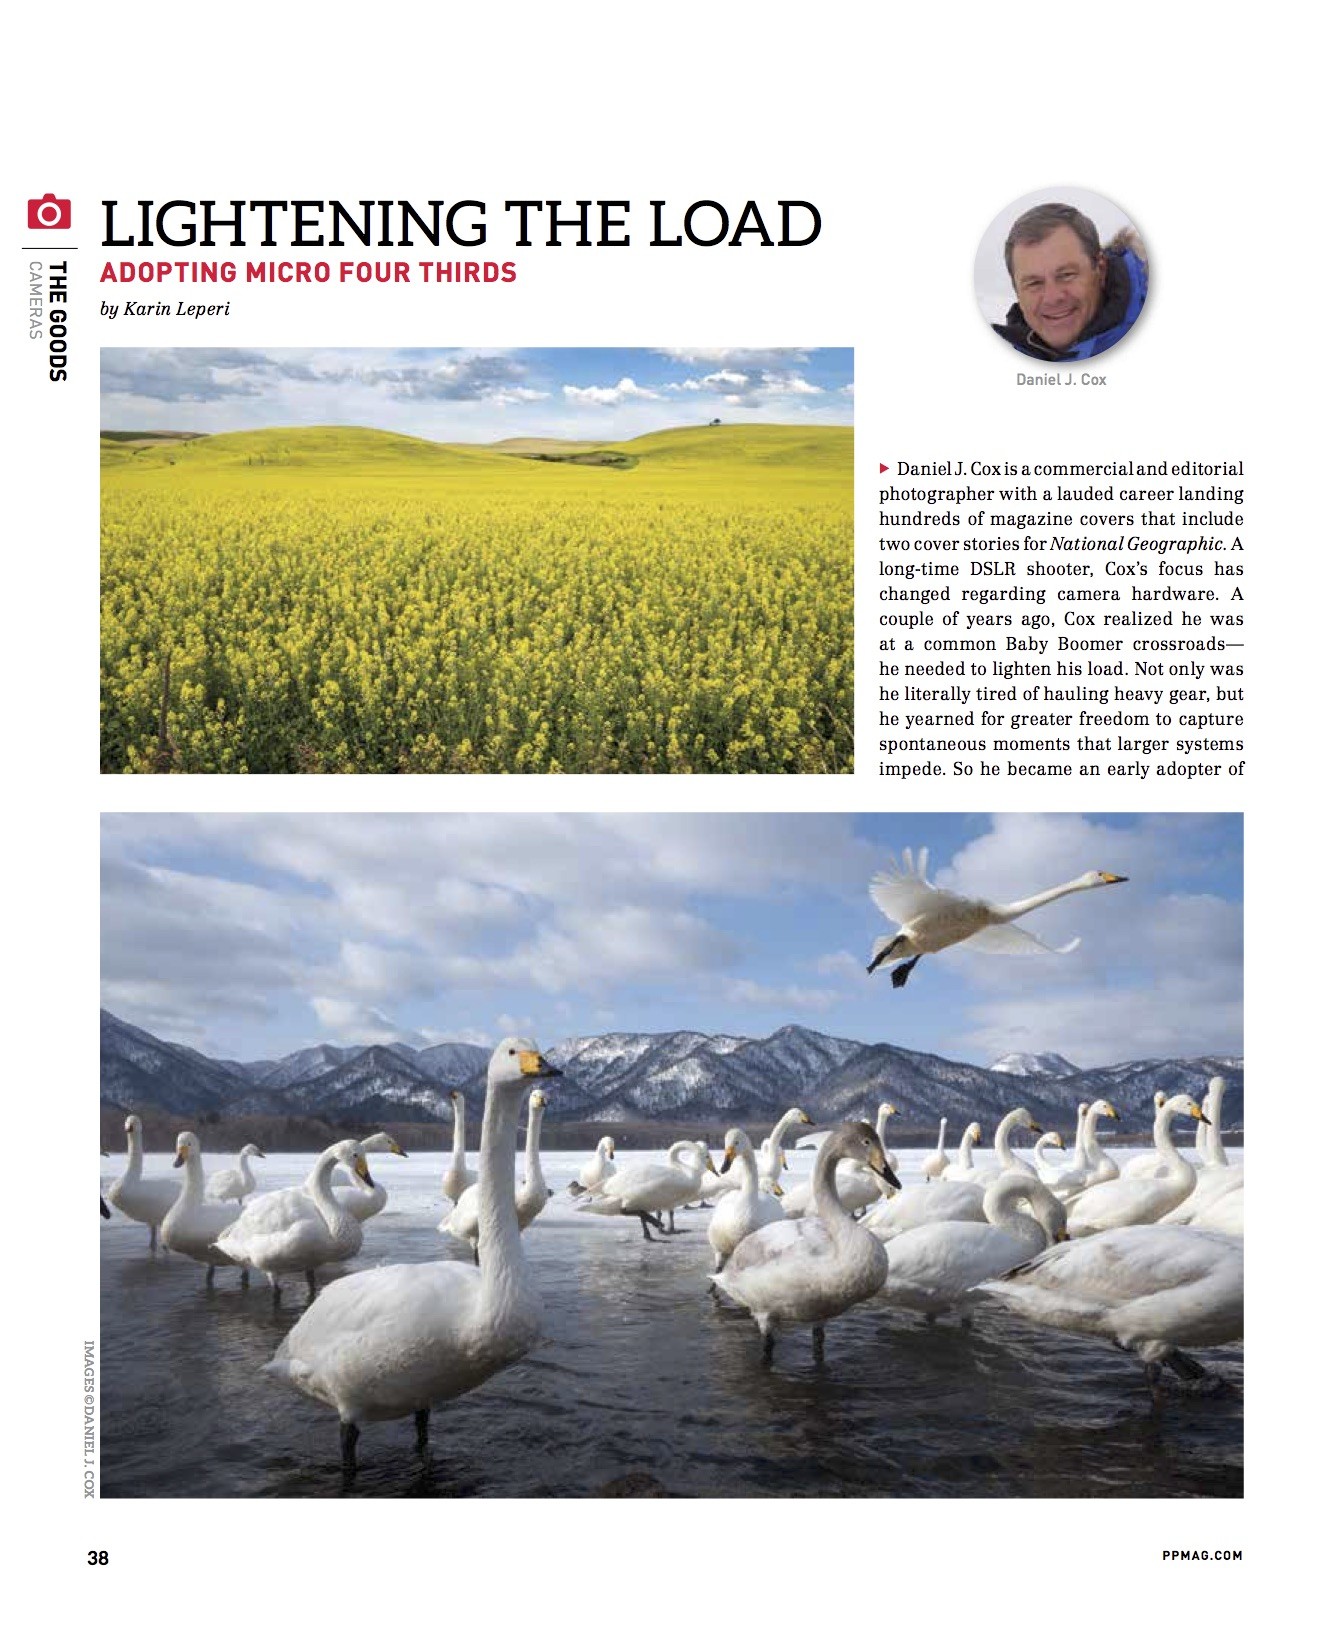
 © Professional Photographer magazine, February 2017, reprinted with permission
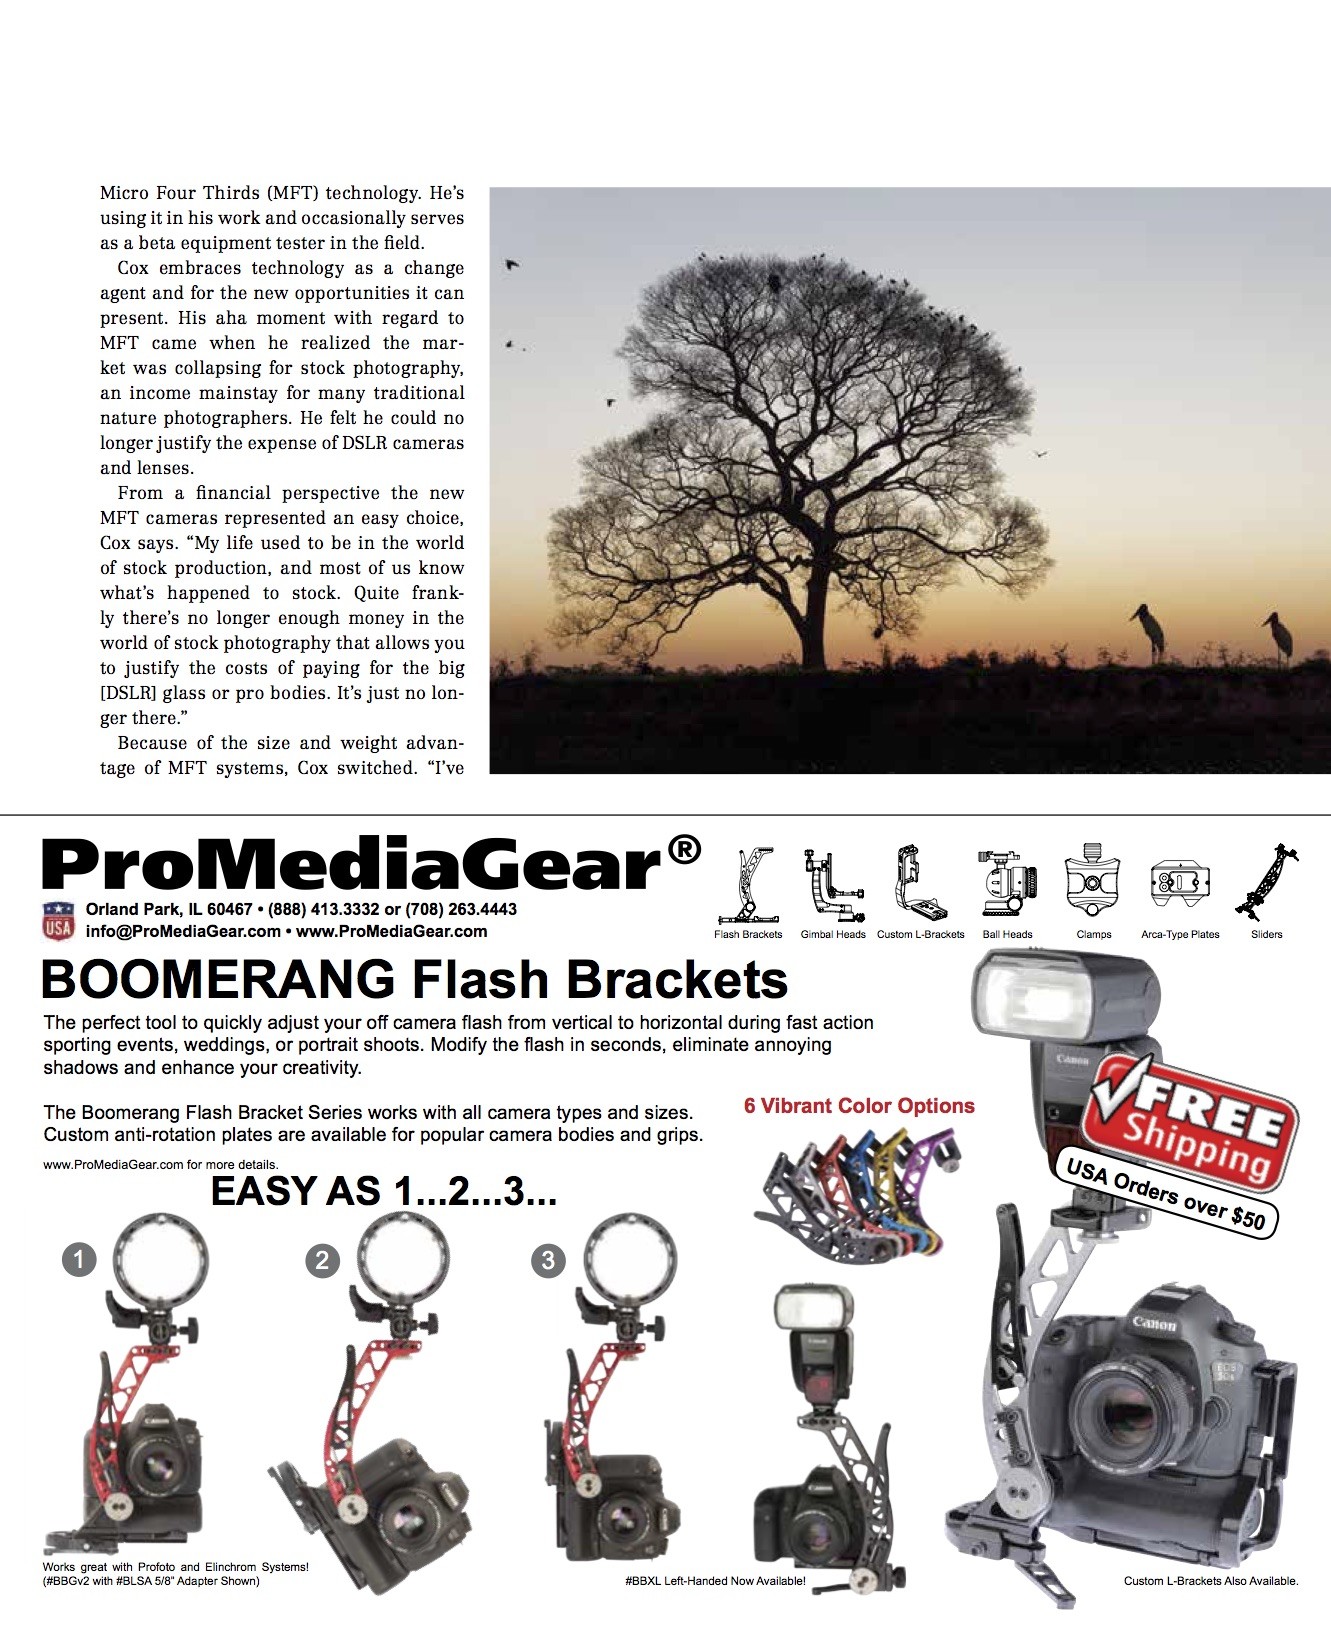
 ©Professional Photographer magazine, February 2017, reprinted with permission

 ©Professional Photographer magazine, February 2017, reprinted with permission

 ©Professional Photographer magazine, February 2017, reprinted with permission